Paul’s Sewing Machine Hobby
First: This page is basically a log of my acquisitions. With something like 70 machines to describe, it has gotten very long, and it’s sorted unhelpfully in the order I got them. Readers presumably have different interests, so I’ve created some index pages which show only subsets of the machines, all ordered by age. Those pages link back here for more information. There are index pages for:

- All the machines, ordered by age (plus a version better on phones)
- Just the machines I still own
- “New England style” machines
- New Home machines, and their forebears
- Willcox & Gibbs machines
- Wheeler & Wilson machines
- Singers
- German machines
- Hand crank machines
- Treadle machines
- Electric machines
So, that out of the way…
I have a small collection of interesting (to me!) sewing machines. I didn’t really intend to start collecting, but once I had a few, and told people about them, I was offered more. And eventually, as I learned more, I started buying one here or there. But I figure I’m just the caretaker of these things for a while.
Most all my machines can sew. The goal is that they all should. I try to use them all occasionally, or, in the case of the very old ones, at least once. I sew a bit, but not well, and not nearly enough to justify more than one machine in the house. But I enjoy the cleverness and quality that went into their invention and design. Early sewing machines live at an interesting intersection of history, aesthetics, precision engineering, and domesticity, all of which I find compelling. I think of them as kinetic sculpture, or at least kinetic industrial art.
The machines appear here in the order I got them, intermixed with various sewing machine adventures or experiments.
Statistics: As of early July 2026 I have 37 complete sewing machines. In general, they can all sew, except for one or two that maybe haven’t been restored, or are missing critical parts. They’re between 73 and 166 years old. A third of them are over 150, and 90% are over 100. 60% are from the 19th century. 9 are treadled machines (6 share a multi-use treadle), 18 are hand cranks, and 2 are electric-only. (Several of the treadled machines also have motors, which I don’t usually use.) The 9 treadles take a lot of floor space!
I also have a small collection of “stitching” videos, showing how various machines actually perform the act of sewing, on youtube. Some were filmed in slow motion, but I recommend slowing down playback for all of them.
Oh, and by way of thanks, and to give credit: the folks on the Victorian Sweatshop forum have been really friendly and helpful, as have the members of the TreadleOn mailing list. If you’re interested in old machines, those are the places to go! There are also a number of manufacturer-specific groups full of lots of good information at groups.io, and also, as much as I hate to admit it, on Facebook. (The trouble with FB is that searching for older information is almost impossible. It’s all focused on “now, now, now”.)
If you want to ask about anything here, or just make comments, drop me a line at pgf@foxharp.boston.ma.us . (But if you have questions about your own machines, you’re probably better off asking at one of the places I mentioned above. I’m not an expert, and only know my own machines well.)
The pictures are all clickable for larger versions. And if you want to skip the text, and just look at pictures, click on any picture and then use the arrows (or click on either half of the larger image itself) to navigate.
- Sewing machine background and trivia
- 1916 Singer 29-4 Leather Patcher
- c.1969 Singer Fashion Mate Model 237
- c.1900 Standard Rotary
- 1941 Singer Model 201-2
- 1916 Singer Model 66-1 Treadle
- c.1968 Singer Featherweight “White” Model 221K
- 1921 Willcox & Gibbs Automatic Silent Sewing Machine
- 1914 Willcox & Gibbs Automatic Silent Sewing Machine
- 1871 Singer “New Family”
- 1941 Singer Model 99K Hand Crank
- 1947 Singer Featherweight Model 221
- c.1880 Wheeler and Wilson No.8
- 1922 Singer Model 99K-13, electric
- 1926-1950 Singer Model 20 Toy Chain Stitcher
- Willcox & Gibbs Hand Crank, with 1904 parts machine
- Custom Sewing Machine Display Bases
- 1871 Howe “Letter A”
- c.1918 Western Electric No.2 Portable
- 1937 Willcox & Gibbs Automatic Silent Sewing Machine, with electric cabinet
- 1906 New Home “New National”
- 1976 Sears Kenmore Free Arm Model 1946
- c.1860 Charles Raymond (no.1)
- Willcox and Gibbs treadle base with 1893 parts machine
- Makeshift DIY spool winder
- 1906 New Home “New Ideal”
- 1931 Singer Model 101
- 1906 Singer Model 15-30
- c.1873 Gold Medal “Home”
- 1888 Singer VS3
- Mrs. Potts’ Cold Handle Sad Iron
- Reattaching a loose bobbin end
- A pilgrimage, of sorts, to Orange, MA
- 1921 Singer Model 15-30
- 1920-1940 Müller Model 12C Toy Chain Stitch
- A visit to the Orange Historical Society
- 1877 Singer Model 12
- 1938 Singer Model 201-2
- c.1920 New Home “Midget”
- 1875 Willcox & Gibbs Automatic Silent Sewing Machine
- c.1861 Charles Raymond (no.2)
- c.1955 Dexter Sewing Machine
- c.1870 Gold Medal “Common Sense” Sewing Machine
- c.1900 Biesolt & Locke “Wettina”
- 1926-1950 Singer Model 20 Toy Chain Stitcher (no.2)
- c.1864 Willcox & Gibbs w/ glass tension
- c.1874 Johnson, Clark & Co. Home Shuttle
- 1887 Singer Automatic Chain Stitch Sewing Machine
- 1877 Davis Low Arm Vertical Feed
- 1878 White VS1
- Treadling a Featherweight
- 1947 Singer Model 201-2
- 1884 Singer “Improved Family”
- Gang of four
- c.1872 American Button-Hole, Overseaming & Sewing Machine Co. Model ‘M’
- c.1893 Atlas model ‘A’ / Bremer and Bruckmann “Brunonia”
- 1866 Grover & Baker chain stitcher
- c.1889 Wheeler and Wilson No.9
- It’s raining sewing machines!
- 1918 New Home “New Avon”
- 1902 Frister & Rossmann
- 1886 Singer Model 12
- 1916 New White Peerless “Excelsior”
- c.1895 Hengstenberg “Robina”
- c.1919 Gritzner “R”
- 1925 Singer Model 99
- 1872 Wheeler & Wilson No.3
- One that got away
- Hamilton Beach “Home Motor”
- Treadle belt ferrules
- Spool felts, and felt washers
- c.1871 American Button-Hole, Overseaming & Sewing Machine Co. w/ overseamer
- c.1922 Salter’s Ideal Sewing Machine
- c.1892 Wheeler and Wilson No.9 parts machine and MUTT treadle
- 1920 Singer 127-3
- 1953 Necchi BU Nova
- c.1905 Jacoby “Eclipse” Fur Sewing Machine
- 1937 Singer Model 201-2
- c.1870 Little Wanzer
- c.1886 Jones Hand Machine
- c.1880 Royal St. John
- 1925 Singer Model 128
- Making new screws!
- c.1860 Charles Raymond (no.3)
- c.1870 Johnson, Clark & Co. Home Shuttle treadle
- Royal St. John with Mother-of-Pearl
- c.1879 Heberling Running Stitch Machine
- Wheeler and Wilson Mirror Cabinet
- 1914 New Home hand crank with floral decals
- 1947 Singer 201K
- c.1876 Weed Family Favorite
Sewing machine background and trivia
-
For an absolutely top-notch intro to the history of the sewing machine, as well as first-class demos and simulations of how the machines work, you should watch this educational video. It’s very well done.
-
For a fascinating glimpse into Singer manufacturing, take a look at this factory video. It’s an amazingly complete overview of a major Singer factory: it’s got hand-poured molten iron, tumblers for 100s of sewing machine bodies at once, milling, stamping, polishing, dip painting, drop forging, needle straightening (by hand!), cabinet making, you name it. (It starts out a little slowly, with 7 minutes of long panning shots of the outside of the building, and of the stacks of raw materials. After that it picks up.)
-
At the turn of the 20th century, Singer was the largest furniture manufacturer in the world. This interesting article talks about that side of their business.
-
The Smithsonian has copies of Singer product catalogs from 1907 and 1908, which contain some amazing machines – like with 12 needles and bobbins, or with 6 foot wide beds. It lists my 29-4 as costing $40, or just $37 without the treadle base.
-
Also from the Smithsonian, this snippet from the introduction to some circa-1870 marketing materials for the Grover & Baker line of machines: “American genius has laid its latest achievement in the practical arts at the feet of Woman; this achievement is in turn by her everywhere being welcomed to its rightful domain. The Sewing Machine is already becoming the ‘angel of the house’ the world over.” Colorful, yes, but it’s also a good summation of the impact the household sewing machine had in the late 19th century.
-
The 1911 Encyclopaedia Britannica (I happen to have the full set) has an article on the history and operation of the sewing machine. If you’re interested in vintage machines, it covers the major players nicely in just a couple of pages, with wonderful flowery and technically precise language. (The article is sandwiched between equally detailed articles on “Sewerage” and “Sex”. :-)
-
ISMACS has charts of Singer serial numbers on their website. I’ve converted those charts to text files, which I find easier to use. But as of 2023 or so, the easiest way to look up Singer (and Willcox & Gibbs) serial numbers is using this great web tool.
1916 Singer 29-4 Leather Patcher
| written January 2018 ... | [index] [index by age] |

I purchased my Singer 29-4 (s/n G4763444) in June of 1998 from the owner of The Village Cobbler shoe repair shop in nearby Lexington, Massachusetts. It was a spare machine, stored at home in his cellar. These machines were built between 1896 and 1922. Mine is from roughly 1916.
It’s an interesting machine, and not only for its air of steampunk
authority. The arm containing the bobbin is designed to be slender
enough to fit into the toe of a boot. The feed mechanism isn’t
implemented with the usual feed dogs, which would rise from under the
presser foot to pull the material forward. Rather, the presser foot
lifts and “walks”, dragging the material underneath on its backward
stroke.


In addition, the presser foot can be rotated 360 degrees, to allow
sewing in any direction without turning the material or object being
sewn. The thread runs down through a hole in the center of the needle
bar, so it doesn’t get twisted up when the presser foot rotates.

The only significant repair I’ve made was to the bobbin “case”: a needle tip broke off when I ham-fistedly tried sewing something much too heavy, and the tip was dragged down beside the bobbin where it jammed and caused score marks in the cast iron hole surrounding the bobbin. This scoring snagged the thread as it passed under the bobbin, and the machine would no longer sew. The fix involved emery cloth, and JB Weld, and more emery cloth, in order to smooth out the walls of that hole.


Unlike most sewing machines, instead of just one set of drive
pulleys on the machine and treadle base, it has two. This gives it
two drive ratios, for different tasks. With my meager skills, it always
stays in “low gear”. :-)

Someday, I’d like to build a replica of the table accessory that
Singer used to make.

Someone asked me for the dimensions of my 29-4’s drawer, because they wanted to reproduce it. Those measurements are here.
An extension table for the 29-4
| written March 2020, while hiding from the novel coronavirus | [index] |
| and updated again, May 2021, to add more details | [index] |
I decided I finally needed to do something about not having a sewing table for the 29-4. I use it often – camping equipment, repairs, heavy materials – and balancing the work on just the skinny snout is often a pain, and unnecessarily difficult. I got the machine in ‘98, and I’ve wanted a table ever since.
I was lucky that my urge to make the table coincided with having on hand some pieces of a rolling kitchen island cart that I’d salvaged from someone’s curbside trash. (Hey, solid panels are hard to come by! And I didn’t want to use plywood.) One of the cabinet doors that I’d saved was a dandy size for my table. You’ll notice some extra useless holes in my finished table – they’re inherited from the role as kitchen cart.


I started with measurements from a friend on the VSS forum, adjusted them, made some mistakes, readjusted, but in the end – it turned out well. I used a little furniture oil to finish it, but I’m so happy to have it that I don’t really care what it looks like!


With the locks twisted in place, it’s completely solid, which is something I’d worried about when thinking about how to build it. From the parts lists I’ve seen, I think the Singer table had some sort of locking mechanism, but I’ve never seen a picture of the underside of an original table. I had to design the levers so as not to touch the rotating parts under the bobbin.

And about the end that hooks onto the perch points on the machine: I didn’t want to use anything that would wear or damage the paint on those points (at least not too much), so that ruled out steel or aluminum, which I think was what Singer used. I thought of using wood strips, but eventually realized a piece of stout leather would do the job. (I only had faux leather – don’t tell anyone.)

There’s also a higher resolution version here.
A couple of things that didn’t make it into the drawing: The leg and table are both 3/4” thick. The hinged leg is 11-5/16” tall, and is centered 17-1/4” from the right end. I chose that distance so that the foot of the leg sits just to the left of the small bump on the cast iron platform. This might help keep the leg from collapsing if it were to be struck from the side?
The locking levers are 3-3/16” long, by 1/2” wide, and their pivots are 7/8” from the end.
Oh – and the note in the drawing about the upper/rear leg of the table being shorter is ambiguous. The front leg is 12-1/2”. The rear leg is only 12-7/16”. Don’t know why – but my 29-4 doesn’t seem to be symmetric there.
c.1969 Singer Fashion Mate Model 237
(Gone! No longer mine.)
| written January 2018 ... | [index] [index by age] |

This portable Fashion Mate 237 (s/n ME167737) was purchased by my mother in 1969 or 1970, replacing the much older black Singer she owned before. (I wish I knew what model it was that she replaced! Piecing together memories, I think it was likely a model 66.) Her 237 came to me in 2003. The ME prefix on the serial number shows this was made in Monza, Italy – I believe all 237s were made there between 1968 and 1972.
The 237 was originally in a portable carrying case, which I discarded, sadly and stupidly, when I got the current cheap cabinet. Its potential future value didn’t occur to me at the time.
I don’t recall ever needing to repair the 237, in my youth, or recently.
I’ve been told that the 237 can be fitted to a treadle. That may be, but I think my mother would zig-zag in her grave if she learned that I’d removed a perfectly good electric motor in order to turn the machine into something her mother might have used! Edit: I have, since, tried the 237 on my MUTT treadle. It worked great!

| updated April 2021 | [index] |
I got this machine out the other day to look it over, and make sure all was copacetic, and to my surprise, it wasn’t. It sewed fine, but the automatic tension release, when you lift the presser foot, wasn’t releasing. (Releasing the tension on the thread allows you to easily pull thread all the way from the spool and through the needle.) Now, most of my old machines don’t have a tension release at all, let alone automatic, so that shouldn’t be a big deal. But, in fact, to me, it is – if it’s broken, it needs to be fixed.
It turns out that while this is reputed to be one of the last “all steel” construction machines (referring to the insides, of course, obviously not to the outer skin!), it turns out that’s not quite true. There’s a very plastic part in the tension mechanism that should have been designed stronger than it is.

The center bar across that hole takes a bunch of spring pressure when the tension release is engaged, and wouldn’t you know, that little plastic “bridge” broke. After only 50 years. (Earlier models with a similar tension mechanism all use steel for that piece, btw.)
Clearly, if it wasn’t steel before, it should be now. So this was the repair. I wonder if it will last 50 years?

| updated October 2023 | [index] |
Someone in one of the sewing machine communities that I frequent expressed how much they wanted a nice example of a 237, for sentimental reasons, because it’s the machine their mother had used. Sound familiar? :-)
As it happens, I’ve been thinking for a while that I should rehome my 237. I’m not using it, in the way that it should be (after all, it’s only a little over 50 years old!), and I’ve been thinking it should go to someone who will appreciate it properly. So I got in touch, and the machine is now theirs. I’m thrilled to have found a new good home for it.
c.1900 Standard Rotary
(Gone! No longer mine.)
| written long after the fact, in August 2018 ... | [index] [index by age] |

I recently remembered that I almost started collecting truly “old” machines many years ago (2011), but for some reason either I didn’t have the time, or the machine that I happened on didn’t quite press the right buttons, or who knows what?
Anyway, the story was that friends of mine had picked a lovely Standard Rotary off the curb, with an eye toward refurbishing it. I believe they got as far as refinishing one drawer front before losing interest. So they gave it all to me. I was fascinated, but in the end, after cleaning it up just a bit, decided against keeping it. I gave it away on a local town mailing list, to someone who was clearly going to take good care of it. (The next machine I got, my 201-2, came from that very same list, six years later. :-) I probably only owned the Standard Rotary for a month or two.
From the looks of it, and from what I’ve now learned about the machine, and the Standard Sewing Machine Co., it was probably made in the late 19th century – the serial number (57930) is relatively low. The company was one of many that started up after the early machine patents all expired, making sewing machines much cheaper to build.


I love the lack of any cabinetry below the top. The wooden drawers ride on a delicate framework of cast iron.

1941 Singer Model 201-2
(Gone! No longer mine.)
| written January 2018 ... | [index] [index by age] |

I don’t know much about this machine (s/n AF787058). I received it as a “giveaway” from a member of a local town email list in early November of 2017:
“Hi, for you tinkerers out there I have a beautiful singer 201 that possibly needs a new motor. Would love to have it go to a good home rather than scrapping. It starts out sewing fantastically and then slows to a crawl. Have oiled and greased it but don’t have the energy to go further.”
The donor also said they “bought it at a yard sale down the street a few years ago”.
The cast-iron 201 was built (with various configurations of motor and other details) between 1935 and 1954. (A different looking aluminum machine took over the model number from then until 1962.) This machine is from roughly 1941.
The finish isn’t perfect – there are some chips in the japanning, and the shellac is crazed in some large areas. I haven’t yet detected a problem with the motor. The machine is gorgeous to hear – really. There’s no belt, because the motor drives directly through a worm gear drive, and the overall tone while running is just… different… than a belt drive machine.
Repairs: As part of a thorough cleaning and oiling, I replaced the motor grease wicks with new, and replaced all the grease with Vaseline petroleum jelly. Sadly I broke one of the wick’s spring clips while removing it, and fashioned a crude repair to make it work.


| updated October 2019 | [index] |
The 201-2 is a truly fantastic sewing machine. It sews beautifully, starts smoothly and slowly, and has a lovely sound to it. Some say it’s the finest machine Singer made, and this was an excellent example of the model. I sold it about 6 months ago because I really had no space for it, and I regretted it almost immediately, But I really did need to sell something – I had started having to stack machines on top of one another. I hadn’t used the 201 in a while, and it “didn’t fit my collection”, so it got the axe. But it turned out that the guy that bought it was essentially running a chop shop – he didn’t even want the cabinet, and was going to toss it, and ship the head overseas somewhere. Sigh – I didn’t think it was going to literally get the axe.
So, I’ve since gotten another one (also free), and while it sews well, it’s a bit of an ugly duckling compared to this one that I let get away. We’ll see how much I use it. If a lot, I’ll get a nicer one. If never, I’ll let it go too…
1916 Singer Model 66-1 Treadle
(Gone! No longer mine.)
| written January 2018 ... | [index] [index by age] |

I was given this Singer Model 66 (s/n G4620412) by my friend Scott in late November of 2017. Here’s what he wrote about it:
“The Model 66 was purchased by my grandfather, Joseph N. Merchant for his bride, Gladys H. Merchant (née Shufelt) in 1918 as a wedding present. They lived in Worcester MA for ~30 years, he was an engineer on the Boston and Worcester RR, she was a homemaker. They moved to Allston in the early ’50s and she worked at Raytheon in Allston before retiring. She sewed curtains, dresses, pants, as a regular event. They moved to Framingham in the early 60s and she continued using the machine as needed or requested. My grandfather passed away in the late 70s and she stayed in her house until her last year, 1988. The machine was always covered with a fitted cloth cover she made for it.”
The machine was remarkably complete: all of the original attachments were still in the drawers, and all of the broken cabinet trim had been saved.
The Singer model 66 was made in various forms from 1902 to 1956. This treadle model was built, decorated with a couple of different decal patterns, from 1902 to 1923. This particular machine is from roughly 1916.
I “restored” the machine, which had gotten very old looking, and which was no longer operational. The whole process took about two weeks, working a few hours a day.
 The head itself was extremely dirty, and while it could be turned by
hand, it was extremely difficult – enough that there was a worry of
breakage. The machine was cleaned with sewing machine oil, partially
dismantled, parts freed up, lubricated, and finally waxed (pure
carnauba) and oiled again. Some damage to the decals occurred, mainly
in the areas that were originally dark green. Most of the dark green
was already missing, but there were more gaps after I was finished
than before.
The head itself was extremely dirty, and while it could be turned by
hand, it was extremely difficult – enough that there was a worry of
breakage. The machine was cleaned with sewing machine oil, partially
dismantled, parts freed up, lubricated, and finally waxed (pure
carnauba) and oiled again. Some damage to the decals occurred, mainly
in the areas that were originally dark green. Most of the dark green
was already missing, but there were more gaps after I was finished
than before.


The cabinet had become stained and discolored, and the finish somewhat
crazed.
 The top “working” surfaces were in relatively good shape,
structurally, though there was some delamination of the veneer on a
few of the edges. The drawers themselves were in good shape. (One
had been previously repaired, since it clearly has a replacement
knob.) The drawer cabinets were in bad shape: the veneer on all of
the large surfaces had begun separating, and splitting, anywhere from
3” to 8” from the bottom of the chest. Many of the add-on trim pieces
had already fallen off, but had been (thankfully!) saved.
The top “working” surfaces were in relatively good shape,
structurally, though there was some delamination of the veneer on a
few of the edges. The drawers themselves were in good shape. (One
had been previously repaired, since it clearly has a replacement
knob.) The drawer cabinets were in bad shape: the veneer on all of
the large surfaces had begun separating, and splitting, anywhere from
3” to 8” from the bottom of the chest. Many of the add-on trim pieces
had already fallen off, but had been (thankfully!) saved.


I completely disassembled the cabinet, anywhere there were screws to allow it. This made cleaning/repairing much easier. This picture was taken just before I began reassembly:

The veneer on the drawer sides was all reattached using Elmer’s
woodworker glue and lots of clamps. It was repaired without
further separating it, using a hacksaw blade to spread the glue into
the narrow space made accessible by gentle lifting of the veneer.
Loose trim pieces were completely removed, and then all the trim was
reattached, again using the same glue, and cushioned by padded blocks
when clamping.

The finish on all the wood surfaces was refreshed with Howard’s “Restor-a-Finish” (mahogany color), applied using steel wool. The product is a combination of strong cleaner and furniture stain, with solvents strong enough to soften old finishes. The steel wool helps with the cleaning process, of course, and also smoothes off rough edges of any imperfections (scratches, gouges) in the finish. After the Restor-a-Finish treatment, the cabinet pieces were oiled with Watco’s “Rejuvenating Oil”.
The treadle irons were cleaned with rags and sewing machine oil. A few pieces that were originally chromed (or nickeled?) were cleaned up with steel wool to remove rust. A few small brackets had lost all of their plating, and had rusted. These were cleaned and sprayed with lacquer.


I’m so pleased with how it all came out, that I have to include just a couple more “before” pictures, for comparison:


The only parts missing from the machine or cabinet were two small
pins, which are designed to keep the top drawer of the cabinet from
pulling out too far. The pins fit in two small holes in extensions of
the drawer sides, and their lower ends drop into milled channels in
the cabinet after the drawer is inserted. After seeing a picture of
the pins in a vintage parts list, I was able to make new pins from
a pair of common nails, using my drill press as an ersatz lathe.


| updated October 2020 | [index] |
Well, a few years have passed since I got this lovely model 66 and cleaned it up. I’ve been running out of space, and was thinking I probably needed to sell it or give it away. So I got back in touch with my friend whose grandmother it belonged to – I wanted to be sure he had the chance to take it back, though he had made it pretty clear in the past that he didn’t want it. Well, to my delight, he was more than happy to have it again! I’m really pleased a) that I got to have the fun of restoring it, and “owning” it for a while, and b) that it’s going back to it’s rightful owner. Perfect!
c.1968 Singer Featherweight “White” Model 221K
(Gone! No longer mine.)
| written January 2018 ... | [index] [index by age] |

This cute little Singer Featherweight 221 White sewing machine (s/n F 198055, and more specifically, a model 221K7) was owned by Julia’s grandmother, Julia Spain Banta. It came to us in late December 2017, via Julia’s parents who also used it for many years. When they learned recently that I had a small sewing machine collection, they gave it into our care. The machine is in very good shape. The case, too, is in good condition, with just a few scuff marks.


These machines are called the “White” Featherweights, but Singer seems
to have referred to them as “Pale Turquoise”. In practice, people
thought of them as white, or mint green. It’s hard to capture the
color in a photo, but putting a white sheet of paper in the shot helps.

The “white” K7 machines were only made between 1968 and 1971 at the Kilbowie factory in Clydebank, Scotland. (The black predecessor machines, with some differences in design, were built in various places starting in 1933.)
The serial number is a bit of a mystery: “F 198055”, with a clear space between the ‘F’ and the digits. If that number was truly just “F198055”, then it would refer to a model 15K machine, made in 1920. In addition, these models are supposed to have serial numbers starting with “FA” or “FB”.
 My pet theory (without any concrete basis) is that the second character on
the serial number stamping machine at the factory failed, and that
this sewing machine is actually an FA or FB machine. This is partly
reinforced by something I found, where someone had reported a
machine “with a SN of F (then a verrry faint ‘A’) 131629”. If the ‘A’
punch was already failing when their machine was made, it might have
failed completely by the time mine was made. By the time the
mistake was discovered, it may have been way too late to fix, on way
too many machines. There are other mentions of this class of
machines with seemingly out of place numbers as well, though I don’t
know whether they all start with ‘F’.
My pet theory (without any concrete basis) is that the second character on
the serial number stamping machine at the factory failed, and that
this sewing machine is actually an FA or FB machine. This is partly
reinforced by something I found, where someone had reported a
machine “with a SN of F (then a verrry faint ‘A’) 131629”. If the ‘A’
punch was already failing when their machine was made, it might have
failed completely by the time mine was made. By the time the
mistake was discovered, it may have been way too late to fix, on way
too many machines. There are other mentions of this class of
machines with seemingly out of place numbers as well, though I don’t
know whether they all start with ‘F’.
Repairs:
-
The gold-colored “badge” was missing. On this model, unlike most “badged” Singers, the badge isn’t a riveted piece of stamped brass – it’s just a foil sticker. Happily, reproductions are available, so that was an easy fix.
-
The masonite bottom plate, which acts as a drip-tray for the somewhat oily underside of the machine, was missing. I fabricated a new one based on a picture of the original piece, using measurements from the machine.
-
The clamshell speed controller was acting as a simple on/off switch – there was no variable control. I opened up the controller, and found that it has an adjusting screw which allowed the copper blade to press on the end of the carbon resistor as it should. In addition, electric arcing had perforated one of the brass switch contacts. I reinforced this piece by soldering on a strip of copper foil.
-
The lacquer on the machine appears to have been retouched at some point in the past. The touchups are obvious now, but perhaps the paint matched better originally. I have no idea where or when this retouching might have been done.

In May of 2018 we were given Julia’s grandmother’s first Featherweight, a black model from 1947. They make a nice pair.
| updated October 2020 | [index] |
I decided that while having two Featherweights was kind of fun, they didn’t really fit the older focus of my collection. So it seemed like one should go, and it was the newer of the two that didn’t make the cut.
1921 Willcox & Gibbs Automatic Silent Sewing Machine
(Gone! No longer mine.)
| written late January 2018 ... | [index] [index by age] |

This is the first machine I’ve bought specifically to add to my collection. Willcox and Gibbs made and sold this machine, with a few variations, from 1858 through at least the 1930s.
Obviously it has a curious shape (from the back it looks like the letter G – the story is that this is related to the inventor’s surname), but in addition it sews a single-thread chain stitch rather the more common two-thread lockstitch. (Which is to say, it has no bobbin.)
I just got it recently (late January, 2018) today, so I don’t yet know all that much about it. It has serial number A666108, which means it was made 1921.

The price was right because a few things are wrong with it. Some I knew before buying (ebay), others I discovered after it arrived.
First, the spool arm is broken (and missing), and the connecting link
arm for stitch length control is broken (but all there).


 I knew about both of these when I bought the machine, so they’re okay.
I think I can jury-rig a spool arm of some sort, and I may be able to
repair the link, but in the meantime the stitch length is still
adjustable from underneath – it’s just not convenient.
I knew about both of these when I bought the machine, so they’re okay.
I think I can jury-rig a spool arm of some sort, and I may be able to
repair the link, but in the meantime the stitch length is still
adjustable from underneath – it’s just not convenient.
In addition, the stitch plate, i.e., the
platform on which the cloth rests while sewing, has been replaced.
I should have seen this in the pictures before buying – somehow it never
occurred to me that the piece wasn’t original. However, every picture
of these machines that I’ve found shows a stamped
rectangular plate, probably nickel plated, and engraved with a
stitch/cloth/needle table, along with other labeling, like this one:

My machine, however, has a relatively crude unplated, unpolished steel plate. Milling marks are visible on the underside. There’s no engraving, and I believe it’s smaller than the usual plate. Despite the milling on the underside, this plate is much thicker than it should be, which prevents the feed dogs from ever protruding through their slot. The first picture shows the dogs in their fully raised position.


 But the real problem with this stitch plate is the opening for the feed dogs.
Normally, with the presser foot down, resting on the dogs, the dogs will
break contact with the material being sewn as the retract through the plate
in order to move to the rear of the machine before coming up for another
shove. But with this plate, with its gigantic hole, the presser foot
simply descends along with the feed dogs, never losing contact. Useless.
But the real problem with this stitch plate is the opening for the feed dogs.
Normally, with the presser foot down, resting on the dogs, the dogs will
break contact with the material being sewn as the retract through the plate
in order to move to the rear of the machine before coming up for another
shove. But with this plate, with its gigantic hole, the presser foot
simply descends along with the feed dogs, never losing contact. Useless.
And finally: the axle on which the hand wheel turns is bent. Not much, but noticeably – it wobbles a few degrees when turned. It will certainly vibrate if it spins, so that will keep speeds down.
So it’s pretty clear that this machine was dropped – parts are broken, the stitch plate may have been bent and replaced, poorly, and the hand wheel axle is bent. But it’s also clear that it’s been well used, and the damage all seems old, making me think it can probably sew again someday despite its injuries. We’ll see.
| updated December 2019 | [index] |
After hoping I’d find a replacement cloth plate for the better part of two years, I decided it was time to get it out of house so it wouldn’t annoy me anymore. :-) Besides, I have four other W&G machines now, so while this was my first, and had some nice aspects, it was kind of redundant. It went to someone who just wants a shelf decoration. Perfect.
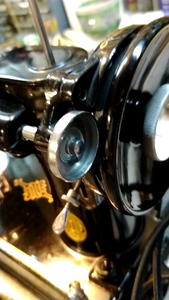
1914 Willcox & Gibbs Automatic Silent Sewing Machine
| written February 2018 ... | [index] [index by age] |
Yes, this is W&G machine number 2.

Soon after getting my first W & G chain stitcher (above), and realizing that it has some “issues”, another one (A592642) came up for sale nearby on craigslist. Not only did this one not have any of same problems my first machine had, but it came with case, motor, foot controller, and a slew of accessories and needles. (Never mind that just the day before I’d ordered new needles from ebay! :-)


The decals aren’t in as good shape as the first machine’s, but I was
sort of thinking it might be a parts donor for the first, and that
between them I’d end up with at least one excellent machine.


| updated December 2018 | [index] |
After buying my 1937 electric cabinet W&G machine, I didn’t really have a reason to keep this motor and base in my collection. I had repaired and rewired it, and I was able to sell it to someone who needed it. So all that’s left from this purchase is the 1914 machine itself, and the accessories that came with it.
After selling the electric base this machine came with, I moved it onto my hand-crank base. The lead picture on this blog entry shows it in that form. It now sports a replacement crank handle – which really is for a Singer Model 20. It’s small, but it will do, for now.
| updated late October 2023 | [index] |
I finally got the time, the materials, the weather, and the skills all in one place in order to make a new hand crank handle for this machine. I’ve hated using the Singer 20 toy machine handle ever since I got it, but it’s the only screw I’ve ever found to match the threads in the W&G wheel. So I’m still using that screw – it’s just counter sunk way into the end of the new handle.
 The new handle is walnut, and shellacked, as it should be. I’ve included
a few pictures of the making process, as well. (I actually got two
handles out of that piece of wood. The first one, in the “making”
pictures, didn’t work out due to a mistake, so I turned a second one.
No pictures of that happening – it was getting dark, and I was
hurrying. But that’s what you see installed on the machine.)
The new handle is walnut, and shellacked, as it should be. I’ve included
a few pictures of the making process, as well. (I actually got two
handles out of that piece of wood. The first one, in the “making”
pictures, didn’t work out due to a mistake, so I turned a second one.
No pictures of that happening – it was getting dark, and I was
hurrying. But that’s what you see installed on the machine.)


| updated March 2024 | [index] |
I’ve finally been able to replace that Singer Model 20 screw with a proper screw that matches the original that would have come on the W&G hand crank base. It’s one of the new screws that I turned myself on a metal lathe. Of course, now that I have the right length screw, I’ll need to turn yet another wooden handle, since the hole through the middle of the handle pictured above is the wrong size for the new screw.
Swapping parts between my Willcox & Gibbs machines
| added February 2018 | [index] |
Alas, it seems that not all W&G chain stitchers are created equal. I had been hoping to swap some parts from this machine to my first: the first machine has a homemade stitch plate, is missing the thread spool pin and arm, has a bent main shaft, and much of the nickel plating on the hand wheel is worn off. But in the end, only the spool pin and arm are compatible:
-
The W&G hand wheel has two cam surfaces milled onto it – one to drive the needle arm, and the other to drive the tension mechanism. The holes in the two machines’ tension arms are of different diameters, by just a couple thousandths of an inch, and the tolerance is so close that the hand wheels can’t be swapped.
-
The main shafts are different. There’s an small cam milled onto the looper end of both shafts, which drives the feed dogs. On the second machine the profile of that cam is entirely within the outline of the diameter of the shaft. On the first machine, the cam is larger, and “hangs over” the shaft diameter. So they’re incompatible. In addition, because of the larger cam, that shaft can only slide out to the left (hand wheel removed). But that shaft is bent at the hand wheel end, so it can’t come out at all – that shaft will never leave the machine.
-
Finally, I was really hoping to move the pretty stitch plate to the prettier of the two machines, to replace the homemade chunk of steel it came with. But that won’t swap because the feed dog mechanisms on the two machines are quite different. The head of one of the two little screws that hold in the round needle plate (where the feed dogs come through) interferes with the first machine’s feed dog movement.
Willcox & Gibbs rotating hook
Perhaps the slickest part of the W&G machines is James Gibbs’ rotating
hook, which forms the chainstitch with just one moving part (in addition
to the needle). The hook manages to grab the thread loop that the needle
brings down, and holds onto it long enough and in such a way that the
needle will pass through that loop on its next stitch, at which point the
hook again grabs the needle’s (new) thread loop and the cycle repeats.
A video is worth a lot of words. (The camera angle changes, for the
better, I think, about halfway through.)
Willcox & Gibbs foot controller repair
| added February 2018 | [index] |
The foot controller for my second chain stitcher was completely dead. I’d found a good write-up on repairing them, but sadly, that controller was very different on the insides than mine.
My controller consists (essentially) of two coil resistors and a large flexible copper plate. The copper plate makes contact with successive points on the large resistor elements, as the pedal is depressed.


The resistors consist of a ceramic tube, wound with very thin wire. That thin wire isn’t what the copper plate makes contact with – it wouldn’t be strong enough, and any arcing would burn through it. To provide appropriate contact points, the tubes (and the thin wire winding) are each circled with 8 pieces of thicker copper wire, spaced along the length. These are just loops, with the ends tightly twisted together. These “wraps” are strong enough to act as an electrical contact with the copper plate, and are tightly held against the thin resistor wire. The whole tube was coated in a gray paste or paint which has dried and flaked off. My guess is that this was meant to keep the corrosion at bay.
Sadly, the copper wire “wraps” on my ceramic tubes were no longer electrically connected to the thin resistor wire underneath, due the obvious corrosion. I could put an ohmmeter on any area of the resistor wire, and get connectivity to the broad copper bands at the ends of the tubes, but there was no connectivity at all to any of the copper wire “wraps”. (The total resistance of each tube, BTW, is about 100 ohms, and the resistance between adjacent copper contact points is roughly 10 ohms..)
In the end, I carefully untwisted, removed, cleaned, and reinstalled all 16 of the copper wire wraps, and also cleaned the layers of fine wire underneath while it was exposed. Doing this restored all the right connectivity. Good as new!


Willcox & Gibbs Needles
| added May 2018 | [index] |
My 1914 machine came with a lot of needles. Thirty-two no.2 needles, ten no.4 needles, etc. Even one no.3-1/2 needle. Curious about their relative sizes, and prompted by some discussion on a Facebook W&G group, I took some measurements and a picture. First, shaft diameters:
| ID | diameter |
|---|---|
| #0 | .025” |
| #1 | .028” |
| #2 | .030” |
| #3 | .035” |
| #3-1/2 | .040” |
| #4 | .041” |
| GB90 | .036” |
(GB90 is a Groz-Beckert size 90)
Then a picture. I drilled a series of 5/64” holes in a piece of wood, and inserted a needle in each. These are just the W&G needles, sizes 4, 3-1/2, 3, 2, 1, and 0. Sadly, I forgot I had the Groz-Beckert needles until after I’d already drilled the holes and taken the picture. You’ll have to trust me that the hole in the G-B needle is even longer than that of the no.4 – it would definitely be the easiest to thread of the bunch, but its diameter is more like a no.3.


And here’s a picture of the Groz-Beckert packaging for the GB90 needles.
(Click to enlarge, as always.)

W&G Needles for heavy sewing
| added June 2022, based on an earlier email to the W&G list on groups.io | [index] |
I don’t do a lot of sewing, so having four W&G machines (plus a whole lot of others) isn’t really because I sew with them all.
But one that does get used is the W&G hand crank (American style, with the gears), which, with the crank handle removed, will fit in one of the bins that support the couch in our camper van. It’s the only (non-toy) machine I have that will fit that space, and it fits even when in a protective case, so it’s my on-vacation machine.
The trouble is, much of what I sew on vacation is repairs and mods, and the work often involves multiple layers, and nylon or polyester webbing. Backpack repairs, etc.
And until just recently, the W&G was just terrible at that stuff. I was always getting big loops on the bottom, which I’d assumed was due to the tension being off because of the thickness.
But I did some more testing recently, and discovered that the machine was perfectly happy sewing through other materials (leather, heavy material) that were just as thick.
So I did a bunch of experiments, with different materials, and different threads, and asked some advice over at the Victorian Sweatshop forum, and discovered a couple of things. Things that someone who actually sews very much would have known/tried a long time ago. :-)
First, one of the threads I had in the travel sewing kit was Coats & Clark “Button & Craft” thread. It turns out that not only is this the thickest (Tex 110, I think) thread that C&C sells (at Joann’s, anyway!), but it’s starched. Who knew? So it’s sticky. And it’s not really meant to be used in a machine. I’d picked it up long ago because it looked heavy duty – I just didn’t know any better. So I tried some others, and found that their “Outdoor”, and Dual Duty “Heavy” threads worked much better in my machine, but still not perfect.
And then I made the real “leap” – I got bigger needles! Doh! Again, should have done that a long time ago. I was using Groz-Beckert size 14 needles. I bought some of size 18, and… perfect. Everything I was having trouble with is just fine now, with perfect stitches even through several layers of nylon webbing. Even the Button & Craft thread is a lot better. (But not perfect, so I still won’t use it.)
I found the W&G size 18 needles at The Thread Exchange. There are links on that page for the #14, #16, and #19 needles. The #14 are the ones most often seen for sale on ebay, etc. If you need more details on one of their needles, you can get that from Groz-Beckert directly.
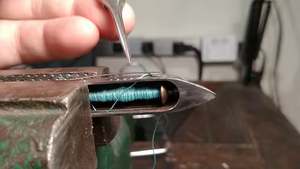
Willcox & Gibbs Tensioner Maintenance
| added February 2019 | [index] |
This 1914 machine has always had trouble sewing at the shortest stitch lengths. It hasn’t bothered me much, because I really have no need to ever sew anything at higher than 12 to 15 stitches per inch, and the machine sews fine in that range.
But it’s been on my mind to investigate, especially after another machine (my 1937, acquired later) had the same problem. So I did investigate, and did solve the problem – it was a simple matter of adjustment.
I’ve documented that adjustment, as well as how to do a full disassembly and reassembly of the tensioner, on my “Working on a Willcox and Gibbs Automatic Tensioner” page
Willcox & Gibbs Hand Crank Reversing Brake
| added May 2023 | [index] |

I only just realized that while this machine has become one of my favorites, and I even carry it in our camper van when we go on vacation (just in case – I don’t use it that often!), I haven’t written anything about it in a long time.
And it turns out there is something I haven’t mentioned. The American-style hand crank bases (so-called, because they were American-made, and quite different than the British-made belt-driven hand crank bases) have an ingenious little feature.
The W&G treadle bases all have a “brake ball”, which is a small rubber
ball that bounces along in a cage alongside the big treadle wheel,
until you try and treadle backwards, at which point it jams up solid,
preventing you from turning the machine in the wrong direction. Well,
it turns out these hand crank bases have the same feature. There’s a
small hole through the pillar which will accept a thin piece of
leather cord. I’ve used a piece of treadle belt, but I had to taper
it to get it to fit – presumably thinner cord would have been used
originally. A small set screw holds it in place.

The cord is positioned so that it bounces along on the large gear’s teeth while you crank the machine, but when you try and turn the handle backwards, the leather is dragged into the interlocking teeth, and the crank is immobilized. Clever!
1871 Singer “New Family”
(Gone! No longer mine.)
| written May 2018 ... | [index] [index by age] |

I had told myself, since our house is out of convenient corners with extra floor space, that I shouldn’t collect any more treadle or cabinet machines. But when I happened to see this machine on Facebook Marketplace, I had to go take a look.

It seemed pretty undervalued (even with my rudimentary knowledge), and sure enough, it turned out to be a “New Family” machine, with mother of pearl inlay. The entire line of machines of which this is a part ran from 1863 to 1902. These were the first mass-market mass-produced sewing machines made. This “New Family” model was made from 1865 to 1877. Before that (for just a couple of years) was the “Improved Letter A”, and after 1877 (25 years) came the “Model 12”. All three variants are quite similar, obviously with improvements and changes along the way. Mine (s/n 618146) was made in 1871.
One nice feature of these machines is the type of shuttle
mechanism they use, called a “transverse shuttle”. If one thinks of a
lockstitch sewing machine as being a sort of one-threaded loom, then
this is about as close as one can get to that mental model. The
shuttle is boat-shaped, with a pointy end, much like a loom’s shuttle.
 Also like a loom’s shuttle, it carries a narrow cylindrical spool of
thread (the bobbin). It moves linearly back and forth beneath the
presser foot: the needle comes down, and retracts somewhat to leave a
small loop of thread. The shuttle passes through the loop from left
to right, and the needle retracts the rest of the way, forming the
stitch. The shuttle then retreats to the left, and is ready for the
next stitch.
Also like a loom’s shuttle, it carries a narrow cylindrical spool of
thread (the bobbin). It moves linearly back and forth beneath the
presser foot: the needle comes down, and retracts somewhat to leave a
small loop of thread. The shuttle passes through the loop from left
to right, and the needle retracts the rest of the way, forming the
stitch. The shuttle then retreats to the left, and is ready for the
next stitch.
My machine’s cabinet is in very good shape. That’s likely
helped by it being made from solid boards – no veneer. The “coffin”
looks like a simple box cover, but actually unfolds in a very clever
way to make a large sewing surface.

The machine head is also in good shape for its age – the decals are
very worn, but the mother of pearl highlights are all present.
There’s very little rust, and the paint is mostly intact. It’s
currently missing the shuttle (which holds the bobbin), so it won’t
sew for the time being. The axle and wheel for the bobbin
winder is also missing, as was the tension adjusting screw, but I’ve
been able to get a replacement for that. Everything else seems to be
there.


The treadle irons are rusty near the floor, but should still clean up pretty well. The original ceramic (I think) casters are both intact. I love the free form design of the irons.

| updated October 2018 | [index] |
I was able to procure a Model 12 shuttle, and a matching bobbin winder assembly, from Helen Howes in the UK. With shipping, they cost about the same as the rest of the machine. All in the name of the hobby, I guess.
I had some trouble initially getting the machine to sew, but with lots of
advice from the folks on the Victorian Sweatshop forum, I got
it sorted out. It turns out the only real problem was with my replacement
shuttle. There’s a springy piece of steel that runs along the side of the
shuttle, which helps keep it aligned and in place during its travels to and
fro. The rivet which should hold that piece in place had become loose on
my shuttle, allowing the spring to catch on the underside of the feed dogs
midway through the shuttle’s forward stroke. I took a video of the
problem:
A punch and a small hammer took care of tightening the rivet, and all was well.
 Sadly, due to the lovely fold-out design of the treadle top, I can’t display
the New Family on its treadle, since to open it up requires too much
floor space. So I made a simple display base, and it fits on top of a
bookshelf. Looks fine.
Sadly, due to the lovely fold-out design of the treadle top, I can’t display
the New Family on its treadle, since to open it up requires too much
floor space. So I made a simple display base, and it fits on top of a
bookshelf. Looks fine.
| updated February 2019 | [index] |
I’ve been thinking of selling this machine, since it’s so hard to display properly. As part of putting an advertisement page together, I took some photos of the folding top, and realized I’d never really shown that feature here. It’s pretty cool.


| updated October 2019 | [index] |
I couldn’t bring myself to sell it. :-) Here are a few more pictures, simply because it’s so pretty.


| updated April 2022 | [index] |
Well, I’ve made a couple of half-hearted attempts to sell this over the last few years, but nothing ever happened. But not being able to display it in the treadle (since it takes so much extra floor space when opened up) meant that it spent a lot of time in the cellar, which just didn’t seem right. So it’s a pretty little thing, but it’s now moved on.
1941 Singer Model 99K Hand Crank
(Gone! No longer mine.)
| written May 2018 ... | [index] [index by age] |

I’ve wanted a hand crank machine for a while – partly just to try sewing on one, and partly because there are just three common ways to power a sewing machine, and I already have examples of the other two. The Singer Model 99 is closely related to the Model 66 that I have in treadle form – it’s basically identical, just shrunken a bit (1-1/2” lengthwise, 1/2” back to front), making it more portable. It was produced from 1911 to 1962 or ‘63. This one (ED197080) was made at the Scottish Kilbowie plant in 1941. The hand crank is original – there is no wear whatever on the hand wheel pulley, so it’s likely never been treadled or attached to a motor.


These pictures were taken after a fairly superficial cleaning – the paint was wiped down with sewing machine oil, and the prominent chrome pieces were rubbed with steel wool. The bobbin slide plate is missing, and I’m hoping to find a vintage replacement. Modern replacements are available, but they look like what they are: modern replacements.
Of course I’ll need to find, or build, a base of some sort to make the machine useable. But I can afford to do a little work on it.
Later… Okay: display case has been built, the bobbin and needle plates have been replaced, and spit and polish applied. Looks pretty good!


| updated November 2020 | [index] |
I’ve recently had an influx of hand cranks, meaning I have a space crunch. This one, which has long been a favorite, didn’t make the cut – it’s a little new for my collection, and a friend of mine was very interested in it. I’m glad it’s found a good new home!
1947 Singer Featherweight Model 221
(Gone! No longer mine.)
| written May 2018 ... | [index] [index by age] |

A second Featherweight joined the family. Or, rather, it stays in the family, thanks to my generous in-laws. Like the white 221K Featherweight I already had, this 1947 black Featherweight (AH198050) also belonged to Julia’s grandmother. She must have liked it, given that she bought a second!
This one needed a little more restoration than the first – the electrical cords were worn through, the rubber foot pads had turned to goo (literally!), and there was a fair amount of dust and cat hair to clean up. But it’s a solid little machine under all that.


 Warning! The 3-wire plug in this picture was
assembled incorrectly, and is very dangerous, even if the wiring itself
were in good shape. Two of little brass tubes will be “hot” if the
cord is plugged into the wall. When assembled correctly, those tubes
are reversed, and will not protrude.
Warning! The 3-wire plug in this picture was
assembled incorrectly, and is very dangerous, even if the wiring itself
were in good shape. Two of little brass tubes will be “hot” if the
cord is plugged into the wall. When assembled correctly, those tubes
are reversed, and will not protrude.
I wanted to rewire it with something that was at least a little bit
“vintage”. Regular modern zip-cord didn’t seem like it would look
right. I found a place that sells cloth-wrapped cord, and got some in
black. (They had both cotton and rayon – I chose rayon.) The
original cords had clearly failed due to lack of strain relief where
they entered the controller and plug, so I used layers of shrink wrap
to add protection there – perhaps too much.


The only piece that was truly damaged on this machine was the bobbin
winder. I’m not sure what happened to it, but the wheel that needs
to ride nicely on the drive belt, in order to spin the bobbin, had been
mangled: it was no longer flat, and it was no longer round. It’s
made of aluminum, so it bends easily, but still – how did that happen?!

The damage is easier to appreciate in a
short movie, which shows it well.
Happily, fixing it was a lot easier than I thought it would be. Singer only sold the assembly as a single part number – so it seemed like it might be impossible to work on the wheel by itself. But some helpful folks that specialize in Singer Featherweights told me the bobbin winder was pressed together. (They also sold me some new rubber feet to replace the old gooey ones.)
I was able to get the wheel off the axle just by tapping on the wheel
end of the axle with a small hammer.

After that, a squeeze or two in the vise flattened out the wheel, and I had
a couple of Craftsman sockets (both 19mm, from two different sets)
that were just the right diameters to gradually work out the
out-of-roundness. I forced each in turn into the cup of the wheel,
again using the vise, and also did a bit of hammering on the rim to
get out the remaining high points while it was still on the socket.

Finally, I pressed the axle back in, using a large nut as a spacer to keep
the wheel from getting squished while the axle went in:

The result is way better than I expected.


A second movie shows the (vast) improvement.
Okay, then, with all that out of the way, here are a couple of glamour shots of the machine, all finished up:


Finally, I don’t think you can own a pair of black and white Featherweights and not photograph them together:


| updated January 2025 | [index] |
I’ve long felt that this machine should really go to someone who could use its capability and portability to full potential. When an accomplished sewist from the Victorian Sweatshop forum lost her home in the recent LA fires, it made perfect sense to send to her. I hope it serves her well. (And, I hope it gets there in one piece! Shipping sewing machines is a risky business… :-/ )
c.1880 Wheeler and Wilson No.8
| written June 2018 ... | [index] [index by age] |

This 1880-ish Wheeler and Wilson model No.8 (s/n 265363) is complete, it turns over (sluggishly), the cabinet is in good shape, and it has quite a few accessories, including more glass presser foot inserts. Clearly it needs work, but I’m really pleased with it. Stay tuned!


Allen Wilson was a very clever guy. He held patents for the vibrating shuttle mechanism (which his machines didn’t use, but lots of others’ did), the round bobbin and rotary hook mechanism (which his machines did use, and which many still do today), and the up/forward/down/back four-motion feed (which is still universally used today). Oh – and there’s a nice write-up on the No.8 on the ISMACS site.
This machine also has a paired drive pulley setup, allowing it to be operated at two different drive ratios. You can see the two belt grooves in the closeup of the large treadle wheel, above. My Singer 29-4 is currently the only other “two speed” machine I own.
| ... continued, October 2018 | [index] |
Okay, I’ve finally done an initial cleaning and oiling of the machine’s head, cleaned up the treadle irons, and refinished all of the wooden parts. I’m very pleased with the result!


In addition to cleaning the case, I’ve also cleaned the head enough
to get it to sew. I have trouble imagining how sewing machines get
so dirty sometimes. I think in the case of the old ones, it’s the oil:
many would originally have used sperm oil (i.e., from sperm whales) rather
than a petroleum-based oil. When the whale oil dries, it leaves
horrible, hard, brown, caked-on crud. Yuck. These parts didn’t get
cleaned: it would have been hard, and the mess isn’t hurting anything.
It looks liquidy in the pictures, but it’s not: it’s like hard shellac.


Restoration note:
As with my Singer Model 66, I used Howard’s Restor-a-Finish on this. I haven’t yet seen any compelling reasons not to use it, and it’s practically “wipe-on/wipe-off”. The results are perfect, for my taste. “Patina” (that’s latin for nicks, scratches, and stains, right?) is preserved, while the piece becomes living room friendly. I might not use it on fine furniture, or on something where preserving or reproducing the original finish was crucial, but for a mass-produced sewing machine? Probably fine.
I do clean the wood first, quickly, with Windex glass cleaner and paper towels. And I apply the Restor-a-Finish with #0000 steel wool. Here are a few before/after shots:


Oh – the other product that makes this stuff easy is Evapo-Rust. Just soak a rust-encrusted part in it, and all the brown flaky crud disappears. As a bonus, it’s safe, non-toxic, and can be poured down the drain when it’s used up.
Here’s the bobbin winder, which is made of a different alloy than the cast iron treadle irons, so it had rusted badly. But it’s fine now, other than still needing a rubber tire, obviously.


1922 Singer Model 99K-13, electric
(Gone! No longer mine.)
| written June 2018 ... | [index] [index by age] |

I don’t need, or even particularly want this machine (Y702893). But the bent wood case is in pretty good shape, and my 99K hand crank doesn’t have a case at all. So I bought it (quite cheaply) for the case. As it happens, the machine is in reasonable shape, though it needs badly to be cleaned, oiled, and rewired. And the controller has some dead spots, and the controller knee lever is missing, (Okay, maybe my definition of “reasonable shape” is starting to skew a bit.) I’m not sure what I’ll do with it – now that I have it, of course, my “preservationist” side keeps saying “Restore it! Restore it!”, while my practical side says “Just fix the case so you have a complete hand crank model, which is all you ever wanted.” I wonder which side will win?


| updated November 2018 | [index] |
Well, in the end I couldn’t bring myself to part out the machine. So I gave it a new foot controller (the knee controller was burned out and unfixable, and the knee bar was missing in any case), shined it up, refinished the case, and sold it. It looked pretty good by the time I was done.


1926-1950 Singer Model 20 Toy Chain Stitcher
| written July 2018 ... | [index] [index by age] |

I got this cute little chain stitcher from Julia’s brother-in-law for my birthday. The Singer toy machines don’t have serial numbers, but various features on this one show that it was made in the 25 years or so between 1926 and 1950. It has a little rust on the cloth plate, and the felt on the base could be replaced, but it looks and works fine otherwise.


 It’s an excellent machine for demonstrating how single-thread
chain-stitchers work, since unlike my
Willcox and Gibbs machines, it’s
light enough to hold and operate in mid-air, and the underside offers
an unobstructed view of the hook.
It’s an excellent machine for demonstrating how single-thread
chain-stitchers work, since unlike my
Willcox and Gibbs machines, it’s
light enough to hold and operate in mid-air, and the underside offers
an unobstructed view of the hook.
Willcox & Gibbs Hand Crank, with 1904 parts machine
| written July 2018 ... | [index] [index by age] |

I’ve been on the lookout for a hand crank for my W&G machines for a while,
so when this popped up on Craigslist, I grabbed it. It didn’t hurt that
it was dirt cheap (relatively speaking).

The machine (s/n B544060) is quite rough (note the JB Weld and wired-on sheet-metal repair!), and a large part of the lacquer is missing on the crank wheel, but the price was right. With a little oiling it started spinning over quite nicely. I haven’t tried sewing with it, but I suspect it will be fine
The only big issue is that the crank handle itself is missing, along with the screw that holds it. Of course the missing screw is 11/64”, and 40tpi. That’s the same threads as the W&G attachment thumbscrews, and, ironically, also the same as the crank handle screw on the Singer Model 20. Maybe I can share my Model 20’s handle between the two machines! In reality, I may end up drilling and tapping the wheel for a more modern screw size. [Edit: in the end, I got another Model 20 crank handle and screw from ebay, and I use that.]


In the end, I bought this machine not for the machine, but for the hand-crank base. The base now sits under my second W&G, since I sold the electric base that that machine arrived with.
| updated December 2018 | [index] |
The hand-crank base’s feet were shot: mushed out, brittle,
and, while they would still protect a tabletop, they’d lost any stickiness
they’d ever had, so the machine wouldn’t stay put on a smooth surface while
sewing.

The feet are of the “rubber plug” type, which fit into holes milled in the base. The holes are just under 1/2” in diameter, and 1/2” deep.
It turns out McMaster-Carr carries the perfect replacement, as part number 9305K32. They’re in the “Push-In Bumpers with Compressible Stem” section. They fit perfectly, and have plenty of “stick”.
The second picture shows one new foot installed (on the right), and also
shows an old foot shaved off with a razor blade, before I pried the
rest out with a thin-but-strong screwdriver. If you have a situation
like this, and don’t have proper replacements, trimming the foot flat
leaves a nicer surface for a stick-on foot than prying out the old
rubber and leaving a hole.

| updated December 2018 | [index] |
While I still have the castings for the 1904 machine itself, most of its parts have been transferred to the 1893 machine that I got with my treadle base. The decals were good on that machine, and, let’s face it, that repair to the 1904’s needle arm lever wasn’t very attractive.
Custom Sewing Machine Display Bases
| written July 2018 | [index] [index by age] |
I’ve made several bases for machines now. I’ve used three different techniques. It’s been fun.

 My Singer 99K hand-crank didn’t
come with any sort of base, or case. Because I might like to travel
with it someday, and room in our van is limited, I made the base as
small as possible. There isn’t yet any attachment of the machine to
the base – I’ll deal with that when it’s used for more than
displaying the machine on a bookshelf.
My Singer 99K hand-crank didn’t
come with any sort of base, or case. Because I might like to travel
with it someday, and room in our van is limited, I made the base as
small as possible. There isn’t yet any attachment of the machine to
the base – I’ll deal with that when it’s used for more than
displaying the machine on a bookshelf.
I used my Kregs jig to install pocket screws to hold it together, and carved the top to match protrusions from the base of the machine. It’s barely larger than the sewing machine’s base. The holes in the ends are for one’s fingers, when picking up the machine.
My mother’s Fashion Mate 237
originally came in portable plastic carrying
case. I was dumb, and got rid of that when I found a floor cabinet
for it. Now I don’t have room for the cabinet, so I again need a small
base to make the machine useful. This one actually uses hinges, just
like a “real” case. I did my first rabbet joints for this one. I also
included an extendable “kickstand”, which does two things: it keeps
the base from flipping up when the machine is leaned backward, and gives
the back of the machine something to rest on.


 My Singer New Family came in a beautiful treadle stand, with a
flip-out cover that forms a large sewing surface. The trouble is that
when the machine is displayed in the open position, the effective
floor space taken by the treadle base and surface is huge. So I
needed a more compact way of putting my oldest machine on display.
My Singer New Family came in a beautiful treadle stand, with a
flip-out cover that forms a large sewing surface. The trouble is that
when the machine is displayed in the open position, the effective
floor space taken by the treadle base and surface is huge. So I
needed a more compact way of putting my oldest machine on display.
I repurposed an old butcher block top, which had the necessary depth. It was pretty easy to cut with a hand-held jigsaw. The outline for the cutout came directly from a tracing of the treadle top.
I used the same technique (and the same piece of old butcher block!) for my 1906 New Ideal as well.
1871 Howe “Letter A”
(Gone! No longer mine.)
| written July 2018 ... | [index] [index by age] |

In 1846, Elias Howe patented the needle with the eye at the pointy end, and, in the same patent, the two-thread lockstitch still used by almost all domestic sewing machines today. He didn’t build machines right away, but his family did. When he finally started, in 1863 or so, he produced this machine, which is known as a “Stockwell Howe” to differentiate it from earlier Howe sewing machines made by another branch of his family. (He was in business with his two sons-in-law, who were brothers named Stockwell.)
This one sat on Facebook Marketplace for at least a month before I decided to look at it. It’s in very good shape – the seller said it came from his grandparents house. They must have taken good care of it. “Letter A” is simply The Howe Machine Company’s name for the model. The Letter B, C, and D machines were bigger and successively more industrial. The serial number (178732) dates it from 1871.


Note that unlike most other machines, there is no wheel above the table. To start the treadle, or move the needle, one must reach underneath and pull on the belt.
There are essentially three things which must move in synchrony on a sewing machine – the needle, the shuttle or bobbin, and the feed dogs. On this machine the L-shaped needle bar is driven by the right most groove in the large drum underneath. The groove to its left drives the shuttle forward and backward under the needle. The feed dogs are driven by a much smaller eccentric cam near the left end of the shaft. Stitch length is controlled by turning the knob at the left end, to adjust how much the cam moves the feed dogs.

I tried to get some of the gunk off the undercarriage, but only succeeded in cleaning enough to make everything move smoothly. I’m sure sperm oil is to blame.

Cleaning the upper parts was more successful, as was cleaning up the
base. This one qualifies for a prime living room location:


And after minimal setup, it sews!!

I made a short movie which shows the machine in action:
 There’s no cloth or thread, in order to show how the shuttle
moves. I love that this was made in 1871.
There’s no cloth or thread, in order to show how the shuttle
moves. I love that this was made in 1871.
| updated September 2020 | [index] |
Sometime last year I was looking at the pictures, above, of the cruddy underside of this otherwise pretty machine, and decided to do something about it. I didn’t do a lot of disassembly, but was able to get almost all of the caked grime off of the big cam cylinder. It looks much better!

| updated May 2021 | [index] |
A note on needles. I can’t remember why I tried them, but I’ve found that needles from my Singer 29-4 work very well in the Howe. This is handy, because while the ISMACS needle cross-reference lists dimensions for the Howe needle, apparently there are no modern sources. The total length, and the length to top-of-eye, both closely match that of the readily available 29x3 (or 29x4, for leather work) needle very well, but the diameter should be smaller: 1.93mm vs. 1.98mm. The needles I own are all 1.95 or 1.96mm, and seem to work fine in my machine.
| updated January 2022 | [index] |

 Someone mentioned that the serial number on a Howe is under the front slide
plate, which I didn’t think was true – mine is on the rear slide plate.
Well, I was happy to be wrong. Turns out the s/n is in both places.
Someone mentioned that the serial number on a Howe is under the front slide
plate, which I didn’t think was true – mine is on the rear slide plate.
Well, I was happy to be wrong. Turns out the s/n is in both places.
| updated April 2022 | [index] |
This machine was spending way too much time in the semi-finished cellar due to lack of display space upstairs. I actually do see it quite a bit, since I’m down there a lot, but still. I now have a few machines of similar style, so that, coupled with the lack of joy it brings me to sew with this one, meant it was time to go. (Something had to go – I currently have more machines than places to put them.)
c.1918 Western Electric No.2 Portable
| written August 2018 ... | [index] [index by age] |

I couldn’t resist picking up this Western Electric machine (s/n A80864), which dates from 1917 or 1918. At least, those are the commonly internet-quoted dates of manufacture. I’ve not been able to find a hard reference. The machine was actually built by the National Sewing Machines company, and badged for W.E. It’s the same machine as the National Model ‘A’, or perhaps ‘A2’, introduced in 1910, and electrified for Western Electric in 1917. Perhaps Western Electric only badged it for two years.
Partly I wanted it because the decals are pretty, and fairly well preserved – I don’t have many machines with pretty decals. Plus, I used to work for AT&T, which was Western’s parent company. But it also has this crazy motor arrangement, where the motor is mounted on swivels, and its position is controlled by a spring: it can either live tucked into the machine for storage, or swiveled to where it drives the hand wheel via a friction wheel when in use. I have two friction wheels – one is the original cork covered one (at least, according to the manual), and the other is a later rubber one.


Interestingly, about half of the old pins I found under the base couldn’t be picked up by a magnet – I believe they’re plated brass.


The bobbin winder is also unusual – it’s driven directly from the
motor by a coiled metal spring “belt”. When doing this, the friction
wheel is held off the hand wheel by deploying a small arm.

It will need some thorough cleaning, and likely the motor needs rewiring. There is no controller or plug – I’ll have to come up with something. Too bad I don’t have the original – it was pretty cool looking, and it came with a lightbulb-like screw on the end of the wire for getting power! I guess when electricity first became commonplace, it was just for lighting: there were really no appliances yet, so this made sense. See this advertisement, and also Figure 3. (Amusingly, the advertisement also shows an electric lamp on the table. Which must be plugged in somewhere. So why not plug the machine in there too?)


Sadly… after a thorough cleaning, and testing, and dismantling, and diagnosing… the motor is dead. There’s a break in one of the field windings, and the armature windings seem to be shorted together. So, it’s to be a shelf queen. Oh well!
But at least it did clean up nicely!


| updated December 2018 | [index] |
I found a motor! It was sold originally as a general purpose sewing machine motor – you could use it to convert your treadle machine to electric power by sitting this thing behind your machine, with the roller in contact with your hand wheel. The motor was spring mounted.


It’s identical to the motor that came with my machine. I had to rewire
it, and I even had to straighten its bent shaft (it must have been dropped),
but it now works, and the machine can sew. I’m very pleased, even though
the shaft still isn’t quite straight – it causes a fair amount of vibration.
But it’s better than not working at all – and having the nameplate on the
motor is worth a lot too.

1937 Willcox & Gibbs Automatic Silent Sewing Machine, with electric cabinet
(Gone! No longer mine.)
| written late August 2018 ... | [index] [index by age] |

This machine is so pristine that it seems like it might not have always been with this cabinet, which shows quite a bit of wear. On the other hand, perhaps the machine is so pristine because it was protected by the cabinet. In any case, the machine is lovely, and the cabinet is very cool.


| updated January 2019 | [index] |
I just realized I’ve never taken better, indoor, “glamour shots” of this
beauty. After minimal cleaning (dusting, really, is all it needed),
here are some better shots of the head:


I’ve also repaired and refinished the electric cabinet. Here are
some pictures (with a different W&G head):


| written long after the fact, in October 2023 | [index] |
Back in early 2020 a friend on the VSS forum started a joking high speed sewing competition. He was reporting numbers like 1372 stitches per minute for a Singer 101, and a 301 long bed gave 1564 spm. Very fast. The test consisted of a 20 second timed run, stitching at a known stitch length, and measuring the final sewn length (and tripling it, of course), for stitches per minute. This was to be done 3 times, with the results averaged.
I’d read that the W&G chain stitchers could sew very, very fast. I’d heard numbers as high as 3000 to 4000 stitches per minute, and even 1500 out of the box – in 1863! Since I had (and still have!) several W&G machines, I figured I’d see what they could do.
So I took my 1937 (the youngest and least-used of my W&G machines), reunited it with its cabinet, and did a warm-up run. And it immediately came in at 1482 stitches per minute! That being the case, I decided it was worth oiling the machine. I hadn’t even done that yet.
After oiling, I spun it up to get things settled, and tried again. Ooooohhh.... that run was 1638 spm! I figured we might have a trophy to claim.
So I went for the official three run average. I won’t bore you with the details, but you can imagine there was a lot of tension in the crowd. ;-) The machine itself, while sensing the anticipation, seemed to have exactly the right amount of tension. If you know what I mean. I will say that this machine seems to like a challenge, or maybe it was just finally warmed up, because the three run average was..... 1742 stitches per minute!! And two of those three runs came in at 1755. Smokin’!
I think my friend had been thinking of this as a competition between more conventional machines – I’m pretty sure he accused me of running nitro, or something like that. I told him we were racing for pink slips next time. :-)
| updated March 2024 | [index] |
I’ve always kept this lovely machine on a shelf where it can be seen, and its cabinet, cute as it might be, in the cellar, simply because I haven’t had space for it upstairs. Then when I got my metal lathe about a month ago (which I’ve used to make new screws for a couple of sewing machines!), it needed some space, which caused a chain of displacements in my cellar which resulted in the the W&G cabinet having nowhere to live. Literally. I was out of room. So I hardened myself slowly to the idea of having to sell it.
And just then, a friend sent an email with a picture of a very similar machine being sold near her, saying how lovely the machine was. One thing led to another, and she’s taking mine off my hands. I’m thrilled it’s going to an excellent home, and she’s thrilled to be getting to sew on it. It’s so great when that happens.
1906 New Home “New National”
(Gone! No longer mine.)
| written October 2018 ... | [index] [index by age] |

I’ve wanted a dedicated hand crank machine for a while, where, by “dedicated”, I mean a machine that was specifically built to be cranked by hand, and not powered by other means. (And no, my toy Model 20 doesn’t count!). The prettiest machines of this sort are “Saxonia” machines, so named because so many came from Germany. Sadly, since they’re mostly German, there aren’t that many here in the States, and the nice ones are very expensive. So I wasn’t really expecting to satisfy my itch with a machine built practically next door, in Orange, Massachusetts, by the New Home Sewing Machine Co.


New Home only made one machine in the Saxonia style, as far as I can tell. The “model U” was made with variations from the 1880s to the 1930s. Mine (s/n 2589510) was made in 1906. The outsides had been wiped down well enough, but given the amount of gunk and crud I had to clean from… everywhere else, and from the wear on some of the decals, I’d say it was well used. Happily, not all the decals suffered, and most are in very good shape.


Unfortunately it was missing a shuttle and bobbin, but I was able to get those, and it now sews perfectly.
Interestingly, there are holes in the portable base for a treadle belt to pass through. The holes don’t line up with the pulley groove on the crank wheel, though, so it’s possible the base and machine aren’t a properly matched pair. In any case, the base was apparently designed to sit or slide into a matching treadle base – so that the machine it held could be either treadled or cranked. An early example of modular design, I guess.


| updated March 2025 | [index] |
I love this machine, but I know someone who loved theirs more, and lost it along with a lot of other stuff that they loved when their home burned to the ground several years ago. Seemed like they should have it! (One great benefit to maintaining this blog is that in some ways, the machines never really go away. I can still look at “my” New National whenever I want.)
1976 Sears Kenmore Free Arm Model 1946
(Gone! No longer mine.)
| written October 2018 ... | [index] [index by age] |

I got this Kenmore (technically a 158.19460) when someone on the town mailing list gave it away. Has a bunch of built-in stitches, including semi-automatic buttonholes, and, more importantly, it’s a free arm machine, which would be awfully convenient sometimes. But it doesn’t really fit in with my collection, so if I find that I never use it, I’ll probably pass it on to someone else someday.


| updated December 2019 | [index] |
Well it had been over a year since I got this machine, and I had yet to have a need for its features, so I passed it on…
c.1860 Charles Raymond (no.1)
| written November 2018 ... | [index] [index by age] |

This diminutive little thing (only 10” long, including the crank handle!) dates from around 1860. Charles Raymond was building inexpensive sewing machines in Brattleboro, VT. Sometime in the next couple of years he moved his company to Guelph, Ontario, to avoid pressure from the “giants” of the industry, and their attorneys. Even if he wasn’t infringing, it would have been prohibitive to defend against Singer, or Wheeler and Wilson.
The machine sews a chain stitch – the loop is caught and held until the next loop can be slipped through it. (Simple, but not as simple as the looper that James Gibbs had invented just a couple of years earlier, used in the Willcox & Gibbs machines elsewhere in this blog.) There are no feed dogs on this machine – instead, the presser foot is a “walking” foot. The needle holds the cloth in place while the presser foot lifts and moves forward to grab the cloth in a new spot. When the needle rises, the cloth is slid to its new position.
This style of machine, created by Charles Raymond, was copied by many small manufacturers – it was cheap to make, and very simple to use. The style became known as the “New England Sewing Machine”.


Sadly, my machine is missing a couple of crucial parts: There’s a threaded rod/bolt that should be installed in the hole near the left end of the upper shaft. This rod would ride on a cam (not really visible in the pictures), and would cause the presser foot to do its walk.
Updated March 2024 – I’ve since gotten a second first-model Charles Raymond, with all of its parts intact, so I now have my own reference for all of the missing pieces on this one. Happily, nothing I’ve seen on the newer one contradicts anything I wrote previously here.
Also missing is the bracket and spool pin which is normally mounted on top of the large rectangular needle bar at the upper left corner of the machine. The spool is mounted horizontally, and the thread unwinds directly down to the needle. Thread tension is applied by drag exerted on the spool by a spring which keeps it from turning freely. Hopefully I can recreate these parts someday.
One clue (among others) to the age of the machine is the little
notch worn in the cast iron faceplate, above the upper righthand screw.

This means the machine probably had a tensioner setup just like the one shown in a video, from Alex Askaroff. The springy-wire part of the tensioner would have worn that notch. There are better pictures of that spool assembly and tensioner on Alex Askaroff’s web page – specifically this one and this one.
Given the features of the casting, and the wear mark, I think it’s safe to say the machine was made in 1860 or 1861.
| [ a few days pass ] | [index] |
Armed with the above assumptions and evidence, as well as a few
pictures, I set out to recreate my missing parts. Here are a few of
the pictures I used (in addition to those from Alex Askaroff’s site,
mentioned above). These came from an ebay sale page, and are used by
permission of the seller. (The machine in these photos is a clear
match to Alex Askaroff’s.)


I used various bits of scrap found in boxes and drawers in the shop, and came up with a prototype spool support and tensioner. It’s made from a scrap of cellular PVC trim, a couple of nylon standoffs (tapered in a pencil sharpener!), and an old coat hanger. And, it looks like hell. :-)


But amazingly enough, it worked on the first try!

So I made prototype spool holder no. 2, also using cellular PVC, and some slightly nicer hardware. The PVC got a coat of Sharpie. Classy, eh?

Someday maybe it will get a proper brass spool bracket. Until then… this will display well enough.
Once it was sewing, I was able to make a slow-motion video of the
under-bed action which produces the chain stitch. The trick is that
the loop formed as the needle retracts is grabbed by a hook, which
holds onto that loop until the needle descends again, and passes through
that loop. At that point the loop is released, and the hook grabs the
new loop passed in by the needle. The video :
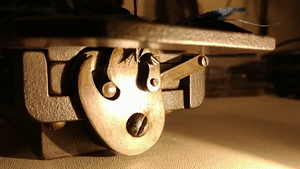
The video is also available on youtube.
| updated February 2025 | [index] |
A few more pictures…


Willcox and Gibbs treadle base with 1893 parts machine
(Gone! No longer mine.)
| written Christmas Eve 2018 ... | [index] [index by age] |

You’d think that owning four Willcox and Gibbs chain stitchers would be enough, but now I have five! Well, four and a half, anyway. This one came attached to a lovely treadle base that I really wanted, and the price was right. (In my defense, the household balance is somewhat intact because yesterday I sold the boxed W&G motor base and foot pedal that came with my 1914.) And this machine doesn’t really count anyway, because it’s been stripped of almost every removable part. (I knew that before buying.)


The treadle top is also incomplete: it has no bonnet (or “coffin top”, as they’re sometimes called), and it should have at least one drawer hanging under the right end of the table top. In addition, there’s a crudely drilled oblong hole in the middle of the table, as if someone tried to turn the top into a lamp stand. Happily that hole is mostly covered by the sewing machine when it’s installed.
The seller told me that the machine was his parents’, and that he remembered playing with it as a kid. It sounded like it had left home with him in his 20s. He didn’t offer up an explanation for the missing parts, or the hole in the table. I didn’t press him. :-)
I’ll certainly install a different one of my machines in the treadle. I’ll also look into swapping parts, in one direction or another, with my 1904 machine, which is complete, but somewhat “cosmetically challenged”.
The treadle base irons have a couple of patent dates cast into them. One, issued in November 1869, is a design patent for the design of the legs and pedal, with their interlocking W and G letters. The other was issued in January of 1870. It’s for a clever disk which acts to protect the treadler’s clothing from the potentially oily upper pivot of the pitman arm.
a week or two later…
I decided that the correct way to do the parts swap was to abandon the 1904 castings. The needlebar lever had an ugly repair made to it, and the decals are mostly gone. So the “new” 1893 machine got a full complement of fresh parts (only 11 years too new), and now looks pretty good!


| updated March 2020 | [index] |
Well, owning five W&G chain stitchers seemed excessive. So I’ve passed this one on to another collector, who unlike me, actually plans to sew with it!
I only sold the machine itself – the treadle now holds my 1875 W&G.
Makeshift DIY spool winder
| written January 2019 ... | [index] [index by age] |
Antique machines look a lot better if you don’t thread them with modern plastic and styrofoam thread spools. I have a collection of old wooden spools, but some are empty, and those that aren’t mostly have thread that breaks really easily. Thread doesn’t usually age well, and modern thread is simply stronger.
So with some pointers from my friends at the sweatshop, I came up with a solution for rewinding old spools with new thread:
- Find a length of 1/4” dowel, or similar. I had a couple of pieces of scrap fiberglass rod that I used. Wrap a rubber band on one piece, in order to form a cushy “stop” for your wooden spool to rest against.


- Put the winding piece and spool into the chuck of your drill press. The sponginess of the bunched up rubber band gives clamping force, to keep the empty spool from spinning after it is pressed up against the drill chuck. I found that the right speed, for me, was 340 rpm.

- Use another piece of that dowel as a spool holder for the thread source.

- Wind the spool. Guide the thread with your hand while doing so.

- Done.

1906 New Home “New Ideal”
| written January 2019 ... | [index] [index by age] |

I was seduced by the glittery decals on this little New Home machine when it was listed on Craigslist, and the price was low. So Julia and I took advantage of a sunny winter day to drive down to the Cape to pick it up, and to go for a nice hike. The hike alone was worth the trip.
The machine isn’t quite as glittery overall as I’d thought. The decals are in good shape, for 1906, but there’s extensive paint chipping along the front of the base, and it was missing the presser foot and stitch length selector knob. It came in a truly junky case, which probably isn’t worth saving.
The motor, which I had thought was original, is clearly not. It’s too new to be from 1906, and there’s no motor boss for mounting it – the mounting consists of two #10-24 holes drilled and tapped in the column. Definitely not original. Given the absence of a mount for either a motor or a crank, it would originally have been on a treadle base. The foot controller seems a lot older than the motor. Perhaps it’s on its second motor, or, more likely, whoever did the conversion to electric grabbed whatever they had on hand. I think they added a lamp, too – there’s a hole drilled and tapped in the middle of the upper arm, just below the “New Ideal” decal, and a bunch of paint is chipped in that area.
Happily it did have the original shuttle and bobbin, and it stitched nicely on the very first try.
After cleaning it up, and borrowing a presser foot from my other New
Home, I’m glad I bought it…


I made it a custom base, from the rest of my scrap of butcher block. Butcher block works really well for many old machines, which tend to not have much mechanism protruding below the “water line”.


| updated February 2019 | [index] |
Someone on the Victorian Sweatshop forum had the stitch regulator knob, as well as a few New Home presser feet. Nice improvement!


1931 Singer Model 101
| written March 2019 ... | [index] [index by age] |

This machine (s/n AD386886) came up for sale nearby, and I realized that if the 101 is anything like the 201 in terms of “personality”, and if it turned out to be a decent machine, I could maybe sell my 201 (in its cabinet), thereby freeing up some floor space.
The 101 was the first electric-only domestic machine Singer produced, in 1920. It has a gear-drive enclosed motor, no belt groove on the hand wheel, and it can’t be fitted with a hand-crank, so it really needs electricity to sew. (As reference, it wasn’t until 1925 that half of all American homes had electricity, though of course cities were electrified much earlier than rural areas.) In addition, the machine also had a number of other innovations. The bottom of the machine, instead of being open, for maintenance, is a mostly sealed tub. To get at the “underside”, one removes the bed plate. That sounds much harder than simply tipping the machine back, as is done with most other machines. Except that they also simplified the oiling ritual, by implementing a one-stop oiling mechanism – cloth wicks take oil applied to a central oiling hole in the bed plate to all of the pivots one would normally need to lubricate. So there’s just one oiling hole in the bed plate for everything underneath, as well as the usual assortment of oil holes on the upper parts of the head.
So I went and got it – it was quite inexpensive. With good reason – the hand wheel wouldn’t budge at first, and the rubber bobbin winder tire had decomposed and literally dripped onto the hand wheel and the base below it. The hand wheel has loosened a bit with some oiling, and the machine now turns over with some effort. It’s going to take some work. (Apparently when the seller bought their house 30 or 40 years ago they never cleaned out the attic. When they finally did, recently, they found this machine. Note to self: don’t store sewing machines in the attic for decades and expect them to work afterward.)


Here’s a shot of the tentacular oil wicks under the bed plate.

| updated a couple of weeks later | [index] |
The 101 mostly freed up with liberal doses of fresh oil. It still felt a little stiff, so I switched to penetrating oil… which didn’t help. In the end it turned out that someone had incorrectly installed the small stack of washers that act as “clutch plates” when locking and unlocking the hand wheel with the stop motion screw. With that stack backwards, the hand wheel would drag on the body of the machine when the stop motion wheel was tightened. Happily, a copy of the adjuster’s manual explains exactly how to get those washers right. After a bit more cleanup, the machine is sewing perfectly. I just need to make a display base for it now.
| updated October 2019 | [index] |
Turns out that a display base needs to be pretty tall to hold all of the 101’s undercarriage, so the appearance isn’t quite what I’d prefer. It also requires a lot of measuring and hand carving, if you’re not going to put in proper hinges, like I didn’t.


Anyway, this what it looks like these days:


| added in July, 2021 | [index] |
The 101 really looks better in a proper cabinet, I think, since it
hides all the extra bulk below the “water line”. I installed the 101
in the cabinet that came with my latest 201, and it looks
much better. Sadly, it’s only temporary. I wish I had room for a proper
cabinet for this beauty. There’s just something about the simplicity of
the 101’s design. It has the lamp and motor hidden in back, the stitch
selector on the base, and a small, streamlined hand
wheel, all of which I find very attractive. I think it’s the
prettiest sewing machine Singer ever built.

| added late December, 2021 | [index] |
A Singer 101 thread on VSS began discussing the various dates and numbers that are cast into the base of some machines. (See post #136, and following, in that thread.) That got me curious, so I pulled my 101 out to take a look. The date cast into the cast iron base roughly correlates (off by just 6 days) with the date that starts the allotment of 5000 serial numbers that this machine belongs to. The consensus on the thread is that no one knows of any other sewing machine with this sort of lot number encoded into the machine castings. It might simply be that the date is when the mold was created, and that that often corresponded with the start of a serial number allotment.


1906 Singer Model 15-30
(Gone! No longer mine.)
| written March 2019 ... | [index] [index by age] |

This 1906 model 15 (s/n H906147) came to me from my brother-in-law, who rescued it from a scrap metal recycling drop-off near his home in New Jersey. (Thanks Scott!) Considering where he found it, it’s in decent shape. The Tiffany/Gingerbread decals are faded, but still have some of their iridescence, and while it’s all a bit rusty, I’ve seen far worse. It’s missing its bobbin plate and bobbin case, but otherwise looks complete. It’s stiff, but it does turn over.


| updated two days later | [index] |
Well, that was quick! The first picture, above, was taken post-cleanup. A little oil in all the right places, and let it sit for a couple of days, moving the hand wheel once in a while, and it now stitches just fine. It’s missing its bobbin case, which is a crucial part of course, but it turns out that the model 15 and its clones were so popular that the class 15 bobbin case was used by Singer, and other makes (Necchi, for example) all the way into the 1980s. So I was able to borrow the bobbin case from my mother’s Fashion Mate 237, and it fit perfectly.
| updated December 2019 | [index] |
Since I got a much nicer 15-30, and this one has always been compromised by bad decals and other issues, I decided that perhaps it was okay to take this one out of display rotation, and I’ve started using it for parts. It’s okay – there are lots of far better machines that need to be rescued.
c.1873 Gold Medal “Home”
(Gone! No longer mine.)
| written March 2019 ... | [index] [index by age] |

This machine was made by the Gold Medal Sewing Machine Co., of Orange, Massachusetts, which was a predecessor to the New Home company. The last patent date on the shuttle slider is 1865, and from what I’ve read so far, it seems to have been made sometime between 1870, when Stephen French designed it, and 1877, when all of the “Combination” patents had expired, and the New Home machine was developed.
It’s dirty and a bit rusty, but it turns over, and the shuttle is present. The serial number is stamped on a small disk which sits at the base of the spool pin: 71319. I’d love to think this means it was the 219th machine made in 1871, but there’s no basis for that, of course. I don’t even know if that style of numbering had been created yet. Fantasy aside, that number doesn’t really help with dating, since there are no good records.


There’s just barely a vestige of a floral painting on the faceplate, and there’s a just a bit left of a painting on the bed as well – it might be picture of the factory, but there’s too little remaining to be sure.

The machine was clearly made by Gold Medal – it’s stamped right into
the slider – but at least some advertising shows it as being made
by Johnson, Clark & Co., which was a previous, or alternate, incarnation
of the same company. Edit: I’ve since acquired a Home Shuttle, a
later version of which is also pictured in this advertisement. It, too,
was designed by Stephen French.

Anyway, I’m looking forward to getting it cleaned up.
| updated several days later | [index] |

I think it came out well, and there’s more of the decorative painting
left than I’d realized.


Cleaning the “hidden” areas usually isn’t necessary, but it always makes
me feel better about myself. ;-)


Some random detail shots, taken during the cleaning process. Mostly they were to remind me how things would go back together, so they’re all “still dirty” shots.


And here are some before/after comparison shots. I rarely think to do these, but I should – even I tend to forget how dirty these machines sometimes are when I get them.


| updated July 2019 | [index] |
It took me quite a while to complete the refinishing of the woodwork on this machine. I believe the original finish was not shellac, since there was (and still is) one bit of good original finish preserved under the “Home” medallion on the bonnet, which rubbing alcohol wouldn’t touch. So, lacquer perhaps?
Using #0000 steel wool and Murphy’s Oil Soap (a combination recommended by someone I trust – I wouldn’t have thought of it myself!), I was able to quickly rub all of the failed finish from the treadle table. I quickly oiled that with Watco furniture oil (“natural”), and was pleased with the result.
The finish on the bonnet was in better shape, but it had to match the table, so off it came. Unfortunately, it has lovely inset panels (some with curved edges!) on all five of its surfaces, so it was much harder to strip. There are a lot of little ledges and corners – not only are they hard to get into, but the finish was often thicker in those areas. Each side took a day or more, and the project got set aside for successively longer periods after I finished each one. :-)
The medallion on the front is made from a primitive pressboard, apparently molded in the medallion’s shape. It has some hand-painted details, so of course it didn’t see steel wool. I think the lacquer (?) was all gone anyway. Its only treatment was a coat or two of oil.
The medallion wasn’t mounted straight when I got the machine, and I’ve left it that way. When removed you can see that there are extra screw holes where, perhaps, someone tried to straighten it previously, and failed. Trying again might have failed again, and would have left way too many holes in too small a space.
Happily, it all looks great.


| updated April 2022 | [index] |
I’m happy to say this machine has found an excellent new home, as part of a fellow collector’s excellent collection. I couldn’t be happier with where it’s off to next.
Threading the Home
| added August 2019 | [index] |
The needle is a Boye 23 or Singer 12x1, the same needle used in the contemporaneous Singer Model 12 / New Family.
Threading the top thread is pretty straightforward (pictures below):
-
The thread comes off the spool and through the first guide, then over the top of (and between) the non-rotating tension disks.
-
It goes through the pigtail guide, and through the eye at the top of the needle bar.
-
The thread descends the faceplate, and enters the “staple” of the takeup mechanism from the rear, so it can go down through the eye of the takeup arm. From there it drops down and goes through the needle’s eye from left to right.
-
Note that the thread stretches taut across the faceplate. With the thread pulled to the side, you can see the accumulated wear through the middle of the floral painting.


Threading the Home’s shuttle
| added August 2019 | [index] |
This machine’s shuttle is different than those on both the Gold Medal “Home Shuttle” machines that it coexisted with, and the New Home machines that followed. It’s a little tricky to thread. I’m pretty confident that this threading is correct, both because the thread path matches the existing wear marks on the shuttle, and because it makes sense once you’ve finished. (And if I’m right, I’m not very surprised it was a short-lived design!)
(If this shuttle looks familiar, and someone knows of another machine this was used on, please say so! Likewise if you know of a different threading path.)
-
Start with the thread coming off the top, as usual. (See pictures, below.)
-
Feed it out through the middle hole on the side.
-
Feed it back in through that same hole, but not all the way: “turn the corner” so it exits up between the shuttle wall and the internal leaf spring.
-
Pull the thread through so that now it’s simply unwinding from the bobbin and going up behind the leaf spring.
-
Pull the thread forward so that it exits at the front end of the leaf spring, where it is now adjacent to the forward hole on the shuttle’s side.
-
Send the thread out that hole.
-
This is the finished view from the outside.


1888 Singer VS3
| written late March 2019 ... | [index] [index by age] |

I have several VS (vibrating shuttle) machines (my Home, New Ideal, and New National – all sort of from the same company), but none by Singer. They’re a pretty big part of the early Singer lineup, and I’ve thought I should have at least one. (Nice excuse to buy another machine, eh?) So when this lovely example (s/n 8379749) came up for sale, I went for it. It’s in very good shape, with nothing missing. The chrome slides and needle plate are pitted, and the ends of the bent wood top are pulling away, so I’ll likely try and re-glue that, but otherwise I think all everything needs is a nice cleaning. I’m actually happy that it at least needs that – it came from someone else’s collection, and it might have already been immaculate. That would have been disappointing. :-)
Of course the decals are all a bit faded, but they’re still very pretty, and none are completely worn off. The Singer name for this decal pattern is “Tapestry”, btw.


I wonder who wound this bobbin, and when?

Interestingly, Singer actually seems to have called this machine the
“V.S. Hand Machine”, and only used “V.S. No.3” for the treadle version.

The two do have different castings – the treadle version would not have been
cast with the protrusion from the side of the pillar to which the hand crank
mechanism is attached.

| updated November 2019 | [index] |
I finally let the VS3 come to the top of the “work queue”, and spent some time repairing the case and giving the old thing a thorough cleaning. It’s amazing the grunge that can come off an old machine.


Compare these before and after pictures of the same area:


The case came out really well. I had to re-glue the ends, which were mostly
falling off, and I had to replace one end of the little storage box. The
color’s not perfect, but it’s pretty good. I’d rather someone know it
was a repair.


Mrs. Potts’ Cold Handle Sad Iron
| written April 2019 | [index] [index by age] |
I’ve made plans to take my W&G hand crank machine with us in our van on our next longish vacation, in case I get bored and want to make something. Sewing sometimes involves ironing, so I decided I needed an “off grid” iron. And this appeared at a local estate sale.


Even if I never use it, I’ll chuckle at the notion of taking an iron on a camping trip! It’s only about 5” long, and has a detachable handle and heat shield. I don’t really know when it was made – probably in the 1920s or 30s? An iron this size would have been for collars, lace, etc. Not bed sheets!
The name “sad iron” (or “sadiron”) apparently comes from an archaic
use of “sad”, which meant “solid”. The detachable handle was
patented in 1871 by an inventor (she called herself an
“inventress”) from Iowa named Mary Potts. The removeable handle
meant that the handle remained cool while the base was heating on the
stove. Staying cool also meant the handles could be made of more
varied materials than before (like wood), since they stay near hot
stove. She also patented a new construction for the base
itself. Rather than making it from solid iron, which led to a heavy,
very hot iron, she made the base hollow, and filled it with a heat
insulator like cement or clay. This caused more heat to be directed
downward, away from the user’s hand. Finally, her irons were
double-pointed, and could be used in either orientation.

Reattaching a loose bobbin end
| written April 2019 ... | [index] [index by age] |
Sometimes one of the ends of a long bobbin comes loose. The brass ends are simply press-fit onto the shaft. Glue might work to keep the end in place, but since it wasn’t glued to begin with I’d personally prefer to fix it without.
I had a New Home bobbin that had this problem – here’s what I did:
I took the loose brass end, and set it on a solid chunk of steel that wasn’t going to move when I hit it. I set the brass piece down curved side up. I happen to have a nice heavy piece of smooth steel bar handy at my workbench, but the flat end of my vise, or an anvil, or really anything solid would do. A concrete floor would probably work, but you don’t want to damage the brass end against it. Smooth steel seems best, to me.

Then I took a large drift, set its working end on the brass piece, and tapped the other end with a hammer. I used a small tack hammer, and didn’t hit the drift very hard – you can always hit it again, but it’s hard to take it back if you hit too hard! The goal is to deform the brass just enough to make the hole not fit the shaft anymore. (Probably what’s actually happening is that the very edges of the hole on the curved side of the end cap are being peened over into the hole a bit.)

Sure enough, after smacking the brass piece just once between the drift and the steel slab, it no longer fit easily onto the shaft – I could press it on just a bit by hand, but it jammed up nicely very quickly and wouldn’t go further.
So, to get the brass end the rest of the way on: I rummaged in my junk box(es) and found a thick brass washer , with a hole larger than the bobbin shaft but quite a bit smaller than the brass bobbin end. The washer was thicker than the eventual protrusion of the bobbin shaft from the bobbin end – a brass nut would have worked as well, and been easier to find. Lots of things would work – basically any piece of steel or brass with a hole in it.

I centered the bobbin end (the one I just partially pressed on) on the hole in my washer, and used my small hammer to tap on the other end of the shaft to drive the shaft through the too-tight bobbin end. I was careful not to go too far – I went just far enough to make the two ends of the bobbin symmetric. It only took a few taps of the hammer.
I now can’t budge it by hand – it’s on there good and tight. And all without even unwinding the bobbin. :-)
A pilgrimage, of sorts, to Orange, MA
| written April 2019 | [index] [index by age] |
I live near Boston, so I get out to central Massachusetts fairly often.
One day, while en route home from a hike, I realized we were quite close to Orange, the town where the Johnson, Clark & Co. sewing machine companies all came from: Gold Medal, Home, and New Home. I have two New Home machines, and I’d read that the original buildings were still there. So we made a short detour, and I took a few photos.
[Update – in 2021, I now have seven from these companies: a “New Ideal”, a “New National”, a “New Avon”, and a “Midget” all from New Home, plus an eponymous chain stitcher from Gold Medal, a Gold Medal “Home”, and a “Home Shuttle” from Johnson, Clark & Co.]


The pictures above are all of the same building featured in the foreground of these renditions of the New Home complex, some of which I downloaded from a local museum dedicated to industry in the area, and the other two came from needlebar.org. I just love that the building is still there. It’s entirely possible that my Home machine was made right there in the early to mid 1870s.


It’s interesting that the facade of the building I photographed is rendered slightly differently in all three of these images! (but see below)
| updated August 2019 | [index] |
There’s a very complete article on the history of New Home on the ISMACS website. I read it quite a long time ago, but I guess I only skimmed the sections discussing the buildings themselves. It seems that the original building on the south side of the river was destroyed by fire and replaced by 1901. Also, “[t]he old original shop, in which the manufacture of sewing machines was begun in the early sixties, was demolished in 1903” , and it was replaced by a new four-story building. It’s unclear (to me) where that original shop was. Regardless, it seems impossible that my Home machine might have been built in one of the still standing buildings. Oh well!
I’ve also recently found a page of photos on the NeedleBar site. These show more clearly than my pictures that the buildings standing today are the ones depicted in the rightmost historic drawing, above. The other two drawings are more similar to one another, and presumably show the 19th century buildings.
| updated November 2019 | [index] |
I’ve found some more historical maps and photos of Orange.
The two “birds eye” maps are interesting because the one from 1878 shows
Gold Medal occupying just one building on the north side of the river,
whereas just 5 years later, the 1883 map shows New Home occupying a huge
complex of buildings on both sides.


By default my blog resizes large images. Since these have so much detail, the full resolution versions can be found here (1878) and here (1883), or at the Digital Commonwealth collection where I found them: here. and here.
I also found this neat company photo from 1871, which would make
it a Gold Medal picture, and not New Home as labeled in the image.
 The full size version of that can also be found here, at Digital Commonwealth.
| updated June 5 2022 | [index] |
Sadly, the largest building of the former New Home factory complex
burned down yesterday. (No major injuries, cause unknown.) The long
mill building was situated along the river, just behind the building
with the white window frames in my photo above. Twenty fire
departments responded to the blaze. The building in my photo also
caught fire, but seems to have only been damaged. (Photos are
screenshots from local news sources.)


1921 Singer Model 15-30
| written April 2019 ... | [index] [index by age] |

I already have a 15-30 head with Tiffany/Gingerbread decals – my brother-in-law rescued it from a scrap metal pile. It’s in pretty good shape, given that history, but it has a lot of scratches, the decals are worn, and they’ve lost most of their color accents. And because it’s from 1906, it has no motor boss. This means I can’t really make it sew, since I’m unwilling to give it a treadle.
So I took notice when this 1921 portable showed up on Facebook Marketplace. They wanted $25, and it looked to be in really good shape. An hour before I was going to go pick it up, they called and apologized profusely, because they’d dropped it! It seems the case hadn’t been latched properly, and they claimed that it was now “garbage”. I was skeptical, and asked what was damaged, and they said they’d simply give it to me if I was still interested.
So I drove over and got it. Sure enough, I was right to be skeptical: the base of the case was broken just a bit at the glue joints, the foot controller had popped open (but no parts were lost), and the light had come loose, but it tightened back up. There was no damage done to the paint or decals that I could find. Did I mention that all it needed was some thread and oil to start sewing perfectly? And it was free! (s/n G8954866)


| updated October 2019 | [index] |
I made a display base for it, to better show it off, since it’s
awfully pretty. These Tiffany decals really are among the prettiest
that Singer ever used. But you do sort of have to wonder why they
couldn’t put them on straight. The border in the first picture isn’t
parallel to the edge of the machine, and the decal in the second photo
should surely be centered on the medallion, right? Maybe it was made
on a Friday afternoon, or a Monday morning.


1920-1940 Müller Model 12C Toy Chain Stitch
(Gone! No longer mine.)
| written July 2019 ... | [index] [index by age] |

I found this German toy machine while we were visiting with Julia’s parents on the New Jersey shore. It was listed by a collector/dealer in Manahawkin, the next town over, so I went and took a look.
Like most toy machines, it’s a Gibbs-style chain stitcher. It’s not an important or valuable machine, but it’s awfully cute! And, being German, it’s very well made for a toy – even including some brass components. (The Singer Model 20 is very cheaply made by comparison.) The Müller company (also spelled “Mueller”, and, of course, “Muller”) was founded in Berlin, in 1868, by Friedrich W. Müller. (Not to be confused with Clemens Müller, whose company made “adult” sewing machines.) They also made much simpler machines, with stamped steel bodies, but this model is one of their largest, and almost of “adult” quality.
The arrangement of the tensioner on this Model 12, with the tensioner mounted in the usual vertical position, identifies it as a 12C, according to pictures in Manfred and Rita Koym’s book about Müller’s toy sewing machines. (The other models all have the plates mounted horizontally, or else have tension applied directly to the spool.) The 12C was made between 1918 and 1945, but it’s very unlikely it was exported during that full span, given the wars going on at the time. So I’ve rounded the likely age range to 1920 to 1940.
Identifying marks: The stitch plate (after several layers of rust were removed) shows the serial number as “No.53294”. The stitch plate also has the lettering “MADE IN” along one edge, but the next word (which would have been “GERMANY”, of course) has been roughly scratched out – presumably an act of patriotism (or fear of reprisal, if perhaps the owner had immigrated from Germany). Finally, on the hand wheel, one spoke has the digit ‘5’, and the next has the letter ‘G’, in a slightly larger typeface.
It’s mostly complete, as far as I can tell. It’s missing the retainer thumb nut from the top of the spool pin, and also the tin tray that would have been exposed when the machine is tilted back. Oh – and there’s no needle. (Anyone know what size it takes? Edit: it takes the same needle as a Willcox & Gibbs) The condition is a bit rough, but I’ve already gotten things freed up enough that I’m confident it could sew before long.


| [ a few days pass ] | [index] |
After taking it apart to clean it, I couldn’t resist this picture:

And with it all back together, it looks pretty good.


It didn’t take long to get it to sew nicely.
The presser foot lift is interesting. To lift the foot, one
simply pulls, then rotates, and the foot is locked in the upper
position. Until you bump it by mistake, then it falls down again. :-)

There is one thing wrong with it. Perhaps there’s a piece missing from up inside the needle bar, which should act as a needle stop. If I do what my manual (in German language, kindly sent to me by Rita Koym) says, and push the needle all the way in, then the needle’s way too high. It will barely protrude below the cloth plate when the needlebar is all the way down.
[Edited 01/2024: An internet acquaintance translated the manual into English. Thanks!]
Someone (who owns a clearly well-maintained model) has told me that their machine has a proper needle stop. So I guess there’s something wrong with my needle bar. On my machine, I’d say that the correct needle height is set with the needle bar fully raised, and presser foot down. In those conditions, the needle should be above the presser foot by about the thickness of a dime, maybe a skootch more. So, say, 1.35 to 1.5mm. Since the feed dogs are in their raised position when the needle bar is at its highest, this measurement depends on the feed dogs being adjusted like mine, which might be a bit taller than normal – someone put some thin shims under the dogs, and I’ve left them there after reassembly. (This very low needle position is, I suspect, a safety feature to keep tiny fingers from being stabbed.)
| updated January, 2022 | [index] |

 The Müller found a new home. It’s awfully cute – I’ll bet they’ll
enjoy having it. It’s a nice looking machine, despite the compromised
paint.
The Müller found a new home. It’s awfully cute – I’ll bet they’ll
enjoy having it. It’s a nice looking machine, despite the compromised
paint.


A visit to the Orange Historical Society
| written August 2019 ... | [index] [index by age] |
My Gold Medal Home was the predecessor to the first New Home machines. It was designed by Stephen French, who worked initially with Thomas White (of the White S.M.Co.) building New England-style machines. After White moved to the midwest, French joined the folks forming Gold Medal in 1868. While there, he designed the Home Shuttle and the Home in 1870. A “New Home” machine first came out in 1877, and the company name changed to match in 1882. (Most of the preceding is based on info from the ISMACS site.)
Before today I’d only heard of two other machines like my “Home”, and had only ever found one picture of a Home on the internet. So I don’t think there are very many of them. It occurred to me that I should try and find more examples.
So, New Home, and Gold Medal before it, were based in Orange
Massachusetts, which is just 1-1/4 hours away from where I live, and
in fact, I’ve visited. And
Orange, like many small towns, has a local history museum. The one in
Orange is housed in Stephen French’s original rambling house – in
 fact, 5 generations of his family lived there, before it was sold
cheaply to the town to house the
Orange Historical Society.
So I paid them a visit!
fact, 5 generations of his family lived there, before it was sold
cheaply to the town to house the
Orange Historical Society.
So I paid them a visit!
It’s a big house – at least 15 rooms filled with their historic collection, plus the three stories in the attached barn. They have all of the usual small town stuff: instruments and bass drums and uniforms from every town marching band, and souvenirs from the local manufacturers of violins, Minute Tapioca, sluice gates (!). Old implements of all sorts, paintings by local artists, old photos, you name it, they have it. The sons of William Grout, one of the Gold Medal / New Home founders, went on to manufacture steam-powered automobiles, and the museum has 3 of them. They also have all of the historic artifacts from the local fire department, including a pump wagon. It’s a big, eclectic, collection.
I was getting worried, because it was taking the tour so long to get
to them, but of course there are also sewing machines. Many of their


 machines are quite lovely, and in very good condition. Sadly, in
amongst all of the other stuff in the house, they get short shrift, in
my (biased!) opinion. I counted almost 20 machines, all housed in a
space that was a sort of hallway, and the display conditions were
sub-par – they’re being preserved, but barely. The Historic Society
badly needs a sewing machine enthusiast to do some caretaking. :-/
machines are quite lovely, and in very good condition. Sadly, in
amongst all of the other stuff in the house, they get short shrift, in
my (biased!) opinion. I counted almost 20 machines, all housed in a
space that was a sort of hallway, and the display conditions were
sub-par – they’re being preserved, but barely. The Historic Society
badly needs a sewing machine enthusiast to do some caretaking. :-/
And, in among those machines, they had a Home (first two pictures), like mine! I suppose I shouldn’t be too surprised. So I now know of four Homes, and have seen two of them.
They do have a nice set of old machines. I recognized quite a few New England style machines, a couple of Home Shuttle machines, a Gold Medal chain stitcher or two (I’ve since gotten my own own), and of course several New Homes. They also had a pretty New Home badged as “Wheeler A”, which I suspect was named after John Wheeler, one of the New Home principals, or a descendent. He’s unrelated to the Wheeler of “… and Wilson”, as far as I know.
I think it’s fantastic that these machines, and all of their other holdings, are being preserved, even if it’s not that accessible (it would be great to be able to stop and study things, without holding up your guide), or well cataloged (the sewing machines, for instance, didn’t even have visible name tags). The Orange Historical Society has existed for perhaps 100 years, so they have a rich collection, and I’m sure folks from the area are thrilled that so much local history is being held onto.
1877 Singer Model 12
(Gone! No longer mine.)
| written August 2019 ... | [index] [index by age] |

I already have an earlier variant of this machine, an 1871 New Family, so I wouldn’t normally have gotten this 1877 (s/n 2603641), which is arguably not as nice. But it was free – what can I say? Someone on Facebook was moving, and needed it gone. I was happy to help. The case needs some refinishing work of some sort, and the treadle irons are a bit rusty, but the machine itself is remarkably clean, both outside and in. Plus, it came with some doodads in one of the drawers: needles, binding attachments, extra presser feet.


And, as an added bonus: the assembly number is still present, in 142
year old handwriting, on the inside of the rear access cover.

| updated August 2019 | [index] |
In the end, I decided I couldn’t/shouldn’t keep this machine, so I gave it to someone who could give it a better home.
1938 Singer Model 201-2
(Gone! No longer mine.)
| written September 2019 ... | [index] [index by age] |

I’ve regretted selling my previous 201-2 ever since it pulled out of the driveway, so when someone offered one up for free on a local mailing list, I went for it. (Just like the first one!) It came with drawers and boxes full of thread spools (including many wooden ones), unopened packages of needles, and a few accessories. Plus the usual old buttons and bits of ribbon.
It’s not as handsome as the last one, but it wears its pin-rash scarf with flair. (I call it that because when you use a cloth like that to store your pins and needles, you invariably scratch the paint underneath repeatedly, resulting in what’s known as “pin rash”.) Not sure what happened to the light – it’s been replaced with an aftermarket rear add-on. The machine came to me with a 1957 manual, though the machine itself is a 1938. The cabinet has a sticker under the top referencing a different machine’s serial number, from 1954. So clearly some swapping around has occurred.
The owner, who was cleaning out his mother’s house, said he remembered the machine being around since he was very young. That would have been around ‘57, the date on the manual, so maybe she bought it used, and the cabinet, lamp, and manual were all part of the package. Who knows.
Anyway, I plugged it in and gave it a whirl. Sounds lovely, just like a 201-2 should.


Oh, and he also had a nice old telephone. When I commented on it, he
asked if I’d like to have it. That was an easy decision.

| updated December 2019 | [index] |
I really didn’t have room for this 201, and I realized that if I want one again someday, I’ll be able to find a nicer one. So I’ve passed this one on. But I kept the phone.
c.1920 New Home “Midget”
(Gone! No longer mine.)
| written October 2019 ... | [index] [index by age] |

I bought three machines at once yesterday, picked from a batch of seven machines that was erroneously advertised as “Lot of 7 antique toy sewing machines”. They were certainly all antique, but only four were toys. The prices were right, so I bought all of the other three: a New Home Midget, a Willcox & Gibbs chain stitcher, and a Charles Raymond “New England” machine.

The New Home Midget (originally called the “Little Worker”, and also labeled by New Home as “Mothers Helper”, and “Baby Sheridan”) was marketed both for children and as a compact machine for adults. It might be considered a toy, except that unlike almost all toy machines, which have no bobbin and use a Gibbs-style rotating hook to form a chain stitch, this machine is a vibrating shuttle design, with its very own compact shuttle and bobbin. The build quality and the materials used were not up to New Home’s standards for their “real” machines, however.

The patents on the machine (USD41288/US1017262 from 1911/1912) are both held by Orville Kies, who along with Jennie Kies (his wife?) was a principle in the Knickerbocker Hand Sewing Machine Company from at least 1909 to 1919.
I’d love to have a better understanding of the relationship between
Knickerbocker and New Home, as well as who exactly built it. Sewalot
has an image of a slide plate embossed with “Knickerbocker Hand Sewing
Machine Co., New York. Pat’s Applied For”.
 This makes it sound like a) it’s an early machine (no patents yet),
and b) that it was made by someone other than New Home.
This makes it sound like a) it’s an early machine (no patents yet),
and b) that it was made by someone other than New Home.
I wonder if Kies/Knickerbocker sold the rights to their machine to New Home, knowing that they wouldn’t be able to compete with the “big boys” in terms of marketing and distribution. The Midget is a nice little machine, but it’s really not up to New Home’s normal standards. It’s a little clunky and loose by comparison, and just more cheaply made. It’s maybe telling that the “New Home” name doesn’t even always appear, anywhere, on a Midget.
But back to my machine: This electric version is a relative rarity – almost all of these machines were hand cranks. The cord on this one was melted badly – it clearly had a short circuit at some point. But after cutting off most of the melted/crumbling wire, and checking for short circuits, I hooked up some clip leads and the motor spins nicely.


The switch on the base was clearly added after the fact, since after all, there was already the factory-installed switch on the motor. To install it they cut through the nice original decal showing what size needle to use. (Sigh.) The installation was not done well. The wire passed through a hole drilled in the base, with no grommet. Not only was there no grommet, but the edges of the hole were never de-burred. I suspect this is why the cord shorted and melted. When I replaced the wire from the motor I bypassed the add-on switch altogether.
It turns out that for some reason, New Home equipped this machine with an AC motor whose speed can’t be controlled by a standard sewing machine controller. So when you turn it on, it will (attempt to) run at full speed until you turn it off. The only saving grace is that the motor isn’t all that strong, so the machine gathers speed slowly. Turning it off is also a bit of an adventure, since the rotary switch on the motor is right next to the friction drive wheel – very easy to grab the wrong “knob”!
I suspect hand cranking this machine would be a far more pleasant experience. I’ll have to see about fabricating a crank arm.
| [ a few more days pass ] | [index] |
While cleaning the Midget, I realized that this machine is perfect for demonstrating how a VS (vibrating shuttle) sewing machine works. The cloth plate can be removed independently of the needle plate, leaving the sewing action completely exposed and operational.
I filmed this in slow motion, and you might want to slow it further, or even move the video cursor manually with your mouse, when watching it:
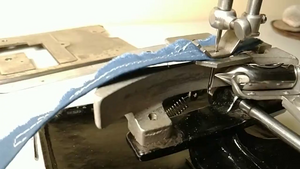
Also available on youtube.
You can see how the needle, after first forming the initial small loop that the shuttle’s point will hit, does another small dip in order to provide more thread – this is to make the loop big enough for the shuttle to easily pass through.
| updated November 2019 | [index] |
I actually got around to making a crank arm for the Midget. Using steel was probably beyond my meager metal working tools (and skills!), so I used aluminum instead.
To form the D-hole needed by the shape of end of the crank axle, I drilled some small holes to outline the shape, and then one larger hole to take out most of the material in the middle (not pictured). A hand file did the rest. I confess to some high tech: I used a CAD program to figure out where the holes should be drilled, and fed that to my small CNC machine to mark their locations. I don’t have the right cutter for the CNC to actually do the drilling, so that was done by hand.


The round plastic knob came from the hardware store. The thought of using a plastic part on an all-metal machine doesn’t feel quite right, so I try to think of it as a modern form of Bakelite instead. ;-) When I drilled it, it actually machined a little like Bakelite, so I might not be far off. Maybe someday I’ll try turning a more authentic handle on my wood lathe, but the round ball fits well on the Midget, I think. Plus, my wood turning skills are even more meager than my metal-working skills.


| updated January, 2022 | [index] |

 In a fit of “thinning the herd”, I re-homed the Midget. It’s a little
new for my collection, and I didn’t enjoy using it, and I realized it was time.
Toy machines aren’t really my thing, though they are cute!
In a fit of “thinning the herd”, I re-homed the Midget. It’s a little
new for my collection, and I didn’t enjoy using it, and I realized it was time.
Toy machines aren’t really my thing, though they are cute!

1875 Willcox & Gibbs Automatic Silent Sewing Machine
| written October 2019 ... | [index] [index by age] |

If the price hadn’t been so low, I probably wouldn’t have bought this, since I already have several W&G chain stitchers, and in the seller’s photos I’d seen it looked like it was probably made in the teens or 20s. But when I got it home I realized that despite its excellent, clean, condition, it actually dates from 1875. That’s the year in which the automatic tensioner mechanism was introduced. From then, until production ceased sometime around 1940, the design was virtually unchanged.


In the end, its home is on the 1893 treadle I bought a while back.

c.1861 Charles Raymond (no.2)
| written October 2019 ... | [index] [index by age] |

The folks who sold me this as a “toy” can be forgiven, because “New England” style machines are often mistaken for toys. They really are very small. But they were made for and sold to adults. I already have one, from around 1860, and this machine is very similar, but far more complete. It does show incremental design changes. The tension mechanism has been revised, to avoid the wear that the initial version caused to the faceplate of the machine, and probably also to make the adjustment more stable. The metal castings changed somewhat as well.
Updated March 2024: I’ve since gotten a second first-model Charles Raymond, which unlike the one mentioned above, is absolutely complete, even moreso than this 1861 model.
Not only does this machine have almost all of its parts, but it also still has some of its original hand-painted artwork. I’m hoping it will clean up nicely.


With a little oil applied, the decoration becomes a little more clear:


| updated November 2019 | [index] |
I’ve now cleaned this Raymond up, as well as my Gold Medal chain stitcher (in a later blog entry), so I’m getting pretty good at setting the timing on Raymond-style loopers. They all work with 15x1 needles, which is very convenient.
This machine suffered a fall at some point, or maybe a couple of them. The bolt that acts as the axle for the crank wheel is quite bent, so the wheel sits at a tilt when installed. Happily, it doesn’t affect its cranking ability – the axle doesn’t turn, so the wheel is tilted but doesn’t wobble.
In addition, the brass ‘L’ bracket that holds the spool is both bent
and twisted.

Mostly this would just be an aesthetic issue, but it
also causes the vertical lever that applies clamping to the spool to
not make contact with the little roller mounted on the machine’s
frame. The lever does, however, make contact with the head of the
screw that holds that roller in place, and that seems to be enough to
give the intended braking action.

The lever and roller are described in detail in Raymond’s
hot-off-the-presses patent, so its a shame mine don’t quite work as
intended. The patent is US patent 32925, issued July 30,
1861 – it’s stamped on the machine’s needle plate. The patent covers
aspects of the design and adjustability of the looper which are new
with this machine.


BTW – the appearance of that patent date on the needle plate gives an “earliest” date of manufacture. Since Raymond moved his operations to Canada in late 1862, that effectively gives a “latest” date. So (I think) this machine was made in 1861/62.
I love reading old patents – here’s how it describes what that lever and roller accomplish when they put the brakes on the spool: ”…[the roller presses] back the lever, and so to force [it] against the cone in such manner as to prevent the turning of the said spool and drawing off of anymore thread during the completion of the descent of the needle, by which means the needle in completing its descent is made to draw up the loop so near the cloth that the looper cannot interfere with it in its advance to form the next loop. The loop is not, however, drawn up tight by this operation, but is tightened by the next upward movement of the needle.” Oddly, after all the description (I only quoted about a quarter of it), the closing paragraph of the patent doesn’t actually list that lever and roller as one of the claims of the patent. Perhaps I don’t understand patent-speak properly, or maybe Raymond was just establishing prior art for some reason. Or maybe he decided to drop the claim at the last minute.


The machine was missing the thumb nut, spring, and small brass cone that hold the spool on. I was able make a cone on my lathe, and I “borrowed” the thumb nut from the stitch length adjuster, where it serves as a locknut. From pictures of fully intact machines, that thumb nut is identical to the one that was lost. The spring, I confess, is just from my junk bin.
c.1955 Dexter Sewing Machine
(Gone! No longer mine.)
| written November 2019 ... | [index] [index by age] |

I went to an estate sale today, and came home with two sewing machines. One is (at least relatively) sublime, and this one is ridiculous, and only cost me $2.
Made by the Dexter Sewing Machine Company in the 1950s and 1960s (from what I’ve been able to find), this little hand stitcher sews a simple chain stitch. The little spring on the side of the hook is what hangs onto the loop until the needle can pass through it on its next pass. Feeding the cloth for each stitch is a very manual operation. There are later models with a stitch selector on the tension knob, sold as a “hemmer and stitcher”. Those came in a box with a bigger instruction booklet. This one is definitely an earlier model.


| updated December 2019 | [index] |
Well, the joke is that this little thing works seamlessly, because
I can’t get it to sew a seam. But that’s not quite true: I can
get it to go in a straight line, very briefly.

Here are a few pages from the manual, to show how capable this little
wonder really is! (Actually, I’ve heard from two different folks
that they sewed quite a bit with one of these in their younger years.
So I guess it’s possible!)


And since it’s a chain stitcher, and I seem to like filming how chain stitchers work, here’s a video. You can see how the little spring on the side of the hook holds the loop, until thread tension pulls it off.
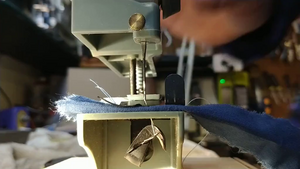
Also available on youtube.
| updated September, 2020 | [index] |
This little thing was never more that a curiosity for me, so when the Facebook Willcox & Gibbs group owner organized a raffle drawing (because the group reached 1000 members), I was happy to donate it as one of the prizes. I was the only one to contribute an entire sewing machine. ;-) I hope its new owner is as amused by it as I was!
c.1870 Gold Medal “Common Sense” Sewing Machine
| written November 2019 ... | [index] [index by age] |

This machine was the reason for my visit to today’s estate sale. It was made by Gold Medal, the same company that made my Gold Medal Home, in Orange, Massachusetts. This chain stitcher is an earlier design. It’s is usually just called a “Gold Medal”. Edit: But it turns out it’s more properly called the “Improved Common Sense”, or perhaps just “Common Sense”. Its hook mechanism is much like that of my Charles Raymond machines, but it has traditional feed dogs, and a presser foot that swings out of the way like my toy Müller 12. The serial number is 4653.
It’s missing the tensioner parts – which I assume should be spring-loaded disks, or maybe a pulley style tension wheel. Other than that it seems to be complete. Oh – it might have the wrong needle currently – it seems too long. I’m not sure what needle it should take.


| [ a day passes ] | [index] |
It turns out that after setting the timing correctly, the needle that came with the machine is the right one. That’s good, because it would be hard to find another, I think. It was bent, but I managed to straighten it well enough. (I’ve since found that a 15x1 needle also works fine, as with my similar Raymond “New England” machines.)
I also figured out how the presser foot lifter is supposed to work. I had assumed that it worked like my Müller, and that the presser foot was to be lifted and rotated in order to lock it in the raised position:
The problem is that unlike the Müller, this machine has no slot in the side of the presser foot, and because it rises higher than the point of the needle before it can be rotated, it can’t, in fact, be rotated if there’s a needle in the machine.
I found the answer by searching the internet for other pictures of
machines like this. I found one, and much to my surprise, it was a
picture that I had taken! It was from my visit
to the Orange Massachusetts Historic Society. I won’t duplicate the
original photo here, but in this cropped closeup of the lifter, you
can see a small pin under the cap nut on top of the presser foot bar:
 That pin is missing on my machine.
These pictures tell the rest of the story. First, see that little
hole to the left of the presser bar, on top of the machine?

There should be a mating pin in the bottom of the cap nut – you can
see where mine is broken off here, after the cap nut has been cleaned:

Normally the pin is aligned with the hole in the machine, and the presser foot can go the whole way down. After lifting the cap nut and unscrewing it a bit, the pin will keep the presser foot in the raised position.
I think I can either drill out the remains of the original pin, or simply drill a new hole, and get it all working again.
| [ a few more days pass ] | [index] |
Well, I really wanted to see this thing sew before taking it apart for cleaning. So, armed with some pictures of a couple of complete and properly configured machines (sent by new friends on the Treadleon and ISMACS mailing lists), I made a prototype tensioner.
The first picture is of an original tensioner.

And then my… well, let’s just call it a “rough draft”:


The pulley came from the hardware store. The “nut” is a piece of plastic that I was able to thread on to the shaft – that shaft is 5/32” in diameter, threaded at 28 tpi. I’ll never find a “real” nut to fit it, let alone two matching knurled brass thumb nuts like the originals.
At first I couldn’t get enough tension out of my contrivance. If I tightened the nut too far, the pulley would simply stop, the thread would start slipping, and I’d be left with loose loops of thread on the underside of the cloth. I tried various methods to get enough “traction” on the pulley so that the thread wouldn’t simply slip – I tried making it sticky with hair spray, and candle wax, but in the end, the answer seems to be to wrap the thread on the pulley multiple times. Once I did that, the thread had enough traction, the tension tightened up, and the machine sewed fine.
| [ another day or two... ] | [index] |
I finished making a “real” replacement tension mechanism. I still haven’t repaired the presser foot lift pin – I’ll leave that for another day. It looks pretty good all cleaned up. (See the first picture, above, as well.) Edit: Since these pictures were taken, I’ve replaced the black plastic pseudo nut with a nice brass knurled version.


| updated January 2023 | [index] |
I learned something new the other day! And I’ve already used the knowledge to update the title of this blog section. This little octagonal machine really did have a name! I’d just been calling it “the Gold Medal chain stitcher”, because I’d never seen any kind of marketing from the company to tie it to a model name. But a post by Mike Anderson on his Wolfegang’s Collectibles Facebook page changed all that. He showed a machine just like mine (except complete, and in far better condition – like all of the machines he shows us), and he included pictures of a marketing/manual leaflet! It’s officially “The Improved Common Sense Family Sewing Machine”. And it cost $18, sometime in the early 1870s.


c.1900 Biesolt & Locke “Wettina”
(Gone! No longer mine.)
| written December 2019 ... | [index] [index by age] |

 I’m not sure why I bought this – it’s in far worse condition than I
usually let myself get involved with. But it’s quite old, German, and
it was dirt cheap (as you might imagine!). [ Don’t look at the picture
above – that’s after it was cleaned up. Look at the next photo
instead! ]
I’m not sure why I bought this – it’s in far worse condition than I
usually let myself get involved with. But it’s quite old, German, and
it was dirt cheap (as you might imagine!). [ Don’t look at the picture
above – that’s after it was cleaned up. Look at the next photo
instead! ]
It’s missing some parts, the bobbin winder has been replaced, it’s all pretty rusty, and both its base (original) and the Singer bentwood top that it came with are in terrible shape. It does have a shuttle and bobbin, and the machine does turn over, albeit grudgingly. Another redeeming feature: it can sew in reverse, which is a bit unusual in such an old machine. (My next-oldest machine with reverse is my 201-2, first produced in 1935.)


I’m not sure what I’m going to do with it. It’s unlikely to ever be displayed in the living room, to say the least. But if nothing else, I’ve rescued its shuttle and bobbin, and perhaps other parts someone will want someday.
[ next day ]
Amazing what can be accomplished with a wire wheel, some steel wool, a little Evapo-rust, and some Howard’s Restor-a-Finish. It’s still no beauty queen, but it can sew, and I’m no longer afraid to touch it for fear of getting filthy. It now just looks abused, instead of extremely abused. I may still part it out.


That last picture shows both forward and reverse stitches. The length of the forward and reverse stitches are synchronized. Stitch length is adjusted by the lever near the hand wheel, and is indicated by the pointer on the pulley guard. There’s a detent in the pulley guard to indicate “neutral” – where the feed dogs are stationary, and originally there would have been decals that indicated ‘R’ (for “rückwärts”/backwards) and ‘V’ (for “vorne”/forwards). There’s a thumbscrew on the rear that lets you set the maximum lever travel for both forward and reverse.


| updated just two weeks after buying | [index] |
It did clean up nicely. But I decided that while I could maybe use this machine as a further exercise in learning to strip and repaint a machine, even if it came out well (unlikely!), it would still just be a poor cousin to my lovely VS3. So I passed the Wettina on to a new owner, who seemed pleased.
Biesolt & Lock automatic tension release
| written December 2019 | [index] |
I love this aspect of sewing machine collecting – discovering small technical advances, and thinking about the designer/engineer/mechanic that created them.
The Biesolt & Locke Wettina hand crank is clearly a copy of a Singer VS3 or 28. (I have a VS3.) In particular, the tensioner setup is identical – the disks sit behind a longer plate which has a locating finger at the top (which goes through a hole in the body) and a thumb-press area at the bottom. Pressing on the bottom end of the plate rocks it a bit, and accomplishes the manual tension release.
Here are pictures of the two machines, my VS3 first, and then the B&L:


Behind the faceplates, things are similarly identical, but for one small part. Again, the VS3 photo is first:

The next two photos show the B&L, first with its presser foot down, and then with the presser foot raised up.


You can see the extra arm of bent wire on the B&L. When the presser foot is raised, the inner edge of presser foot lift lever (barely visible behind the bottom of the presser foot bar) pushes against that piece of bent wire, and, rocking on its pivot in a hole in the casting, it in turn pushes on the locating finger of the tension assembly. And that, of course, releases tension on the disks.
So basically, by drilling one hole in the casting, and bending up a coat hanger (that’s what it looks like!) to act as a tension release arm, B&L were able to very simply add a very desirable feature to their machine. Clever! It’s so simple that it might even have been introduced after the initial release of the model. (Singer added a tension release mechanism, implemented differently, when they came out with the 127/128 machines.)

1926-1950 Singer Model 20 Toy Chain Stitcher (no.2)
(Gone! No longer mine.)
| written December 2019 ... | [index] [index by age] |

This Model 20 was given to me by a good friend – it had belonged to her aunt as a child. It’s in very good condition, with just some light surface rust which will likely clean up nicely. There are no serial numbers on these machines, so it’s hard to date exactly. The Model 20 from 1910 to 1950, but various changes were made over time. In particular, this one is stamped with numbers to make threading easier. That puts it at least at 1926.
Before cleaning:


And, a week or so later, after cleaning:


c.1864 Willcox & Gibbs w/ glass tension
| written in very late December 2019 ... | [index] [index by age] |

I’ve always figured that eventually I’d find a glass-tension W&G machine (which were made before 1875) someday. These two poor photos of a forlorn machine enticed me to drive much too far (9 hours round trip!), in order to give it a proper home:


Okay, I did get a few more pictures from the seller before setting out, but they weren’t much better!
I knew the machine was a Willcox & Gibbs, and that it was made sometime between 1858 and 1874. The rest of my W&G machines all have the “automatic tension” mechanism, which was introduced in 1875. Prior to that, the thread tensioner was of a relatively common design, with the thread passing between two spring-loaded disks. Those disks are usually made from polished steel, but on these machines, they were made from glass.
I could tell from the seller’s other photos that the glass disks were intact, and that the machine looked to be complete, if a bit (understatement!) rusty. And it was on what was clearly its original treadle base. When I finally saw the machine in person, I was more than happy to see its serial number (46119) which places it in 1861. Edit: However, the cloth plate bears (and “bares”, after all the rust is removed) a “last patent” date of March, 1864, which makes the claim it was made that year somewhat suspicious. So (with regret!) I’m calling it “c.1864” instead.

There’s a fair amount of surface rust, especially on the cloth plate, where
it’s pretty thick. But the machine turns over, sluggishly.


Plus, it looks like someone painted it. Maybe a couple of times, since
there are two layers chipping off. Maybe the paint helped protect it
from rusting? Hey, always looking for a silver lining! They even painted
the glass disks.


Happily, the treadle escaped the repainting. Both the irons (including the wooden pitman) and the table top are in pretty good shape. The top is made from a single solid piece of wood. From the W&G sales brochures, it’s would have been black walnut or mahogany, and I’m thinking it’s the former. Sadly, the treadle’s drawer is missing. (I’m not surprised. Drawers always go missing for some reason.)


The only pieces missing (that I’ve noticed so far) are a) the treadle drawer, and b) the two screws that hold on the cloth plate. The good news is that the threading for those screws is the same as for newer machines, and I happen to have an extra pair. The bad news is that the newer screws won’t quite work: they have a flat body between the head and the threaded region. The old screws must be threaded the whole way up, because the female threads in the body come all the way to the top of the hole. The flat body of the screw keeps the screw from going all the way in. I can think of a couple of ways to fix this – just need to think about it some more.
| updated a few days later | [index] |
On the last day of 2019 I had a few hours to kill, so I finished up (the first pass of) the paint removal and cleaning. Since reassembling I’ve noticed a few more spots with paint that I missed – I guess I was in a hurry.
But it looks pretty good, especially if you compare to the “before” pictures above. This was all accomplished with Citristrip Gel paint remover, Evaporust, #0000 steel wool, a couple of different brass wire wheels, and some elbow grease.


The cloth plate even cleaned up enough to show a last patent date of March of
1864. The table in Grace Cooper’s book says this serial number was built in
1861, but the table is only an approximation. It’s far more likely that this
was built in 1864 or 1865.

The paint on the machine isn’t great. I think there wasn’t much paint
left when someone primed and painted the whole thing (including all the
metal bits that I had to strip it from during cleaning). But, like
all my machines, “it is what it is”. It led a hard life, but it’s still
mostly whole, and I like it just fine like this.

Oh – Did I mention that it sews? That’s always the best feeling… :-)
| updated a week later | [index] |
The treadle irons were rustier than most I’ve had to deal with, but
most of the remaining paint was intact and solid. So repainting was
definitely not necessary, but I was still a little worried. I
dismantled these irons, the first time I’d done that on any machine.
That let me do some light brushing with a brass wire wheel and some
scrubbing in soap and hot water.

Then I took it all outside (sunny and 64 degrees in mid-January!?!),

where I cleaned a bit more with Orange Glo, and waxed with Howard’s Feed ‘n Wax.
 These comparison pictures show the left side waiting for those last two
steps, the other side finished. The wet gloss will fade a bit as the
wax dries. This sort of proves that repainting isn’t always the
necessary.
These comparison pictures show the left side waiting for those last two
steps, the other side finished. The wet gloss will fade a bit as the
wax dries. This sort of proves that repainting isn’t always the
necessary.


The treadle top responded really well to sanding (quite a bit of sanding – there were some deep stains) and Danish oil. It has some bad cupping (concave by about 1/4” in the center), but I don’t think there’s much I can do about that. There were some ancient cardboard shims under some of the screws when I disassembled, so I think it’s been cupped for a long time. That, and the existing splits in the wood, make me not want to stress it in any way.


Interestingly, it wasn’t until I got it all back together that I realized how small this thing is. Its treadle top is only 27-1/2” tall, which is 2-1/2” less than most of my other treadle bases. It’s also smaller in width and length than any of the others.
c.1874 Johnson, Clark & Co. Home Shuttle
| written in early February, 2020 ... | [index] [index by age] |

This nice little “Home Shuttle” sewing machine comes from the same folks that produced my Gold Medal chain stitcher and my Gold Medal Home, out in Orange, Massachusetts. In fact the Home Shuttle and the Home were both designed by Stephen French. (The Orange Massachusetts Historic Society, which I’ve visited, is housed in Stephen French’s former home.) It was made sometime between 1868, when French patented the design, and 1878, when the company switched to producing the first New Home machines. The Gold Medal Sewing Machine Co. and Johnson, Clark & Co. were very intertwined: incorporated separately, but comprised largely of the same individuals.
As its name implies, although small, this isn’t a chain stitch machine – it uses a proportionally sized shuttle and bobbin.
As an aside, French’s patent actually describes a machine whose shuttle moves front to back in a straight line (known as a “reciprocating shuttle” – if it went side to side it would be “transverse” shuttle). What they actually built was a machine where the shuttle travels in an arc, which is known as a “vibrating shuttle” machine. VS machines were relatively new at the time.
As a second aside, French’s original 1868 patent was reissued in 1880, in a much more rigorous form. By then, the earliest New Home machines were in production, and this model had been retired. But aspects covered by this patent show up in the Gold Medal Home, and perhaps also in the early New Home machines.
I’m still trying to figure out if this is an early or late machine. It has no serial number, which points to “early”, but most of these machines have a much simpler sheet metal faceplate, so that might indicate this is later. My theory (completely unfounded, as usual) is that they were experimenting with covered faceplate designs for the Dolly Varden model of the machine when they made mine. The serial number (and company name!) would normally have gone on the sheet metal faceplate, and they hadn’t yet made plans for moving it. So my machine, and probably others, went out without identification.
The mechanics seem fine, and the floral designs are very well preserved. The most obvious missing parts are the tension assembly (they were missing on the Gold Medal chain stitcher, too) and the crank axle bolt. The tension elements are relatively easy to recreate. The crank bolt might be a little harder. We’ll see.


| updated a week later | [index] |
Disassembly is always fun, and a little messy.


The cleanup went well, especially for the metal parts. They’re always relatively easy, but I’ve finally discovered the magic of using metal polish to get the last of the brown stains off of plain steel parts. I’d always thought that if steel wool wasn’t taking a stain off, that it just wasn’t coming, and was a permanent part of the finish. But I think what I’ve been doing is simply burnishing the tarnish (rust?) to a dull glow. I’ve used metal polish on brass parts before, but had never really tried it on steel. This time I tried it, and… Magic!
 (Getting that gear really clean exposed the poor quality of their
castings. Pits like that show up on some other pieces as well.)
(Getting that gear really clean exposed the poor quality of their
castings. Pits like that show up on some other pieces as well.)
Something else metal-related: sewing machine manuals always warn
about running a machine without cloth, with the presser foot down,
because “damage to the presser foot may result”. Now, I don’t do that
often, but I’ve never seen a hint of a problem. But clearly someone
did that quite a bit on this machine, and perhaps we’ve made some
advances in metallurgy in the last 150 years:

I mentioned that it was missing a hand crank axle bolt. I realized that that bolt is (or, should be) identical to the crank axle bolt on my Gold Medal chain stitcher. The two machines were made by the same folks, around the same time, so it’s not too surprising. That made it easy to verify all of the dimensions, including the thread diameter and pitch. And true to form, for a machine that’s 150 years old, it’s 21 threads per inch. Not a typo: 21. Not going to find that at the hardware store. [ Edit: I’ve since learned that I didn’t mis-type, but I did mismeasure. It’s actually 22 threads per inch. ]

Until I can find or make (?) a replacement, I need a way of holding the crank on. So I took advantage of the fact that a 1/4”-20 screw gets about 3 or 4 threads of purchase before binding up in the 21 tpi hole [ Edit: 22 tpi ], and made an ersatz shoulder bolt of the right length, using some aluminum tape to build it out to the right thickness (about 23/64”). It seems to work well enough.

Edited, March, 2024 At long last, I’ve been able to replace that that homemade “ersatz” screw with a proper homemade screw. It’s one of the new screws that I turned myself on a metal lathe.
After a full disassembly and cleaning and reassembly, the machine now looks like this:


I’m pleased. Next up is making a replacement for the tensioner, setting the timing, and making it sew!
| A couple of days pass... | [index] |
I’d read that the Home Shuttle takes a 12x1 needle, like my Singer New Family, and my Gold Medal Home – which was also designed by Stephen French, so it might have made sense. But the 12x1 didn’t fit at all (too slender), so I tried a 15x1, which works in a surprising number of machines that predate its development. That’s because they all really want a 20x1, which is the same, but just a little longer. This worked, by dropping the 15x1 a bit before tightening, and it does sew. But I think this machine didn’t take a 20x1 originally, because that’s a flat-sided needle, and the clamp screw on the Home Shuttle is on the front – so it doesn’t clamp on the flat, and in fact tends to make the needle twist a bit when you tighten it. So it must have been a round shank needle. I’ve tried a 126x3, and it works nicely, but still needs to be dropped before clamping. (This is the same needle used by the Wheeler and Wilson No.8, and by my 1871 American BHO.)
Threading the shuttle was exactly per the manual. Pictures attached. First you run the thread under the brass bar and out the hole behind, then back in, above it. That’s a lot easier than trying to feed it from underneath if they hadn’t provided the hole! Then you run it out the rearmost hole on the other side, in through another, and out through the central hole below the slot.


In a fit of impatience, I simply borrowed the tensioner that I’d made for the Gold Medal chain stitcher and put it on this one. And then I set the timing. The top shaft has a flat for the gear’s setscrew, so there’s no adjustment there. To adjust the needle/shuttle timing you loosen the lower gear, and you adjust the feed dog timing by loosening the cam at the other end of that shaft.
After iterating on the above a few times, it sews!

But it needed its own tensioner, so I took my raw materials, and made
 one. (Apparently the Home Shuttle was made with both disk and
pulley style tensioners. I know how to make the pulley style, so
that’s what this one gets!) The pulley was mounted to my drill press, and
the valley deepened with a round file. The threads on the shaft on
the machine are non-standard. By taking a modern thumb nut and
drilling out most of the threads, and then re-tapping to a different
size to further desecrate them, I was able to then force it onto the
mismatched shaft, where it’s now perfectly adequate for adjusting
tension. (If not the least bit authentic!) Suspending the shiny
new brass parts over some vinegar in a sealed container for a few
hours adds tarnish, and removes the “LOOK AT ME I’M BRAND NEW” shine.
one. (Apparently the Home Shuttle was made with both disk and
pulley style tensioners. I know how to make the pulley style, so
that’s what this one gets!) The pulley was mounted to my drill press, and
the valley deepened with a round file. The threads on the shaft on
the machine are non-standard. By taking a modern thumb nut and
drilling out most of the threads, and then re-tapping to a different
size to further desecrate them, I was able to then force it onto the
mismatched shaft, where it’s now perfectly adequate for adjusting
tension. (If not the least bit authentic!) Suspending the shiny
new brass parts over some vinegar in a sealed container for a few
hours adds tarnish, and removes the “LOOK AT ME I’M BRAND NEW” shine.


1887 Singer Automatic Chain Stitch Sewing Machine
(i.e., early Model 24)
| written February, 2020 ... | [index] [index by age] |

The Singer 24 is one of those machines that I knew I’d own someday. After all, they built it to compete with the Willcox and Gibbs chain stitchers, and I have 5 of those! Like the W&G, it had a long run: it was made from 1887 through to the early 1950s, and it was sold into both domestic and industrial markets. (It uses a Gibbs-style rotary hook to form a chain stitch – the Gibbs patent had long expired by 1887.)
A friend found this one for me in a thrift shop where he was shopping for axe heads. I guess we all have our collecting quirks. ;-) (Thanks Tom!!)


One curiousity of this particular machine is that the serial number is
in a different place than any other model 24 I’ve seen. The number is
usually on a raised area on the back of the pedestal. For days I
didn’t think it had a number at all, until I finally disassembled the
tensioner, and there it was, behind the wire thread guide.
 The serial number (7719128) dates it to 1887.
Another curiousity of the machine is that the tensioner itself is
different than any other machine I’ve seen. An internet friend sent
me images of her slightly younger 1887 model 24, and those pictures
confirmed that sometime in 1887 Singer a) moved the s/n to the rear of
the pedestal where it’s usually found, and b) changed the style of the
tensioner. It’s still automatic (some later machines were fully
manual, with a familiar thumbscrew and disks), but it’s different in
appearance than mine. It does retain the same screw and locknut
on the rocker arm in the rear, for adjusting the automatic tension.
Her machine looks like this page from an 1895 (I think) manual, except
that like mine, hers does not have the little window in the cloth
plate for the stitch length readout.

Given that it’s an early 24, you’d think it might be a 24-1. But every model identification guide I’ve found for the 24 says that the 24-1 has manual tension. While this machine is a lot like a 24-1 in most respects, it’s earlier than that – I have copies of manuals from 1890 and 1895, and neither mentions a model number – just “Automatic Chain Stitch Sewing Machine”. But I’ll probably still refer to it as a Model 24.
[ Edited January, 2022 ] This diagram is the only picture I’ve found
 that matches my machine. It’s a diagram from the 1893 “Columbian
Exposition” edition of the Singer catalog. It shows the rectangular
thread guide on the face plate, the round cap over the hex-shaped
tensioner body, and the stitch length scale under the cloth plate
(i.e., no little window), which are all different than any other early
machines, or pictures, that I’ve seen. My guess is that it’s an early
drawing, made before those design details changed, which was reused
for the catalog.
that matches my machine. It’s a diagram from the 1893 “Columbian
Exposition” edition of the Singer catalog. It shows the rectangular
thread guide on the face plate, the round cap over the hex-shaped
tensioner body, and the stitch length scale under the cloth plate
(i.e., no little window), which are all different than any other early
machines, or pictures, that I’ve seen. My guess is that it’s an early
drawing, made before those design details changed, which was reused
for the catalog.
 The machine has the usual patent date on its cloth plate. It’s only
partially legible, due to pitting from rust, but the web tells me
it reads April 13, 1886. That single date actually
represents two patents from the same inventor, both assigned to
Singer. US339623 is for the automatic/intermittent tensioner,
necessary for a good chain stitch, and US339624 is for the feed
mechanism, which is positively driven (no springs) in all four
directions of its motion. This is no doubt to allow for higher
speeds. (A manual I found for a slightly later variant of the model
24 says the machine shouldn’t be run faster than 2000 stitches per
minute. That’s pretty fast.)
The machine has the usual patent date on its cloth plate. It’s only
partially legible, due to pitting from rust, but the web tells me
it reads April 13, 1886. That single date actually
represents two patents from the same inventor, both assigned to
Singer. US339623 is for the automatic/intermittent tensioner,
necessary for a good chain stitch, and US339624 is for the feed
mechanism, which is positively driven (no springs) in all four
directions of its motion. This is no doubt to allow for higher
speeds. (A manual I found for a slightly later variant of the model
24 says the machine shouldn’t be run faster than 2000 stitches per
minute. That’s pretty fast.)


| updated a few days later | [index] |
It turns out it only takes three muffin trays to hold a Singer 24. It
all came apart nicely. One screw (one of the cone bearings for the upper
oscillating shaft) took some soaking in PB Blaster, and some warming up,
but it submitted in the end.

| and after another couple/few days... | [index] |
The Evaporust, and the ultrasonic cleaner (using Simple Green HD), and the Wrights polish have done their work yet again. Of course, in photography, lighting is everything. It doesn’t really look as good as this in real life. :-)


Even the underbelly is kind of shiny now…


I borrowed a 24x1 needle from one of my Model 20 toy machines, and after a bit of adjustment to the automatic tensioner, it sews nicely at all stitch lengths. I’m looking forward to sewing with it more than 1/3 of a stitch at a time, which is all I can muster turning the balance wheel by hand. I’m hoping to make an adapter board that will let me mount this machine on my Willcox and Gibbs treadle base.
Working on this machine, I’ve come to realize what’s really interesting about it, in a historical sense. In the Model 24, Singer pretty much copied Willcox & Gibbs wholesale – some model variants, later than mine, duplicate practically the whole W&G threading path, including the funky spring-loaded takeup post.
This copying is really sort of unusual. Singer was the Big Boy. In general they didn’t need to copy – everyone else copied them. They designed the Singer New Family in the 1860s, and there are still German clones to be found everywhere. They built the VS2/VS3/128 machines in the 1890s, and clones of those can be easily found. And their long-lived model 15 is probably the most copied machine ever.
So maybe they deserved the chance to leverage someone else’s engineering for the Model 24, for a change.
| ...and yet another couple of days go by... | [index] |
Making a machine sew by turning the balance wheel 1/3 of a stitch at a time is a little unsatisfying. Makes for a slow test seam!
I was planning on making use of my W&G treadle base, and making an adapter plate to go between the 24 and the treadle top, but then I realized that the belt angles were going to be such that even raising the machine just 3/4” would cause the belt to rub on the ends of the slot in the table.
So I went wandering around the house and realized that my Wheeler and Wilson No.8 treadle would work really well. Not only is the wheel on the outside of the leg, so the belt isn’t stuck behind the pitman when there’s no machine installed, but making an adapter base was trivial. I used a scrap of 1/2” plywood.
I’d read about using aquarium tubing or screen door spline as belts, but then found some Tygon (fuel/oil resistant) silicon tubing I bought for the chain oiler I built a few motorcycles ago. It’s perfect. I joined it with a short section of the threaded part of a nylon screw. The tubing was 1/4” O.D., 1/8” I.D., and the screw was probably a #8. And the tubing is lovely, don’t you think?


I had adjusted the tensioner the other day, and today the machine
sewed perfectly, on both long and short stitches.

It’s a little odd though: the needle, which isn’t bent, rubs on the side of the hole in the needle plate. And the feed dogs, which aren’t adjustable, hit the bottom of the cloth plate when they come up, and actually lift it a bit. I don’t think the cloth plate is bent, but perhaps its been tweaked a little. [ Edit February 2025 – in fact, the cloth plate was bent. I’ve been able to remove some of the bend, but not all. The feed dogs no longer hit the bottom, but they do still rub a bit on the edge of the opening in the plate. ] In any case, I won’t be doing much sewing with it – some of the cross-supports that define the holes for the feed dogs are broken and/or missing. Definitely don’t want to damage it further.
1877 Davis Low Arm Vertical Feed
(Gone! No longer mine.)
| written March, 2020 ... | [index] [index by age] |

I luckily spotted this Davis on FB Marketplace after it had been listed for a couple of days. I think if the ad had mentioned “Davis”, or if the lead picture had been of the machine, instead of the closed-up treadle cabinet, it might have been gone already. Though it’s hard to say, I guess. Antique sewing machines don’t exactly fly off the shelves!
The machine is in excellent shape.


It came with both drawers full of “stuff”. Happily, some of that “stuff” was original Davis attachments, and a packet of 8 new Davis needles! The rest of the “stuff” was an eclectic mix, as usual.

The woodwork is good, except for the finish, which is… challenged.
You can see that much of the shellac has failed. The large flat
surfaces will be relatively easy to strip and refinish, probably with
oil. The fussy details on the corners of the bonnet top will be a
nuisance.


 The irons are in excellent shape, including the fairly delicate and
complete (surprisingly!) bobbin winder. Some of the original painted
decoration is even still there.
The irons are in excellent shape, including the fairly delicate and
complete (surprisingly!) bobbin winder. Some of the original painted
decoration is even still there.


 The serial number of 89791 implies 1877. On the underside of that
slide plate W.H. Ohler from Portland, Maine stamped his name. And
below that, easier to read after I cleaned the crud off after taking
this picture, are the digits “79 3 27”. It’s likely that Mr.
Ohler either worked on or sold (more likely) this machine on March 27,
1879. I say this because there’s an announcement for his sewing
machine business in an 1872 edition of the Portland Daily Press!
The serial number of 89791 implies 1877. On the underside of that
slide plate W.H. Ohler from Portland, Maine stamped his name. And
below that, easier to read after I cleaned the crud off after taking
this picture, are the digits “79 3 27”. It’s likely that Mr.
Ohler either worked on or sold (more likely) this machine on March 27,
1879. I say this because there’s an announcement for his sewing
machine business in an 1872 edition of the Portland Daily Press!


 The decoration on the bed is interesting, in that it seems to be
inset, or recessed, into the japanning. It’s especially evident in
the center, where all of the colored paint (?) is gone, but you can
also see it a bit where it’s still present. I’ll have to research how
this might have been done – it clearly was done before, or at the same
time, as the japanning.
The decoration on the bed is interesting, in that it seems to be
inset, or recessed, into the japanning. It’s especially evident in
the center, where all of the colored paint (?) is gone, but you can
also see it a bit where it’s still present. I’ll have to research how
this might have been done – it clearly was done before, or at the same
time, as the japanning.

 Because of the walking foot design of the Davis “Vertical Feed” machines,
the undercarriage couldn’t be simpler. A vibrating shuttle at its simplest.
Because of the walking foot design of the Davis “Vertical Feed” machines,
the undercarriage couldn’t be simpler. A vibrating shuttle at its simplest.
| updated a week or so later | [index] |
The area behind the faceplate, though – whoa, that’s a lot of sliding stuff!


 Much of the machine was pretty clean, but some was really cruddy. This
hanger rod is a little hard to get to for cleaning, so I think it had been
accumulating crud for the machine’s entire lifetime. It all came off
though – see the part all shiny in the “exploded” parts picture, below.
Much of the machine was pretty clean, but some was really cruddy. This
hanger rod is a little hard to get to for cleaning, so I think it had been
accumulating crud for the machine’s entire lifetime. It all came off
though – see the part all shiny in the “exploded” parts picture, below.
 I polished the hand wheel, as I often do with these machines, by mounting
it on my drill press. A little steel wool and metal polish works wonders.
I polished the hand wheel, as I often do with these machines, by mounting
it on my drill press. A little steel wool and metal polish works wonders.
And here’s the obligatory “exploded view” picture.

It went back together pretty well. I had some trouble getting the stitch length adjuster adjusted (!), and had to jury rig things a bit to be able to run the machine with the faceplate off.

All cleaned up. Next (someday!) comes the cabinet.


And it sews! This little video captures the unusual movement of
the presser feet nicely.
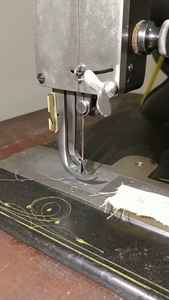
For (maybe just my?) future reference, the needle height is set by lining up a small score mark near the top of the needle bar with the top of the faceplate, while lining up the needle’s eye with the level of the throat plate.
Cleaning and refinishing the Davis treadle
| updated at the tail end of April | [index] |
All that was left was the treadle stand – both the irons and woodwork.
The irons cleaned up quickly – as usual, I just used Orange Glo furniture cleaner, and Howard’s Feed ‘n Wax. Easy peasy.
I did do a minor repair to the pitman arm. The holes at the ends of the arm had worn to oblong. I could have gone to the trouble of boring out a new hole and inserting a bushing, which would likely outlast the rest of the machine. But I channeled Robert Pirsig, cut up a can, and shimmed it. Problem solved.


Cleaning woodwork was harder. The shellac had completely failed in several
places (there are some pictures above), and it was just bad overall, as
you can see.

So I decided to strip it. Based on recommendations on a woodworking site, I used plain 100% denatured alcohol (it took less than a quart, I think, total).
First I verified that it was shellac, using some alcohol on a test spot. It came clean quickly, so I knew I was on the right track. The steps went like this: I put some 100% denatured alcohol in small spray bottle. I spritzed a section generously, so it was all wet, then covered it with a paper towel, and spritzed that pretty well too. Then I covered it with a sheet of plastic (just the side of a plastic bag) to keep it from drying out, and put a heavy towel over all of it, to squish it all together. Then I did a crossword puzzle for 5 minutes or so.
When I pulled off the towel and plastic, I was able to use the paper
towel to pull off most of the now-sludgy shellac.

A little more spritzing and a few more paper towels left it pretty clean – sometimes I used #0000 steel wool on an extra thick spot. After it dried out I sometimes had to go back and do a bit more, and I did sand the whole thing with very fine paper to finish it off.
I did remove the little “half-finials” on the front two edges, in order to make it easier to strip them. A bit of heat gun, and the hide glue released, and they came right off. Then they had to be “clamped” and glued back on.

After all that stripping there’s still shellac present, of course, down in the pores, so the surface is still fairly “sealed”. I was worried oil might not work well on that (excessive drying times?), but I use Watco Rejuvenating Oil on just about everything, and this was no exception. It worked fine.
To say I’m thrilled with the results is an understatement.


| updated February 2022 | [index] |
Someone on a Facebook group I frequent posted a picture of their
American sewing machine, and it looked very familiar… and I
realized it looked just my Davis! Not all sewing machine makers made
their own cabinetry (unlike Singer, who did). It’s pretty clear that
in this case, Davis and American used the same supplier. Compare this
picture to those above.

Also, recently I did some sewing on Davis, and needed to wind a bobbin.
I really love how antique bobbin winders work. Here’s a video.
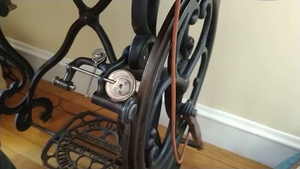
Threading the Davis shuttle
There’s a U-shaped spring on the shuttle that acts both to keep the bobbin in place, and also as the distribution bar for thread coming off the bobbin. Open this U-bar “latch” by pressing in on it through the little hole in the side of the shuttle. The end of a bobbin works for that, if you have one handy. With the latch open, the bobbin goes in so the thread comes off the bottom and up the side with the long (distribution) arm of the U-shaped spring. It’s a little tricky to hold the bobbin in place and close the latch at the same time, since the latch doesn’t really hold the bobbin until it’s almost closed. Then, send the thread down through the small U-shaped staple on the opposite side of the shuttle, and out through the slot.
1878 White VS1
(Gone! No longer mine.)
| written June, 2020 ... | [index] [index by age] |

This White VS1 (s/n 78129) was on listed on Facebook for many months. I inquired about it at some point, but couldn’t convince myself to get it, and I had some other projects at the time. A month or two later, I had finished those projects, so I got back in touch. When I asked whether the price was flexible, he dropped it in half! Hard to argue with that. Besides – White was one of the major builders of sewing machines, so I should have one, right?
I still may have paid too much (well, not really), because the bonnet top has been dropped and is now in many pieces (not all of them present, sadly), and the top layer of paint on the machine head is flaking off in places.
On the plus side, the bonnet may be repairable, and its front is burled, much like my Davis. The cabinet is in pretty good shape with all its drawers, and the machine itself appears to be complete. The shuttle and bobbin are present, in a drawer. (Whew.) There are even some attachments. And are faint traces of the original decals left in just a few spots.


| updated November 2020 | [index] |
I never really bonded with this machine, and the obvious rust pitting under the paint meant that it would really never look nice without a full repaint. That’s something I’d rather not take on. Plus, the bonnet was broken badly. So I’ve passed it on, to someone who is a fan of White machines, and I believe is from Templeton, where White first made machines (earlier than this one).
Treadling a Featherweight
_written June 2020
Some folks on the ISMACS mailing list were talking about whether it was possible to treadle a Singer Featherweight, and there was so much negativity that I just had to try it. :-)
I used the treadle base from my Wheeler and Wilson No.8. I’d already made an insert for it when testing my Singer 24, so it was the obvious choice. Plus the large treadle pulley is conveniently to the outside of the leg, so swapping belts is easy.

The Featherweight wasn’t fastened to the table for this test – I think that at most it might need some way to keep it positioned, but it actually seemed pretty solid. The belt is urethane belting, which is cut to length and joined with heat. It happens to be very “slippery”, so I didn’t feel I was going to damage the treadle top with the obvious rubbing.


The pictures show that a guide pulley should clearly be used on the rear portion of the belt, to prevent rubbing on the table. They don’t show quite as clearly that the belt is also rubbing on the front corner of the machine’s pulley guard. It might be possible to eliminate that with another guide pulley, which would pull the front (downward-moving) portion of the belt several inches to the rear. But this was all just proof-of-concept. I don’t like sewing on my Featherweights nearly enough to want to treadle them. Their motors work just fine!
I actually had more trouble remembering to install the needle “backwards” and to thread it right to left than I had getting the machine to treadle.
This short video shows it in action.
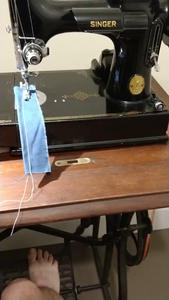
1947 Singer Model 201-2
(Gone! No longer mine.)
| written late June, 2020 ... | [index] [index by age] |

This is my third Singer 201-2 (but the first I’ve paid for!). I sold the first one when I thought I was out of space for more machines (I’ve since found a lot more space, and machines to fill it ;-), and regretted it immediately. It didn’t help that it turned out I’d sold a perfect, all-original machine in its original cabinet to a guy that was going to separate them and just ship the head off somewhere, probably overseas. The second one I rescued really wasn’t a good machine – lots of cosmetic issues, and so it, too, was sold. (At least that one was to a nice guy who had just started taking sewing lessons.)
This one (s/n AH367267) is in a solid art deco cabinet. After dealing with a serious thread jam under the bobbin, it seems to run fine. It had an amazing amount of junk in the drawers.


| updated September, 2020 | [index] |
The machine head didn’t need much, but it had the usual yellow coating on many parts (I suspect that can of 3-in-1 oil pictured in the drawer, above, is to blame), and grime and lint everywhere. So it got the usual spa treatment.


Refinishing the Singer #42 Art Deco cabinet

The cabinet, unlike the sewing machine head, needed more work than I realized. In addition to the obvious plant and mug rings, and generally failed shellac, it turns out it must have been stored in a damp area, and perhaps was even flooded at some point. Much of the veneer along the top and bottom edges had separated, and in half a dozen places at floor level it was missing entirely.


So first there was a lot of clamping, to reattach the loose stuff. Most
of it was only loose to a distance of an inch or so from the edge of
the piece, which meant there wasn’t a lot of flex to allow getting glue
in there. I used a very thin (.008”, IIRC) automotive feeler gauge as
a trowel to get glue into that narrow gap. I used Tite Bond hide glue
(brown bottle) on this project, to try it out. It takes longer to set
than Elmers (so the clamps needed to stay on much longer), but I knew
I’d be able to loosen the veneer again, with heat, if I screwed up.

Once all the undamaged veneer was solidly attached, I had to learn how to do patches. This was new to me. Luckily there were a couple of places in hidden areas of the cabinet’s interior where I could “harvest” patching material. This was easy: I used a utility knife to outline the area of veneer I wanted to remove, and then heated the area with a heat gun. Once warmed up, I could get a very thin blade under the veneer and peel it off.
For some patches I cut back the old veneer to a reproducible shape, and cut a matching patch. For others, I used a “pressing” technique where you use a clamp covered in thick felt to press the patch into place. This lets it conform exactly to the cut out area, and minimizes the glue-filled gap. I learned that trick from a Popular Woodworking youtube video. (If you watch the video, take note that they cheat heavily, by using what is clearly a piece of the very same veneer that’s damaged, in order to make the patch. No wonder it matches so well at the end!)


 You’ll notice I did manage to damage my patch. I was too impatient to
fix it. (Remember that thing I said about using hide glue, so I could
fix veneer mistakes? I should know myself better than that!)
You’ll notice I did manage to damage my patch. I was too impatient to
fix it. (Remember that thing I said about using hide glue, so I could
fix veneer mistakes? I should know myself better than that!)

This patch worked very well, which is good because it’s prominent,
right at the front of the cabinet – it’s the same spot pictured in
the first “missing veneer” photo, above. It was easy to do well,
since I patched the whole way across the 2” vertical span.

Once the veneer was patched, all the finish needed to come off. Sadly, I don’t have any pictures of the stripping operation. Wearing rubber gloves covered in chemical stripper and old shellac muck makes it hard to use one’s camera! I used a product recommended by a friend, called Kwik-Strip Paint & Varnish Stripper, which worked well. Applied it with a brush, waited for 5 minutes or so, then wiped off the sludge with a lot of paper towels. (They say to wait longer, but I found it dried, and was hard to remove, if I did that.) Then I used a spritz bottle of 100% denatured alcohol several times as a “rinse”, with more paper towels, to remove the remaining “shellacky” residue. When I refinished my Davis treadle, I only used the alcohol. I tried that on this cabinet, too, but for some reason it didn’t work as well. Perhaps the shellac was thicker, or maybe I needed to sand it before starting, to remove whatever waxes or oils had been applied over the years. In any case, using just alcohol means covering the area with plastic while it works, and that would have been harder on this cabinet.
When all the obvious finish was gone, I sanded first with 150 grit, then with 220. I was able to use an orbital palm sander for most of it, and a sanding block anywhere else, like up against the handles, or on curves.
The original finish on the cabinet was designed with a small coloring detail for some of the edges, and for the handle trim. I wasn’t going to recreate it, but it turned out that while it was just coloring in the (now removed) shellac in some places, in others it was real wood stain, so I had to do something. It took me a couple of tries to get it right – in the end those areas got a mix of cherry and walnut stains. The rest of the cabinet was left natural. It’s all pretty subtle, which is fine by me. It was subtle originally, too. (The original Singer finish had a 2” band of darker color all around the base. I chose not to recreate that.)
By the way, after you oil your wood, stained or not, will change color drastically. That’s important to remember when choosing a stain. The trick to getting a preview, without applying oil (which you don’t want to do, since it soaks in), so to wet the wood with mineral spirits instead. It will wet/darken the grain just like the oil, but will dry out and disappear in an hour or two.


And then, finally, my favorite part – applying the Danish oil. I use
Watco “Rejuvenating” oil, since I keep it on hand for our dining
table. Regular Watco oil would surely work just as well. Apply it
liberally – you don’t want it to dry out before you wipe off the
excess with a fresh rag. If I see areas becoming non-glossy before
I’m ready to wipe it, I add more. I use a clean rag to apply it –
don’t use too big a rag, since it will just soak up and hold onto more
of your oil. Let the surface stay wet for 5 to 10 minutes. If you wait
too long it will turn gummy, and hard to wipe off. (If that happens,
well, in the past I’ve applied more oil, but it might be there’s a better
trick.)

I apply a couple of coats in relatively quick succession – say, an hour or two in between. Then a third coat the next day, and if it looks dry in a month, or a year, I’ll give it another. (This is rare, in my experience.) When doing repeat coats after a long period, I usually go over the surface with #0000 steel wool first, to be sure it’s clean. The rejuvenating oil claims it cuts through wax, but since I never wax furniture, I don’t know if that’s true.
 My veneer patches turned out okay. Not even near perfect, but okay.
I certainly should have used the same technique, and the same general
shape, for all the patches, rather than the hodge-podge you see here.
In the third picture you can see that I didn’t manage to get the grain
aligned properly. Sigh! But see note above about impatience. Or
maybe it’s laziness!
The patches are all down at floor level, so not that visible.
My veneer patches turned out okay. Not even near perfect, but okay.
I certainly should have used the same technique, and the same general
shape, for all the patches, rather than the hodge-podge you see here.
In the third picture you can see that I didn’t manage to get the grain
aligned properly. Sigh! But see note above about impatience. Or
maybe it’s laziness!
The patches are all down at floor level, so not that visible.


All done!


And in the end, I’m pleased.


Updated June 2025 Surprisingly, given how much I love the 201, and how much I love this cabinet, and how much work I put into it, I’ve almost never used it. And I’m really, really, short of floor space. So I decided to sell this machine, or at least the cabinet. And happily, when I mentioned it to a friend, she was ecstatic, and wanted the cabinet to replace her grandmother’s, which she’d had to discard because it was too far gone. She still has the machine, so it really worked out: I get to keep my 201-2 machine head, and she gets the cabinet she really wants.
Updated November 2025 I’ve now also rehomed the 201-2 head, after finding a 1947 201K to take its place. I hope the new owner, a quilter, will be happy with it. (They also got the library table the 201K came in.)
1884 Singer “Improved Family”
(Gone! No longer mine.)
| written late June, 2020 ... | [index] [index by age] |

This machine is in such “uninspiring” condition that there’s no way I’d have normally bought it. But it turns out that the treadle is relatively rare, only made for a few years in the 1880s. (The Improved Family head dates from 1884, s/n 6441861.) A couple of friends were interested, and since the seller was right on my route to where I picked up my 1947 201-2 (previous blog entry), I picked it up. It wasn’t free, but pretty close. After some discussion, I’ll be dismantling the treadle and shipping it and the bonnet top to California.
The Singer “Improved Family” is the direct predecessor to the Singer Model 15, and the family resemblance is strong. While most of the details are different, the overall design involving an oscillating shuttle holding a round bobbin, the faceplate-mounted tension, the bulbous curvy body, are all similar.
Maybe someday I’ll get a prettier Improved Family – some have lovely delicate decals – but for now I can at least say I’ve played with one.


| updated August 2022 | [index] |
The treadle irons were shipped to my friend in California a long time ago.
I never really intended to keep the head, either, but I certainly couldn’t throw it away! So when someone on the VSS Forum expressed an interest, I was happy to give it to them. Took a while (a year or more?) to get the rendezvous to happen, but they happen to have the treadle irons that match those that this came on, and wanted the appropriate machine for to put on them.
Gang of four
| written July 2020 ... | [index] [index by age] |

Or, as my charming spouse likes to remind me, “One for the price of four!”.
I only wanted one of these machines, but the ebay sale was for all four. I have no idea what I’ll do with the others. Probably give them away.
It may not be obvious which one I actually wanted…


c.1872 American Button-Hole, Overseaming & Sewing Machine Co. Model ‘M’
| written July 2020 ... | [index] [index by age] |

The full name of the company that made this machine is “The American Button-hole, Overseaming & Sewing Machine Co.”. Kind of a mouthful. As I understand it, they began in the late 1860s, in Philadelphia, and they made a machine that could make button holes, do overseaming, and also be converted to make a regular lockstitch. This machine, which seems to be from 1872 or 1873 (from comparing patent dates with other collectors machines), isn’t one of the convertible machines. Edit: But I later got one that is.


An interesting feature of these machines is that they use a somewhat unusual vibrating shuttle. Rather than swinging in a broad horizontal arc below much of the cloth plate, this shuttle swings in a short vertical arc, right below the slide plates.
The machine is sadly missing its shuttle and bobbin. These two
pictures I found on the web show what I think it should look like.
The pictured shuttle is from an American No.1, which was made at the
same time mine was, which is why I think this is what I’m looking for.
Of course, they seem to have used two different tension mechanisms
inside the shuttle in that time frame, so I can’t be sure which I
should have, and also don’t know whether that would affect the
exterior design. [ EDIT: I’ve since procured a bobbin and shuttle,
and it sews!]


It’s not even clear exactly which model this is, since most have a
very prominent “No.1”, “No.2”, etc. All I have is a letter ‘M’. And
the number of ‘44’. Numbers that small are suspicious, but I’ve heard
that American restarted their serial numbers with every new model, so
it’s not out of the question.
And I think many/most American machines have curved arms, not straight
like mine. So for now, the ‘M’ stands for the “Mystery” model.


[Added 12/2021] One more significant difference: on this machine the shuttle is accessed from the rear slider plate. The front plate is fixed in place with a screw. (Pictures further down the page.) On the “No.1” machines, it’s the front plate that moves. And of course, on many American models, like my second one, the throat plate is round.
| updated early August, 2020 | [index] |
After some cleanup, and building a new (for me) kind of wooden display
base, it looks kind of nice. I’ve started watching for shuttles on
ebay and elsewhere, but my expectations are low.


| updated May 2021 | [index] |
Well, I finally found a shuttle and bobbin. They’re way smaller than
I thought they’d be. “Tiny” is the right word.

Once I got the threading
and tension worked out, and had it making stitches by hand, I hooked up
my Hamilton Beach Home Motor, so I could sew with it “for real”.


| added December, 2021 | [index] |
Since I got a second American machine, I’ve added sections on which needles to use, and how to thread the top thread and the shuttle.
| added April, 2022 | [index] |
I was hoping that this machine would be a candidate for use on my
MUTT treadle, but it turned out that the treadle base I got
was inappropriate, due to the iron brace to the outside of the band wheel,
which interferes with the belt path. But I realized it might work
on my Wheeler and Wilson No.8 treadle, since it has no such brace.
Amazingly, it fits perfectly. So I sewed up a small stuff sack, which
seems to be my go-to project when I don’t have anything else pressing.

c.1893 Atlas model ‘A’ / Bremer and Bruckmann “Brunonia”
| written September 2020 ... | [index] [index by age] |

This elegant hand crank was made sometime in the early 1890s. The Atlas Sewing Machine Company (London) was in the business of reselling badged machines from other makers, and this was one of their first models. It is actually an “Original Brunonia A”, made by the company Bremer und Brückmann in Braunschweig, Germany. It is similar in some ways to the Howe sewing machines made in Connecticut, though of course those have reciprocating (straight-line forward/backward) shuttles, rather than vibrating (swinging in an arc).


The available history is scarce, but the factory was covered in the German language book “Alte Nähmaschinen” (which I’ve never seen). I corresponded with Peter Wilhelm, the author, and he let me know that the machine was produced from 1881 to 1896, and that my machine was built between 1892 and 1894.


The shuttle is sadly missing, but I did some measuring, and checked all of my other VS machines, and found that the shuttle from my Davis fits almost perfectly! Pure luck. This machine can sew!
From pictures of other examples, it’s clear that the bobbin winder arm
should be straight, and when I got it, it had a backward bend. How
the heck do these things happen? I hoped to straighten it without it
breaking, but, no dice. I’ll try and repair it. We’ll see.


The seller’s photos on Ebay had been taken with some harsh lighting,
and I wasn’t expecting much in the way of decals. Much is missing,
but I’m pleased with what’s left.


I won’t be doing a full disassembly on this machine right away, but I do
want to display it. So it needed new feet to protect
the furniture, since the old ones were shot. Want to see what a 125
year-old rubber foot looks like? Eww…

| updated late March 2021 | [index] |
I’ve managed to do a thorough cleaning of the Atlas now. It looks a bit better, though the difference isn’t stunning. So I’ve simply replaced (almost) all of the pictures above with newer versions.
 Regarding the feed dogs that wouldn’t come above the cloth plate:
I had assumed that I could adjust that, but the screw for adjusting
was stuck, and I let it go. But it turns out that wear on the cam
follower block was letting the feed dogs ride much too low on the cam,
so they never cleared the table. You can see that the wear block on the
forward/backward follower is much less than on the up/down follower.
Regarding the feed dogs that wouldn’t come above the cloth plate:
I had assumed that I could adjust that, but the screw for adjusting
was stuck, and I let it go. But it turns out that wear on the cam
follower block was letting the feed dogs ride much too low on the cam,
so they never cleared the table. You can see that the wear block on the
forward/backward follower is much less than on the up/down follower.
 As it happens, they were made to be readily replaced. The notch that
they slide into (from the side) is undercut, to help hold them in, and
is actually narrower on one side than the other, so that when you
press the block in from one side it won’t slide right out the other
side – the block and the notch it fits into are sort of wedge shaped,
so once you get it tight, it probably won’t go anywhere. This picture
shows the replacement I made.
As it happens, they were made to be readily replaced. The notch that
they slide into (from the side) is undercut, to help hold them in, and
is actually narrower on one side than the other, so that when you
press the block in from one side it won’t slide right out the other
side – the block and the notch it fits into are sort of wedge shaped,
so once you get it tight, it probably won’t go anywhere. This picture
shows the replacement I made.
(It’s made from a piece of “Epicurean” brand cutting board. They’re made from durable epoxy-bound “stuff”, which cuts, machines, and wears very well.)
| updated May 2021 | [index] |
This machine is so much like my Howe in many aspects that I wouldn’t be surprised if it originally used the same needle, which is no longer available (at least according to the ISMACS needle cross-reference). Happily, as with the Howe, I’ve found that needles for my Singer 29-4 will work in this machine. But it turns out the Atlas/Brunonia must have tighter tolerances than the Howe, because not all 29-4 needles work well.
I have 29x4 needles from Groz-Beckert (they sell them as “110” needles), and 29x3 needles from Organ (sold as DIX3, I think). The G-B needles work in the Atlas with a close fit, but the Organ needles jam up when inserted into the clamp. I measure them as 1.96 and 1.97mm respectively, so it’s not much of a difference! I was able to get an Organ needle to work by putting it in my drill press and slimming it down slightly with emery paper, but it’s still a very tight fit.
1866 Grover & Baker chain stitcher
| written October 2020 ... | [index] [index by age] |

I’ve been hoping to find a Grover and Baker machine for quite a while now – think of it as a bit of a “grail”. So when one came up at an auction within a days drive (well, two days – one day there, one day back!), I bid on it, and won! I’m very pleased.

The interesting features, for me, are the fact that it sews a
two-thread chain stitch (I need to see that!), it has a curved needle,
it has lovely aesthetics, and it was made at Haymarket Square, in
Boston. This illustration, which includes the factory, is from an
1853 Grover and Baker advertising brochure.

Grover and Baker were tailors in Boston, and they were convinced that the sewing machine would change their industry. Grover set to work and devised a chain stitch using two spools of thread – they received their patent in early 1851, and incorporated later that year. Their early machines were clunky, boxy, things, but they soon transitioned to the graceful form shown by this one.
And here’s the stitch it sews, as illustrated in the 1911
Encyclopaedia Britannica. Where they say “bobbin”, in modern
parlance we would say “spool”. Today we think of a “bobbin” as
being small enough to pass through a loop of thread, as in a
lockstitch machine.

The serial number (s/n 157549) dates it to 1866. While the paint isn’t perfect by any means, and the bonnet top has lost a couple of bits of trim, the machine and cabinet are complete, and in very good shape. I think it will clean up nicely.


And look at the attachments!

Here’s a page from a c.1867 company catalog showing this model. The price then was $70. From the reading I’ve done, that would have been 2 or 3 months wages for a skilled worker (like a carpenter).

| updated in late November, 2020 | [index] |
I finally got the G&B parts all cleaned up and reassembled, and worked on getting it sewing.
I had some trouble when I first tried to stitch, because just as it was before I disassembled the machine, the rotating hook was colliding with the bottom of the feed dog at some points in its rotation. Back then, I thought it would clear up after I got everything apart and cleaned up, but even after thoroughly cleaning out the hole in the top of the spiral rod that the hook sits in, there was still not quite enough clearance under the feed dog.
One nice thing that came in the drawer of the treadle is that
in addition to my good lower hook, I also have a broken one. When I
examined the older broken one, I discovered it had been shortened –
someone had filed off perhaps 3/32” from the bottom of the post, which
would have allowed it to sit lower. This picture shows the “new”
hook, alongside the broken stem of the old one, which is clearly shorter.

So I thought about it for a day or two, convinced myself that it was okay (and wouldn’t make me a bad person), and took a fine hand file to the bottom of the good hook. I took off less than 1/16”. It now sits just a tiny bit lower in the spiral shaft, and when rotating clears the underside of the feed dog by “just enough”.
I didn’t like doing it, because it shouldn’t have been needed. Either something has been bent (but that would be parts of those lower castings, which seems unlikely), or the top of the spiral shaft has worn enough that the hole the hook’s post fits into has gotten less deep. That also seems hard to believe. But the metal slot on the arm that drives the spiral shaft is very worn, so maybe the top of the arm is too – it’s hard to tell without knowing how long that shaft was when new.


First stitches! This is just from turning the machine by hand – the irons still need to be cleaned/tuned/oiled, and the cabinet is still “in process”.
By the way, to position the needle: With the needle arm at its highest point, the needle’s eye should be the height of the needle gauge from the cloth plate, the the long groove facing the operator. For those that don’t have the gauge, it measures .735”. That’s 47/64”, or 18.67mm. Really. No wonder they provided a gauge!
Creating new trim for the G&B bonnet
| written early November, 2020 | [index] |
So, the G&B machine itself seems to be complete, except for some little gizmos that the manuals says should be there to help keep the spools from slipping off of the spool ends. But the bonnet top is missing some trim pieces. There should be a long “racetrack” oval on the front and on the two sides (but not on the back).
 The straight parts of all three are intact, as are the curved parts of
the (most prominent) oval on the front. On the sides, all four curved
parts have come off, and sadly only one of them was preserved in the
treadle’s drawer.
The straight parts of all three are intact, as are the curved parts of
the (most prominent) oval on the front. On the sides, all four curved
parts have come off, and sadly only one of them was preserved in the
treadle’s drawer.
After thinking about it for a while, and being goaded on by some internet friends, I decided to try and recreate the missing half-circles. I don’t yet know what wood I’ll use, but I’m going to try carving them with my CNC mill. (“CNC” stands for Computer Numerical Control. If you know what a woodworking router is, this is like a small version of that, but you can write a program to control its movements, up, down, left, and right.)
I designed the piece a few days ago (using OnShape, a cloud-based CAD
system), and the design looks like this.

In the past I’ve used a bunch of little scripts that I wrote to turn a design into the “G-code” instructions necessary to carve it, but since my scripts don’t give me the ability to create curved surfaces (not without a bunch of new programming, and math that would make my head hurt), I’m using a new tool I found. I translated my design into carving instructions using a package called “Kiri:Moto”, which “just” (I confess I find it somewhat miraculous) examines my design and produces the necessary code. Very cool.
 Today I was able to run the G-code instructions that Kiri:Moto produced
in a carving simulator, in order to see how it will (hopefully!) work.
This simulation step will probably save me a lot of time and test
runs in the shop. In this picture, the orange cylinder represents the
cutting head (an 1/8” end mill) that I’ll use to carve the piece. The
green lines represent the path that it is following to do the carving.
The red lines are high speed non-carving moves, when the cutting head
is moving upward, or across in areas where there is no material to
carve. You can’t tell from this picture, but in the real program, I
can zoom in and get a sense of how much sanding I’ll need to do to get
rid of the little nubs of wood left by cutting with a round cutting head.
Today I was able to run the G-code instructions that Kiri:Moto produced
in a carving simulator, in order to see how it will (hopefully!) work.
This simulation step will probably save me a lot of time and test
runs in the shop. In this picture, the orange cylinder represents the
cutting head (an 1/8” end mill) that I’ll use to carve the piece. The
green lines represent the path that it is following to do the carving.
The red lines are high speed non-carving moves, when the cutting head
is moving upward, or across in areas where there is no material to
carve. You can’t tell from this picture, but in the real program, I
can zoom in and get a sense of how much sanding I’ll need to do to get
rid of the little nubs of wood left by cutting with a round cutting head.
| updated early December 2020 | [index] |
Well, as usual when I want to do a project using my mill, before using it I had to do a small project to my mill, to make it operational again. I guess that’s part of the fun of having multiple hobbies. ;-)
But I’ve also been working on creating the carving “G-code” needed to create my trim pieces. Because I have the carving simulator to work with, a lot of early bugs were dealt with without ever turning the mill on. So when finally, yesterday, I was able to run a test, it went well!
The first picture shows the result hot off the mill. The second shows it
in comparison to one of the original trim pieces.


The third picture shows the piece before I did any sanding, which cleaned most of the visible lines up nicely. (The little “shelf” around the base of the ‘U’ is a design error – it sanded away, but shouldn’t been there in the first place. It won’t be there in the next iteration.)


The last picture shows that it’s a nice fit! I’ll probably do a couple more iterations using the same cellular PVC (it’s a scrap piece of “Azek” house trim) before switching to some common hardwood, and then finally I’ll try it using some of my small stash of what I think is black walnut, or maybe American Chestnut, taken from the broken bonnet top of another machine from about the same time.
This is all going so well that I may also try and create a replacement for the missing piece of corner trim that you can see in that last photo – I’m actually missing two of them.
| updated February 2021 | [index] |
I don’t think it’s ever taken me longer to get to the end of a sewing machine project. And I still might not be done. But for now, I am.
Every time I start using my CNC mill, at least half the project involves doing some sort of maintenance or improvement to the mill itself. Or learning new software packages to help program it. This project was no exception – perhaps 1/3 of the 10 or 11 weeks this took were spent on that kind of stuff. All productive, and all necessary, but not feeling like progress. (I confess I also got a little sick of the whole thing a couple of times in the middle, and let it sit for days, maybe even a week, at a time.)
But after a lot of rough drafts (each of which probably represents the better part of an hour of setup and carving time), I’m calling it quits.
Evidence of the rough drafts…


 It’s hard to get a good shot of the mill at work, because there’s so
little space under the dust collector. But here are a couple. The
cutter is a 1/4” end mill (i.e., flat bottom), so it takes a bazillion
passes over the part to make that smooth surface. It takes about 25
minutes to carve, and that’s after carving the piece on its side, to
get the accurate 45 degree slices.
It’s hard to get a good shot of the mill at work, because there’s so
little space under the dust collector. But here are a couple. The
cutter is a 1/4” end mill (i.e., flat bottom), so it takes a bazillion
passes over the part to make that smooth surface. It takes about 25
minutes to carve, and that’s after carving the piece on its side, to
get the accurate 45 degree slices.

 And of course there was a lot of test-fitting along the way…
 And then, the results. I needed to recreate 3 of the semi-circular
“racetrack” ends – two on the left end, one (at the rear) on the right.
The ones on the front are original. In addition, I recreated two of
the corner blocks (left lower front, left upper rear), and had to
re-seat one of the originals (right upper rear). Every one of them
can be identified because of their (relatively) poor fit. :-) :-/
And then, the results. I needed to recreate 3 of the semi-circular
“racetrack” ends – two on the left end, one (at the rear) on the right.
The ones on the front are original. In addition, I recreated two of
the corner blocks (left lower front, left upper rear), and had to
re-seat one of the originals (right upper rear). Every one of them
can be identified because of their (relatively) poor fit. :-) :-/


Turns out those corners are complicated. Recreating the S curve profile took a few iterations, and then I realized that the outer edge is not a circular arc – it’s actually the narrow end of an ellipse. Go figure! Getting all that right took a lot of time. Plus, for the one in the lower left front, the bottom of the corner piece is visible when you lift the bonnet. There were a lot of places to get the fit right. Plus, all of these pieces, and the pieces they adjoin, were originally hand fit. So I had to allow for some hand sanding at the end to get it (almost-)just-right.


In comparison, the semi-circles were a piece of cake, though it did take me a while to realize that their cross-section (i.e., the shape that protrudes from the wood) is not the “half round” you’d assume. It, too, is more like a “half ellipse”. (I learned a lot about how to create not-round shapes in my CAD program.)
While (in my opinion) the color variations kind of stick out like a sore
thumb above, they’re not so bad from a distance.


The darkness, where you see it on any of the parts, both original and my replacements, is a result of there being a lot of end grain on those pieces. They were all sealed with several coats of shellac before applying Danish oil, so it’s better than it might have been, but still not perfect. I’ll live with it a while, and see if I care enough to take another stab at it, probably by trying to darken everything else a bit, to reduce the contrast between the two shades.
All cleaned up
And finally, some “finished” shots of the machine head and the treadle, which it feels like I cleaned up eons ago:


While I’d sewn with it on the bench back then, it
felt great to finally treadle it today. Here are some shots of
the lower thread and hook, and the stitch:


And, here’s the obligatory video trying to show how it makes the stitch. It’s the best I can do. Basically, when the upper needle comes down, the lower hook rotates to grab the upper thread’s loop. It forms its own loop with the lower thread in the process, and waits. The upper needle goes through that loop the next time it comes down. At that point, the lower needle rotates back, and then forward again, starting the next stitch. That’s a poor description, I know. I tried to stitch slowly for a bit in the middle, but you may still want to slow your playback. The problem is that when the lower hook rotates, it does it incredibly fast.

c.1889 Wheeler and Wilson No.9
| written October 2020 ... | [index] [index by age] |

A fellow collector picked up this machine for free. She only wanted it because she needed a bobbin case and bobbin case holder for her W&W No.8, and this one was the same. Since I don’t have one of these, and I don’t really need it to be able to sew (though maybe someday!), I offered to take it off her hands. I’m nice that way. ;-) (Actually, I think she offered first… )
I’d never laid hands on one, and wanted to see what sort of machine it is. People who use them regularly seem to feel that they’re superior to the Singers of the day. It’s certainly a substantial machine, and feels very well made. BTW, I took it despite the treadle having been thoroughly scavenged at some point: there’s no cabinet or table, and it’s missing the wheel, pitman, and pedal. There are some extra non-original screws on the machine’s pillar – I suspect they were for a motor that was added at some point. The treadle was no doubt stripped at the same time.
It’s a fairly early No.9, made not long after the No.8 models
(like mine) were discontinued and this
model was begun, in 1887. Interestingly, its two serial numbers
differ, though not by much – 49545 on the slide plate, and 48722 on
the casting. The numbers are fairly low, and the lack of a March,
1890 patent date on the slide plate implies it was made before then.

As mentioned, the treadle is rather incomplete, but it does still have some nice graphics. (Hard to see in this picture.)


Interestingly, the machine has two spool pins – the simple pin, near the wheel, was the original style provided with the machine. The inverted U-shaped pin, in the center, was a later change. Since the straight pin is attached to an access cover, and the cover isn’t held by a thumbscrew as it should be, it may well be that the original “pin-less” cover was replaced with an older one with the spool pin. Regarding the odd U-shaped folding spool pin: Coils of thread can fall off the spool when they get loose, and normally they will bind around a traditional spool pin. With this design, they’ll fall clear, with no pin to get stuck around.


The bobbin and its case and the case holder are missing, of course. The second picture here shows what they should look like. (That is, in fact, a picture of this machine before those parts were “borrowed”.)


| updated April 2022 | [index] |
Well, I found a parts machine and treadle while looking for a base to use as a MUTT treadle. That gave me a working check spring, and a proper cover plate for the inspection hole at the right end of the top of the machine. That second spool pin definitely wasn’t right.
And the big things – the bobbin case and clamp. While the bobbin holding pieces from the parts machine don’t match the ones that were on this machine to begin with, they work fine if you swap them both together. So the machine can now sew! Plus, since my MUTT treadle project was successful, I also have a base to put it on. Haven’t really used it yet, but I’m looking forward to it.
[Aside: the late W&W No.8 and early W&W No.9 (like mine) shared the same bobbin case holder (the big clampy thing) and bobbin case (the half dome that holds the bobbin. They changed the design after a few years, and integrated the tension into the bobbin case. Many years later, the D-9 machines got yet another, easier to use, design.]
Interesting thing about the bobbin winder. This machine had been electrified, and that made the belt-driven bobbin winder useless. So they cleverly disassembled the bobbin winder and reversed it. After installing a tire on the winder pulley, it could now be driven from the hand wheel. You can compare the reversed winder (foreground) with the original (background) in the first picture.


I was convinced that it had been flipped around, and not replaced, since the arm is identical to that on the “new” parts machine’s, and I could find no picture of a WW9-class machine with the wheel on the left. In addition, the cast iron arm has a small notch where it pivots, which acts as a “detent” to keep the winder in a specific rest position. That position was no longer appropriate when flipped, and a second notch was ground, somewhat messily. Definitely not a factory job.
 I wanted to put it back to original form. It turned out to be easy.
I decided the wheel must be pressed on to the axle, because if it
screwed on, surely they’d have needed a slot or hex head with which to
tighten it at the factory.
I wanted to put it back to original form. It turned out to be easy.
I decided the wheel must be pressed on to the axle, because if it
screwed on, surely they’d have needed a slot or hex head with which to
tighten it at the factory.
I looked at my pin press (too small) and my gear puller (too big), and finally looked at my nail punch and tack hammer. I balanced the wheel on top of the (loose) jaws of my vise, and used the punch to hit the end of the axle. A few taps and I felt it give. Took me more time to find the axle on the cellar floor than it did to get it out!
Cleaned it up, turned it around, set the wheel on a block of wood with a small clearance hole for the axle to come through, and tapped it in the other way. I should really get a brass hammer for these occasions.
| updated November 2023 | [index] |
The original, stripped, treadle base for this machine has been in my attic since I got it. I finally offered it up on a local Facebook “giveaway” group, and it was claimed in… 5 minutes? Maybe less. “That piece is beautiful. I’d love to make it into a table/shelf for my daughter.” I’m not a big fan of making tables from treadles, because it usually means one less working treadle in the world. But in this case, I hope he does!
It’s raining sewing machines!
| written November 2020 | [index] [index by age] |
So out of the blue I got an email yesterday, from a fellow collector who I’ve corresponded with a bit in the past (and who is now one of my all time ever best friends!), who apparently approves of how I care for and present my sewing machines. It seems they wanted to do some rehoming, and thought that the machines would do well in my care, and asked if I wanted any of them! Well, you’ll just have to imagine my jaw dropping as I read that, because it did, indeed, drop – it was an amazingly generous offer, and they seemed to know my tastes well. I couldn’t resist taking them up on their gift. (I didn’t try very hard. ;-)

You probably have to be a collector to fully appreciate this bounty, and the reason I’m so overwhelmed. The machines included (in the order pictured above) a 1918 New Home (“New Avon”) model T hand crank, a 1902 Frister & Rossmann hand crank with MOP, an 1886 Singer Model 12 hand crank, a 1916 New White Peerless (“Excelsior”) hand crank, an 1895-ish Hengstenberg “Regina” high-arm hand crank with MOP, a 1919-ish Gritzner R hand crank, a 1925 electric Singer Model 99K, complete with working controller and knee-bar, and finally… an 1872 Wheeler & Wilson #3, with extra needles and new leather belts (including for the pedal “feet”!)
And, I believe, they all sew!
Since I believe my benefactor reads this web page sometimes: Thank you, again. :-)
I’m not going to write about all of these all at once – I think I’ll wait until I start working on each to do so, in order to do them each justice. So the group shot above will have to suffice for the time being.
| a couple of days later | [index] |
Nah… I need some individual pictures of all of them…
1918 New Home “New Avon”
| written November 2020, updated June 2022_ ... | [index] [index by age] |

This is my fourth New Home machine, and it sews nicely. This little machine is a “T2”, one of their later models. The slide plates don’t carry the company name, just the serial number (3823314), but the decals carry “Made by the New Home Sewing Machine Co. Orange Mass”.
The decals show a lot of silvering – perhaps someone was overenthusiastic with their cleaning materials – but it still looks good. The best remaining color is on the faceplate.


1902 Frister & Rossmann
(Gone! No longer mine.)
| written November 2020 ... | [index] [index by age] |

Frister and Rossmann machines have an excellent reputation for quality. I’m looking forward to sewing with this one. (s/n: 947526)


| updated February 2021 | [index] |
I’ve been realizing lately that I have too many machines – they’re covering table surfaces in the spare room because there’s really nowhere else to put them. :-/
I played with this excellent machine quite a bit (it sews beautifully) before reluctantly deciding that it was somewhat redundant, given my other TS (transverse shuttle) machines, and that it should be one to rehome. Happily, a fellow collector had a hole in her collection just waiting to be filled by a TS hand crank, and had even been hoping to fill that hole with a Frister & Rossmann. It was an easy decision to give this one to her.
1886 Singer Model 12
| written November 2020 ... | [index] [index by age] |

Just a humble model 12, with a few small traces of decals here and there. The slide plates are nicely crafted brass reproductions. (s/n: 7138665)


| updated a couple of weeks later | [index] |
I already own a Singer New Family, which is an early version of the model 12, but it lives on a display base since the treadle takes too much room. Even if I could sew with it, I’d worry about the mother of pearl and painted decor. So I’m actually looking forward to sewing with this, since I figure I can’t really harm the finish. There’s just a couple of small patches of decals left. The better patch is near the bobbin winder.


The next picture shows a different machine, at needlebar.org, wearing the decals this would have had in its youth. I think someone must have scrubbed mine a little too hard, for too long, with the wrong stuff. :-/
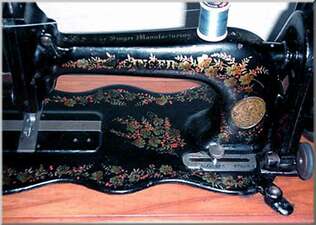
An interesting (missing) feature on this machine: there is no hardware on the base for attaching a bonnet top. I’m told this isn’t unique, so it must have been a purchase option, presumably less expensive.
| updated March 2021 | [index] |
I’ve revised the original text, above, a bit, and replaced all of the photos with “post-cleanup” pictures, plus added a few more.
I had time to do a cleanup on this nice little machine earlier this
week, and it definitely deserved the bath. It wasn’t a huge change,
but the metal bits shined up a bit. The first picture here is a
“before” picture. Mostly the difference cleaning made was in the
hidden parts.


I noted above that there’s no means of fastening a bonnet top to the
base of this machine. But what it does have is evidence of clips
which would have been used to locate it on the top of a treadle base,
if one wanted to replace “hand power” with “foot power”. The clips
would have attached in these three holes on the underside. They were
made to collapse out of the way when putting the machine on a regular
table.

(It’s sort of an odd feature to have on a machine that isn’t really “portable” when removed from the treadle. With no bonnet, or handle, it’s not particularly suited for travel.)
Removing the Model 12 hand wheel
| written April 2021 | [index] |
On my 1871 Singer New Family, the hand wheel is pressed onto the shaft, and I have no intention of ever removing it.
But on this machine, there’s a release mechanism to allow the hand wheel to spin freely. That mechanism, itself, gets dirty, and cleaning it would be a lot easier with the whole thing off. On my machine, it looks like this – I believe a similar mechanism is used on some Improved Family machines, and maybe others as well.
[ Note that there are two different release mechanisms on model 12 machines: some, like mine, have a “pull and twist to unlock” latch, and others have a “twist to loosen” clutch, more like a more modern machine. ]

Starting from the right, there’s the free-spinning hand wheel, with its notch, then in the middle there’s a disk that’s firmly attached to the end of the shaft, and is also notched. Lastly, on the left, there’s the spring-loaded pull-out knob which has a rectangular post attached. When rotated correctly, that post will drop through the notches in the other two pieces, locking them together.
Initially, I was completely baffled by how to remove that middle disk from the shaft. Putting a wrench or pliers on it wouldn’t work, and I’d heard that it could be very difficult. I had decided not to bother, and had cleaned the latch knob as well as I could, but then I got some excellent info from someone on the VSS forum. It turns out removal is easy, once you know that the threading on the end of the shaft is a LEFT-hand thread.
I blocked the shaft from turning by jamming the bevel gears with brass washer, then I gave the notch in the disk several raps with a hammer, using a piece of scrap aluminum as a punch. (Aluminum punch and brass washer, because they couldn’t possibly harm the machine’s steel parts.) It broke free and became finger-loose on my third, somewhat firmer, try.


I had been able to clean the hand wheel without ever removing it, but the latch mechanism looks better after a good cleaning.


Threading the Model 12 shuttle
| written October 2025 | [index] |
I’ve decided I should start making note of how to thread every machine’s shuttle, since otherwise I usually have to dig up a manual.
So, to thread the Model 12 shuttle: Put the bobbin in the shuttle so the thread winds off the bottom toward the two slots. Pass it out through the lower, and in through the upper. From there either go out through the rearmost hole in the far side, or if more tension is needed (rarely), go out and in through a pair (or more) of holes, and out through the short slot. In either case, finish by going under the spring.
1916 New White Peerless “Excelsior”
| written November 2020 ... | [index] [index by age] |

This cute little VS hand crank has great decals. Apparently White sold this particular model under various names: “New White Peerless”, “Tisbest”, “Nonequal”, “Swan”, and “Excelsior”. I think my favorite is “Tisbest”. (s/n: P41392)
It sews perfectly, of course.


Unfortunately it has a broken hand wheel, so the wheel wobbles when
turned. At first I thought the shaft was bent, but it seems that the
machine was dropped hard enough to break/bend the inner hand wheel
spokes. Someone glued it back together with a lot of something like
JB Weld, and with glossy black paint, the repair was hidden surprisingly
well. It’s even hard to photograph.
 Presumably it wouldn’t go together straight, otherwise I’m sure
they’d have done that. Happily, it doesn’t affect it when sewing, and the
bobbin winder still works reliably. The wheel sure looks
a little drunk while it’s turning, though!
Presumably it wouldn’t go together straight, otherwise I’m sure
they’d have done that. Happily, it doesn’t affect it when sewing, and the
bobbin winder still works reliably. The wheel sure looks
a little drunk while it’s turning, though!
And every machine needs a few shots of the secrets below.


| picture added April, 2022 | [index] |
Sunlight doesn’t usually beam into our cellar, but today it did so in
the early evening, and lit up the Excelsior nicely.

c.1895 Hengstenberg “Robina”
| written November 2020, updated February 2022 ... | [index] [index by age] |

I’d never heard of Hengstenberg before getting this machine. They were based in Bielefeld. (s/n: 313458) Alex Askaroff has a nice summary history of the Hengstenberg Sewing Machine Company at sewalot.
The previous owner thought this was a Regina, and I assumed so too, until I saw references in a couple of places (including at sewalot) to a “Robina” model, identified by the central mother of pearl robin. So now I think it’s a Robina.
As with many German machines of the period, it’s a copy of the Singer
Model 12, though in this case, a high-arm copy. The mother of
pearl decoration on the machine was apparently a specialty of
Hengstenberg’s, and the marquetry on the bonnet top is wonderful as
well.


 I had been confused by the little MOP babies on the bed on this
machine, since these days we only adorn things with babies if they’re
destined for the nursery. But I guess I was mainly looking at the one
in the front corner, where the decoration is most worn. When I
spotted the faded gilt wings belonging to the other two, it made much
more sense. They’re cherubs!
I had been confused by the little MOP babies on the bed on this
machine, since these days we only adorn things with babies if they’re
destined for the nursery. But I guess I was mainly looking at the one
in the front corner, where the decoration is most worn. When I
spotted the faded gilt wings belonging to the other two, it made much
more sense. They’re cherubs!

I haven’t had a chance to sew with it much, but it seems to be very
smooth. Can’t beat German engineering! Also, I think I have more
accessories for this machine than any others (well, other than the
more modern Singers), so I guess I really should learn to use it!

| updated December 2022 | [index] |
 It’s a little embarrassing that it took me this long to figure out how
to wind a bobbin on this machine. The bobbin winder is similar to that
on most other antique German machines, but I’d never tried it. I
mis-threaded it a couple of times, with predictably poor results,
before I went looking for a manual. I found one for a similar Frister
& Rossmann, as well as a manual for a much later model Hengstenberg.
Happily, they agreed. :-)
It’s a little embarrassing that it took me this long to figure out how
to wind a bobbin on this machine. The bobbin winder is similar to that
on most other antique German machines, but I’d never tried it. I
mis-threaded it a couple of times, with predictably poor results,
before I went looking for a manual. I found one for a similar Frister
& Rossmann, as well as a manual for a much later model Hengstenberg.
Happily, they agreed. :-)
The thread comes through the upper thread guide from behind, then down and around the tension disks, and back through the lower thread guide. Then (counterintuitively, for me) it goes down the back of the tall arm, under its smoothly curved base from back to front, then through the hole in the end cap of the bobbin before the bobbin is loaded into place (with the pin through that same hole).
Once you do all that, it winds absolutely perfectly. Those Germans. They know their stuff.
Threading the Hengstenberg shuttle
| added March 2025 | [index] |
Someone on VSS asked recently about threading the bobbin on their German TS (transverse shuttle) machine. They had some pictures to go by, but were having trouble figuring it out, so I did a pictorial. I’ve reproduced it here. (It turns out my pictures didn’t help on VSS, because their shuttle was a little different. Oh well!)
Once you know how, you can do the entire thing without loosening your grip on the end of the thread.
 Start with the thread coming off the bobbin like so.
 Draw the thread to the rear end (right end, in the picture above) and
into the tiny slot. Once it’s in that slot, cause it to go
counterclockwise around the end of the long pin, which you can see
here.
Draw the thread to the rear end (right end, in the picture above) and
into the tiny slot. Once it’s in that slot, cause it to go
counterclockwise around the end of the long pin, which you can see
here.
 Draw it all the way around the pin, back up through the tiny slot. It
will now be under the pin, like so.
Draw it all the way around the pin, back up through the tiny slot. It
will now be under the pin, like so.
 Pull the thread to the other side of the shuttle, and catch it under
the little hook.
Pull the thread to the other side of the shuttle, and catch it under
the little hook.
 Pull it along behind that spring.
 Continue pulling it out the slot on the side of the shuttle, and
counter clockwise around the circular slot.
Continue pulling it out the slot on the side of the shuttle, and
counter clockwise around the circular slot.
Done.

c.1919 Gritzner “R”
(Gone! No longer mine.)
| written November 2020 ... | [index] [index by age] |

The decals on this Gritzner are nicely preserved. I’ve seen a few mentions of how heavy their machines are, and this one is no exception – just because it’s a portable doesn’t mean you’d want to carry it very far! (s/n 2765314) But it does sew nicely, with a pretty light action.


| updated February 2021 | [index] |
It’s been great fun to have met two serious local collectors – we’re all regulars on the Victorian Sweatshop forum, and it turns out we live in adjacent towns. I’ve been sorting through the machines given to me back in November, and this is one of the machines that was just a bit redundant, and a bit new, for my collection. And I literally don’t have enough space to display all of my machines. So I was more than happy to give three machines away to my new friends this month. Great to be able to share the wealth, and pay it forward a bit.
1925 Singer Model 99
(Gone! No longer mine.)
| written November 2020 ... | [index] [index by age] |

The 99 was an incredibly popular Singer model, for good reason – small, very practical, and a very good stitcher. I already have a hand crank version, so having this electric, with its knee-bar controller, is kind of fun. (s/n: AA701919)


| updated a couple of weeks later | [index] |
I should have included a picture of the near-perfect bentwood top that covers this machine.

It incorporates internal clips to store things: it came with a cardboard box full of attachments, the iron knee lever that lets you control the speed of the machine, and one empty little round clip. I knew what it was intended to hold, but I’d never seen it in use.
But now I have! We got together with good friends today, for a socially-distanced walk in the woods, and a picnic. And they brought me a little Singer oil can that fits nicely in the little clip. Perfect!


| updated February 2021 | [index] |
I won’t repeat everything I wrote above about my Gritzner, but like that machine, this one was fun to play with (and it has a new oil can!), but in the end it’s not one I want to hang onto long term. So I’ve given it to one of my local fellow collectors.
1872 Wheeler & Wilson No.3
(Gone! No longer mine.)
| written November 2020 ... | [index] [index by age] |

I have a Wheeler and Wilson No.8 and a No.9, and I’ve wanted a No. 3 for some time. I’m thrilled with this one (s/n 765971). It’s in very good shape, and the machine and cabinet are complete. It even has extra needles and an extra bobbin. And a new leather belt, as well. Couldn’t ask for more.


I’m always amazed at how much thread comes off sewing machine bobbins.
(For this bobbin, I fashioned a tool based on a design I’d seen
somewhere.)

W&W #3 Drawer Dimensions
| added June 2021 | [index] |
A friend asked me for the dimensions of the drawers on this No.3 cabinet, since his are missing. I hope my markups are legible on the photos. Both of my drawers are stamped “101”, and both have that stylized “K”. The second drawer also has a less-stylized “K”, and a hand-scratched “101”.


| updated July 2026 | [index] |
I’ve loved having the W&W No. 3, but I’ve really needed to get some floor space back for a while. It’s gone to a very good home, and sounds like it will be in good company in its new collection.
One that got away
| written March 2021 ... | [index] [index by age] |
Back in early February I spotted an ad on Facebook Marketplace for a machine that I was sure was special. I quickly messaged the seller to see if it was still available (it was!) and made plans to drive to Connecticut to get it. The price was $100…
…until I stopped for gas, just a few miles from my destination, and saw a new message from the seller: “Someone just offered me $1000”. My heart sank – even though I was “first”, he was in no obligation at all to sell me the machine, and since I didn’t really know what it was worth, I couldn’t go anywhere near $1000 to match that offer. I had $200 in my pocket, but that wasn’t going to win back the machine.
I continued on (without replying), and 15 minutes later he was happy enough to let me at least see the machine, and give its (frozen) parts a wiggle. It may be the most valuable machine I’ll ever touch. It was a Williams & Orvis, made in Boston and sold in the early 1860s. Perhaps a few thousand of this model were made.
It sews a two thread chain stitch, and unusually, is driven via friction drive from the treadle wheel (i.e., no belt). I should have taken a picture of the underside as well.

I’ve also put a full-resolution copy of the picture here.
I heard later, through the sewing machine collector grapevine, that when the seller didn’t reply immediately to the $1000 offer (perhaps waiting to see what I’d say), the new buyer sent a second offer for quite a bit more. And from what I’ve read, it really was worth at least that much, perhaps even twice that. The decals were in very good shape. (Insert wistful “sigh”, here.)
In the end, despite my 3 hour wasted round trip drive, I’m really mostly very happy for the seller, that they didn’t sell it to me for $100, just through ignorance. It’s not like I was a really savvy buyer. And I’m glad I got to see it.
[Edit: Since then, I’ve learned who the buyer was. I’ve even met them. And I’m pleased that I can’t really imagine a better home for that machine.]
Hamilton Beach “Home Motor”
| written April 2021 | [index] [index by age] |
In June of last year I spotted a ratty $15 New Home sewing machine head in the classifieds which wasn’t at all interesting to me, except that it had a swing-away motor attached to it, similar to that on my Western Electric. I had needed to replace the motor on the W.E. machine, and its new motor had come on a base that was now unused. I knew this motor could be installed on that base, so I got it.
It was pretty grungy inside, and needed rewiring.


But once I cleaned it up and mounted on the base, it looked pretty good. Shiny, even.


These motors were developed in 1917, and were marketed as general
purpose “electrifiers”, to help automate anything you had in your home
that wasn’t already electrified. In particular, they were often
targeted at converting your old treadled sewing machine to
modern, fatigue-free, ease.


Full size versions of those scans (which are thanks to Steve, at Victorian Sweatshop) can be found here (advertisement) and here (pamphlet).
In addition to selling it as a standalone motor, Hamilton Beach also sold it to other companies to install on their sewing machines, as for my Western Electric, and for the New Home where I found this one. Even Singer used the Hamilton Beach motors briefly, just prior to 1920.
I’ve only really used mine once, mainly to prove it could be done. I
used it to motorize my Singer New Family! Mostly I just wanted to
have one because it’s such a nifty piece of the history of
electrification.


| updated May 2022 | [index] |
I finally have a MUTT treadle which can hold a variety of sewing
machine heads that I’ve never been able to treadle before. And since
I can treadle them, I can also now use the Home Motor the way it was
intended: as a way to “electrify” a treadle machine. The machine in
this short video is my 1920 Singer Model 127. It’s the perfect
candidate, since it wouldn’t have been electrified when purchased.
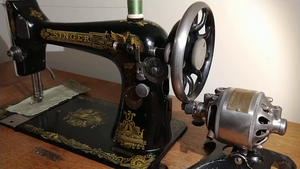
Much of the noise in the video is from the rough surface of the old rubber tire on the motor. The motor itself is pretty quiet. I’m sure many a sewist was thrilled to no longer have to treadle.
Treadle belt ferrules
| written April 2021 ... | [index] [index by age] |
Usually the two ends of a leather treadle belt are joined by putting a small hole through each end of the belt, and then inserting and crimping a wire “staple” to hold the ends together. This works well, but making the holes (I use a 1/16” bit in a little “eggbeater” drill, btw), and crimping the staple, is a nuisance, and then you have to take it apart and do it again if the belt stretches, and possibly again, if you misestimated. (Special plier/punch combinations are sold to make the job easier, but they’re not cheap.) That stapled joint is also not the loveliest part of an old treadle machine, and they’re even less charming when they’re new.


One of the quirky things about Willcox and Gibbs machines is that when
they were sold as treadles, or as belt-driven hand cranks, the belts
were joined in an unusual way. Instead of using a staple, the belts
were provided with a small brass cylinder, a ferrule, smooth on the outside
and threaded on the inside. The two ends of the belt are screwed into this
cylinder to join them. Here are instructions from an early (pre-1875)
manual:

A few weeks ago I was led to a post on the Quilting Board forum that showed an easy way to make one of these treadle belt ferrules. So thanks to “cwillis”, a member there (who I don’t know, but already like!), for the impetus. The idea was to use a binding post screw (also known, apparently, as a “Chicago screw”) to provide the threaded cylinder. It’s a good choice – they’re common, pre-threaded, available in brass and aluminum, and have much thinner walls than a cylindrical standoff would. I’ve never seen an actual W&G ferrule, but cwillis says they’re 3/8” of an inch long, and 3/16” in diameter. Conveniently, binding posts are readily available in that diameter. (With 8-32 threads, btw.)
I decided it might be easier to use a binding post extension, rather than the female end piece, because the “male” end on the extension can easily be held in a drill chuck. So I got some 1/2” extension posts at the hardware store. I used aluminum because I couldn’t find brass. (I looked at ordering some online, but the reviews all suggested that the “solid brass” ones weren’t, and I didn’t want to use steel.)


The piece of tape, about 2” square, is wrapped such that it covers just 3/8” of the post. It acts as just a bit of a “fence”, or guide, to keep the cutting blade in the right place until it has cut its own groove. Also, giving the tiny cylinder a long blue tail makes it much easier to find after it flies away when the cut is finished. (Trust me on this, and wear your goggles!)
cwillis used a Dremel tool to cut his ferrules, but I hate Dremel tools, and it seemed like spinning the ferrule itself would yield a nice cut. I have a drill press and many cutting options, but since not everyone does, I decided to try some other methods as well.
- I tried using my rechargeable drill, along with a triangular file, to do the cutting. The drill, while it had a nice flat base, was hard to hold still, and the file took a while to cut through the binding post. The good news is the cut was easy to control, and left a nice finish on the cut end. But aluminum does gum up a fine steel file, so maybe this isn’t the best approach. (A wire brush cleans most of it, btw.)


- I also tried a corded drill, which I clamped very lightly in my bench vise. I cut with a fine hacksaw blade. This was much faster, but the saw is much more aggressive than the file was, and it tends to “catch” a bit. It also jumped around quite a bit while starting the cut, even with the tape to help guide it. It was overall harder to control, and left a rougher cut when done. It didn’t help that I was nervous about how firmly the drill was held by the vise, so I kept one hand on the drill the whole time.


- In the end, and not surprising, using my drill press was the easiest (and safest feeling) method. I was able to hold the hacksaw more firmly, using two hands to guide it. (BTW, I often put a cardboard box on the table of my drill press – it contains the spatter from cleaning and polishing with my wire wheels, and helps catch small parts if I lose my grip on them.)

Anyway, lots of options for cutting (and don’t forget “Dremel” too!). In all cases, to clean up the threads on the cut end I simply used a pointy X-Acto knife to trim the rough stuff around the inside of the ferrule. I could have chased the threads with a tap, but I think this did a better job.
As suggested by cwillis in the QB post, I used a pencil sharpener to taper the ends of the belt. My sharpener has two sides – I found the narrower side with the thinner taper to work best.


So, how well do these ferrules work? It turns out it depends a lot on the quality of the belt. I’ve never bought a large spool of belt (should have, long ago), so I have an assortment, and therefore an assortment of scraps. The scraps from one of my junky belts just sort of frays after being “sharpened”, and I only got it to stay firmly in the ferrule about one in five tries. But with good quality belting, these things seem to hold well. I find that (contrary to the W&G manual, above) “untwisting” the second end of the belt by 3-1/2 full turns is about right, to get it to sit mostly flat when done.
As it happened I decided to try one of the ferrules on my 1871 New Family. And also, as it happened, that was the machine equipped with the original junky belt. Predictably, after a couple of failed tries at giving it a ferrule, the belt was now too short for the machine.
However!! I realized I had several matching scraps of really good
belting, and of course I now had several ferrules. So my New Family
is now somewhat ironically sporting three of my new aluminum ferrules,
connecting three pieces of scrap belt. Hey, waste not want not!

I guess I need to order some treadle belt.
Spool felts, and felt washers
| written Juneteenth, 2021 | [index] [index by age] |
Spool felts are used to keep the thread spool from spinning too fast, thereby dumping thread when you don’t want it to, and if sewing quickly, to keep the spool from chattering. They also look nice. I like the idea of spool felts, but I don’t really like the idea of buying them. Part of my issue is that the fancy machines that they use to make them don’t seem to work on anything but BRIGHT RED FELT, and frankly, I don’t really like the look. Particularly on an antique machine, I think the bright red draws attention to how colorless the rest of the machine (usually) is.
I spent a lot of time browsing the internet looking at big expensive punches until I finally figured out the easy way to make my own. (Maybe everyone else already does this, and didn’t tell me!)
Punch a hole in your piece of felt. Take two fender washers (which basically means, “large diameter with a small hole”), and use a screw and wingnut to fasten the washers to the felt, sandwiching it from either side. A lock washer under the screw head makes it easier to tighten by hand. Then just cut around the washers, as closely as you can. Easy. Use different washers for different sized felts.


c.1871 American Button-Hole, Overseaming & Sewing Machine Co. w/ overseamer
| written September 2021 ... | [index] [index by age] |

It’s been 10 months since I acquired a new machine! That’s left time for other projects, but I was thrilled when this machine was pointed out by a friend on the Victorian Sweatshop forum. It was made by the American Button-Hole, Overseaming and Sewing Machine Company in 1871 (or so).


I already have another American BHO machine, but that one’s a bit of an oddball, and doesn’t have a treadle base. This one has nice delicate ironwork on the machine head, and the base is mostly complete. Sadly the bonnet top is missing all of its hardware fittings, all the wood has been overcoated with what I think is polyurethane, one of the iron legs is cracked and the irons have been repainted. Can’t have everything, I guess. But, unlike my other American, this one came with shuttle and bobbin. Hurray!


Counts of machines licensed by year by the patent cartel would place its serial number (30944) in 1871. But its last listed patent date is December 12, 1871, so it must have been pretty late, or quite possibly was made in 1872.


But what’s really great about this machine is that it includes the extra under-bed mechanics needed to form the overlocking stitch referred to by the company name! There are two more spool pins under there, implying three threads total – at least, I assume that’s what it means. Now all I need to do is figure out how it works, and what it does! I’m thrilled – this is going to be fun. [Edit: One spool pin is extra. The overseaming stitch uses just two threads.]


Here’s an advertisement for this, or a very similar, machine, courtesy the Smithsonian archives.

Like my Singer 29-4, and my Wheeler and Wilson No.8, this machine has paired drive pulleys, giving it “high” and “low” drive ratios that are accessed by simply moving the belt from one pulley pair to another.
| updated late October, 2021 | [index] |
This machine was put on the back burner for a while – the weather has been much too nice to spend days in the cellar. But I did find time to drench some parts with penetrating oil from time to time. Now that the weather has turned, I’ve gotten back to it.
The big issue I knew I’d have was separating the needle bar from its
sliding spiral sleeve. While the machine turned over fairly easily,
it clearly hadn’t been used in “overseaming mode” for a long time.
The close-fitting sleeve was very firmly stuck to the needle bar.
It wasn’t until I had disassembled things far enough to remove the needle bar
that I figured I had a fighting chance.
 I soaked it in a plastic bag with penetrating oil all around it for a few
days, then realized I should try some heat. I put the bag in the freezer
overnight. When I took it out, I used a small butane torch to heat just
the sleeve, and immediately rested the edge of the sleeve on one jaw
of my vise, and used a small hammer, to tap on the top of the needle bar (“cushioned”
by a brass nut, to prevent damage to the tip of the “finial”. It worked!
the bar slid in the sleeve by about 1/16”. I called it a day, and left it
to soak some more.
I soaked it in a plastic bag with penetrating oil all around it for a few
days, then realized I should try some heat. I put the bag in the freezer
overnight. When I took it out, I used a small butane torch to heat just
the sleeve, and immediately rested the edge of the sleeve on one jaw
of my vise, and used a small hammer, to tap on the top of the needle bar (“cushioned”
by a brass nut, to prevent damage to the tip of the “finial”. It worked!
the bar slid in the sleeve by about 1/16”. I called it a day, and left it
to soak some more.
When I tried again, I didn’t bother with the freezer, but I did use the
torch again. I was able to tap the bar back and forth in sleeve, and
eventually I was able to slip a drill bit through one of the holes in
the shaft, and holding the leather-wrapped sleeve with pliers, was able
to twist things back and forth until the sleeve was free!

The rest of the cleaning went well. The shuttle race had come out of the
unit, and I was able to disassemble, clean, and reassemble it in an afternoon.


Interestingly, two sections of the feed dogs on this machine seem to be
independently adjustable. I’ve never seen that before. [Edit: they’re
not actually “adjustable”. The feed dogs are designed so that about
half of them can be lowered out of use when doing buttonholing/overseaming,
presumably to make the cloth more maneuverable.]

I can’t remove the main shaft without removing the hand wheel and
loosening all of the cams. Even if I could, my chances of getting the
timing all adjusted properly afterward would be slim to none. So as
usual, I cleaned this part in situ.

All the other bare metal parts on the machine have been removed and cleaned. Next comes reassembly!
| updated mid November, 2021 | [index] |
Okay, that was a fib. Just because the bare metal parts were clean, didn’t
mean the painted parts were clean. And that took a while. (Plus, other
projects took a while.)

I used GOJO (non-pumice) to help with the cleaning on this machine. I’d tried it before, but was unimpressed. Then I saw a couple of machines where it had been used, which looked great, so decided to try it again. You just paint on a thick layer, let it sit for 5 or 10 or 20 minutes, then wipe it off. Then I rinsed with my usual go-to, Orange Glo, to get rid of the residue, and to make everything oily again. I’m pleased. Knowing me, I was probably impatient about the waiting, last time I tried it.
 It took about a week to find the time to put it all back together,
but… it sews! Also, it became much easier to get it sewing correctly
after I realized that this machine has a small mark on the needlebar
which helps set the needle height. When the mark on the bar is level
with the top of the machine, the eye of the needle should be level with
the throat plate. (This is the same mark and procedure used by the Singer
model 12.) Very easy. Interestingly, my 1872 American BHO doesn’t
have this mark – instead, you simply insert the needle until it stops, then
tighten the screw.
It took about a week to find the time to put it all back together,
but… it sews! Also, it became much easier to get it sewing correctly
after I realized that this machine has a small mark on the needlebar
which helps set the needle height. When the mark on the bar is level
with the top of the machine, the eye of the needle should be level with
the throat plate. (This is the same mark and procedure used by the Singer
model 12.) Very easy. Interestingly, my 1872 American BHO doesn’t
have this mark – instead, you simply insert the needle until it stops, then
tighten the screw.
Oh – and, which needle? After some research, and buying some samples, I’ve determined that these machines would have likely taken a Boye 27, which happens to be the same needle used by the Wheeler and Wilson No.8. A Groz-Beckert 712032 is one modern equivalent. I got mine from threadexchange.com. When researching this kind of thing, the ISMACS needle cross-reference is an invaluable resource.
| updated early December, 2021 | [index] |
So, after getting it it to sew a normal lockstitch, the next step was to try to get the
overseaming mechanism to work. Sadly (and obviously, I guess, in
retrospect), for that to work the machine needs a different throat
plate, with an extra hole for the lower needle to come through. Well, not
really “extra” – there’s still just a single needle hole but it has to
accommodate two needles. (Thanks to Mike Anderson for this photo.)

(There actually is an extra hole in my needle plate, but that’s for something else – perhaps just to make it easier to bring the bobbin thread up initially.)
Happily, I’ve been making progress on the design for CNC’ing a new
needle plate. I plan on making the initial version from Bakelite.
Normally I’d worry about strength, but the needle plate rests on a
“beam” going right across the middle of the opening that it covers.


| a few days later | [index] |
 The new throat plate seems to be a winner, and the Bakelite is plenty
strong enough. There will be another iteration, but this one works
well, for now. You might notice that the feed dog hole is a different
shape. It turns out there’s magic involved: the machine actually has
a little button you can push which causes the rear (wide) half
of the feed dogs to drop away. Apparently they then work
better for twisty sewing (like buttonholes).
The new throat plate seems to be a winner, and the Bakelite is plenty
strong enough. There will be another iteration, but this one works
well, for now. You might notice that the feed dog hole is a different
shape. It turns out there’s magic involved: the machine actually has
a little button you can push which causes the rear (wide) half
of the feed dogs to drop away. Apparently they then work
better for twisty sewing (like buttonholes).
In case someone else needs them, I’ve put some screen captures from my CAD program here. I hope they capture all of the necessary dimensions.
| updated June 2022 | [index] |
I have a few little projects that I’ve been wanting to do on my wood lathe, which I’ve hardly ever used. A couple of them are sewing machine crank handles, and another was to create a replacement “kickstand” for this American machine – the propping post that holds the machine up when you tip it backwards. I collected photos of what they should look like from the web, and even got measurements from a friend with an interest in American sewing machines. But my friend and I agreed that American seemed to use quite a few different styles, and when push came to shove, I realized I don’t actually have the skills to faithfully reproduce an original propping post, even with careful measurements in hand!


So after a quick degree in wood turning from YTU (YouTube University!), I went ahead, with loose guidance from the photos and measurements. I think I came up with something passable, or, at least, not embarrassing.
If you look closely it has a couple of small chips and gouges, but the biggest issue is that the bottom isn’t quite square, so the lower edges don’t quite meet the table. Sigh. I even tried to undercut that a bit, while turning, to make sure it would work. (Hey, I only just got my degree!! :-) )
I may end up redoing it in a more appropriate wood. This started as an old piece of broomstick, so I have no idea what it is. It will need to match the table and bonnet reasonably well after I refinish them.
| updated late September 2022 | [index] |
 Well, I got hold of some nice black walnut (Thanks Ziggy!), so I tried
turning a new “kickstand”, using a design more closely inspired by
pictures of the ABHO originals. Mine is taller and slimmer – taller
because I wanted to be sure the thread spool didn’t fall off the
machine when it’s tipped back, and slimmer because I thought it was a
better match for the spindly irons and lacy casting of the head. I’ll
put off finishing it until I decide what to do about the rest of the
woodwork.
Well, I got hold of some nice black walnut (Thanks Ziggy!), so I tried
turning a new “kickstand”, using a design more closely inspired by
pictures of the ABHO originals. Mine is taller and slimmer – taller
because I wanted to be sure the thread spool didn’t fall off the
machine when it’s tipped back, and slimmer because I thought it was a
better match for the spindly irons and lacy casting of the head. I’ll
put off finishing it until I decide what to do about the rest of the
woodwork.
How does it sew?
| added December 2021 | [index] |
After several iterations of figuring out how to thread the lower thread, I’ve started getting decent stitches… once in a while. Part of the trouble is that I haven’t found any pictures of someone actually trying to sew with one of these, so I’m not certainly what the stitch should look like. The ABHO stitch is described and pictured (in sketch form) in a couple of patents (US24863 and US40311). The pictures show two different forms of the stitch. In both, you can see that the lower thread somewhat counterintuitively ends up entirely on top of the cloth. Only the upper thread passes through the cloth. And if I were to try and summarize the stitch: A loop of the lower thread passes through a loop of the upper thread (below the cloth plate), and a loop of the upper thread passes through a loop of the lower thread (as pictured, above the cloth plate).
In the first image, from US40311, the lower thread (now on top)
is shown in black, snaking in S-turns between the loops of the upper thread.

The second sketch, from US24863, shows the lower thread passing
straight through the upper thread loops.

It turns out that in my flailing to make things work, I have managed
to roughly reproduce both of those forms of the stitch. The top
of the cloth is on the right, in both pictures:


I’d be thrilled with that result except that after sewing many feet of overseam, those examples are the only couple of inches that actually look much at all like “sewing”.
Most of my results (literally) look like this!

Clearly I have some learning to do.
As for how the stitch is formed? Here are some snapshots, and a short movie.
First (under the cloth plate, unpictured), the lower needle passes
through the loop of thread brought down by the upper needle. It then
comes up through the cloth plate. (first pic)

The rotating “loop spreader” grabs the loop of lower thread that the
lower needle has brought up, and swings it clockwise. (second pic)

The shape of the end of the loop spreader opens up that loop of
lower thread (hence the name!), so that the upper needle can pass
through that loop on its way down. (third pic)

This movie, even slowed to 1/4 speed, isn’t really slow enough to fully
capture what’s going on. The upper needle drops through the spreader’s
loop, and the spreader rotates back, very quickly!
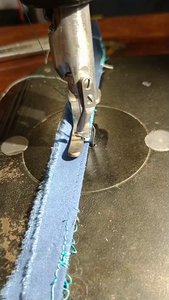 (There’s a second copy of this, on youtube.)
| a day later | [index] |


After playing with the tension a lot, and finding that it needed a lot of top tension, stitching got better.
I then also noticed that my Bakelite throat plate barely left room for the thread around the lower needle spike, so I made another one, with more room for the thread. Much better!! (For the record: My lower spool tension spring was compressed to about 3/8”, and the top thread was wrapped 3-3/4 turns around the tensioner.)
Needles for the ABHO machines
| added December 2021 | [index] |
The needle is a Boye 27, or a 126x1 (or probably 126x3), available
from Groz-Beckert as their no. 712032. I suspect Schmetz and Organ
have similar 126x1 replacements.

The long slot in the needle should be to the left, because the machine threads from left to right.
 If your machine has a set-screw on the side of the needle bar, simply
insert the needle as far as it will go,
If your machine has a set-screw on the side of the needle bar, simply
insert the needle as far as it will go,
 If the needle bar has a collet on the end (that you tighten with a
wrench), as I suspect all overseaming machines do, then there is
likely a small mark an inch or two from the top of the needle bar.
Insert the needle so that when that mark is even with the top of the
machine’s casting, the needle’s eye is even with the cloth plate.
Poke a slender pin into the needle’s eye to make this adjustment
easier. (This is the same method used for setting the needle on
a Singer New Family / Model 12.)
If the needle bar has a collet on the end (that you tighten with a
wrench), as I suspect all overseaming machines do, then there is
likely a small mark an inch or two from the top of the needle bar.
Insert the needle so that when that mark is even with the top of the
machine’s casting, the needle’s eye is even with the cloth plate.
Poke a slender pin into the needle’s eye to make this adjustment
easier. (This is the same method used for setting the needle on
a Singer New Family / Model 12.)
Interestingly, my overseaming machine is pickier about needles than most. Needles are mainly measured by the diameter of the shank (so that it fits in the machine, and sits the right distance from the hook, or shuttle), and by the length from the butt to the eye (so that the hook or shuttle can pick up the loop correctly). They’re also measured by total length, but in most cases the distance from the eye to the point doesn’t matter much, as long as the needle is clear of the cloth while the feed dogs are in motion. I bought both 126x1 and 175x3 needles to try out. They’re basically the same diameter, and the same overall length, and both worked equally well for sewing a lockstitch in both of my ABHO machines.
But the 175x3 is 2.3mm longer from butt to eye than the 126x1, meaning the eye to point distance is shorter by that amount.
I happened to choose the 175x3 while testing the overseamer, and the machine was dropping stitches. I eventually realized that as the needle descended, the rotating loop spreader was releasing the loop of lower thread just before the needle’s point had reached the cloth, letting that loop slip underneath. There are no adjustments for the timing between the loop spreader and needle which might have fixed this. Something made me measure my needles, and I switched to a 126x1. And it sews perfectly, because that extra 2.3mm of needle reach is enough make it always catch the loop.
Threading the ABHO top thread
| added December 2021 | [index] |
Threading the top thread is the same whether the machine will be sewing
lockstitch or a buttonhole/overseam stitch.

Threading is easy, though the tension mechanism is somewhat unique – the thread is wrapped around a small drum, which can be rotated to vary the number of turns of thread it holds.
There’s no thread guide between the spool and the tensioner. The thread goes over the top of the tension wheel, around once or twice, and out through the small hole in the side.

From the tensioner the thread goes from front to back through the long guide on the left end of the machine, up and through the takeup arm from front to back, then back-to-front through the long guide again. Finally, down to the needle, which threads left to right. There’s no flat on the needle, so be sure the groove is to the left.
Twist the tensioner counter-clockwise to add tension, at least one or two turns for lockstitching, perhaps twice that for overseaming. (This is just from my very limited experience!)
Threading the ABHO shuttle, for lockstitching
| added December 2021 | [index] |
 There are at least two different shuttles types, but both of mine are
the same. The patent for this version of the shuttle has nice
drawings. US139421 (May 1873)
There are at least two different shuttles types, but both of mine are
the same. The patent for this version of the shuttle has nice
drawings. US139421 (May 1873)
 Threading is straightforward. There’s a barrier of sorts across the
middle of the shuttle, below the bobbin in these pictures. The thread
passes between that barrier and the spring which presses against it.
Threading is straightforward. There’s a barrier of sorts across the
middle of the shuttle, below the bobbin in these pictures. The thread
passes between that barrier and the spring which presses against it.


After installing the shuttle, take the thread and run it out through the large hole in the throat plate before reinstalling the throat plate. This just ensures the thread is in the right position when the shuttle picks up the loop.
Converting an ABHO machine for overseaming
| added December 2021 | [index] |
-
First, remove the shuttle. You won’t be needing it, and it may just fall out later.
-
Then, lower the rear end of the feed dogs by pushing on the button which sits about 3/4” below feed dog height, at the rear of the dogs. In these pictures it’s the mushroom-shaped thing, below the screw. You’ll need to push the button in, and manually move the end of the feed dogs down. You need to do this so the alternate throat plate will fit.
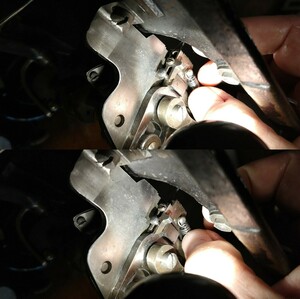
Once you know how, it’s very easy to change the feed dogs, using just your index finger to reach behind them to push the button and raise or lower the dogs. It’s just hard to take a picture of it from that angle, so the pictures were taken from the bottom, with the machine flipped up. (Ignore my hand positioning – I was keeping the machine from falling.)
By the way, this mechanism is covered by the May 1870 patent on the machine’s medallion.

-
Now swap the normal lockstitch throat plate for the overseaming throat plate. Once you have the lower needle in its correct place, you won’t be able to do the swap, because one needle or the other is always through the plate.
-
Reconfigure the needle bar slider. Remove the pin that locks the spiral sleeve to the needle bar. (If the pin on my machine looks a little like an old nail, that’s because it is. It came that way. Hopefully your machine has the original pin!) The arrows are clearer if you look at the large version of the pictures.
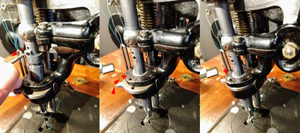
Adjust the height of the needlebar and the sleeve until you can press the lock lever into the groove on the sleeve. Secure the lock lever using the same pin.

- Tip the machine back (don’t let that tall spool pin hit the
wall!), then locate the little brass knob at the rear end of the
shuttle race, and pull it outward (to the right). It’s on a
spring-loaded pin, and pulling will allow the shuttle race to drop
and rotate. Rotate it about half a turn, toward you, until the
spring-loaded pin engages with a new hole.


- Unscrew the thumbscrew that couples the shuttle driver to its
connecting arm. The shuttle driver will drop and rotate, like the shuttle
race did. Rotate it far enough that the connecting arm can again
be attached to the shuttle driver, in its new orientation.
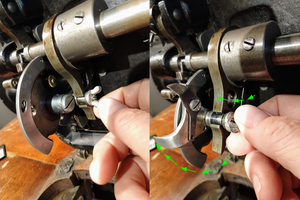

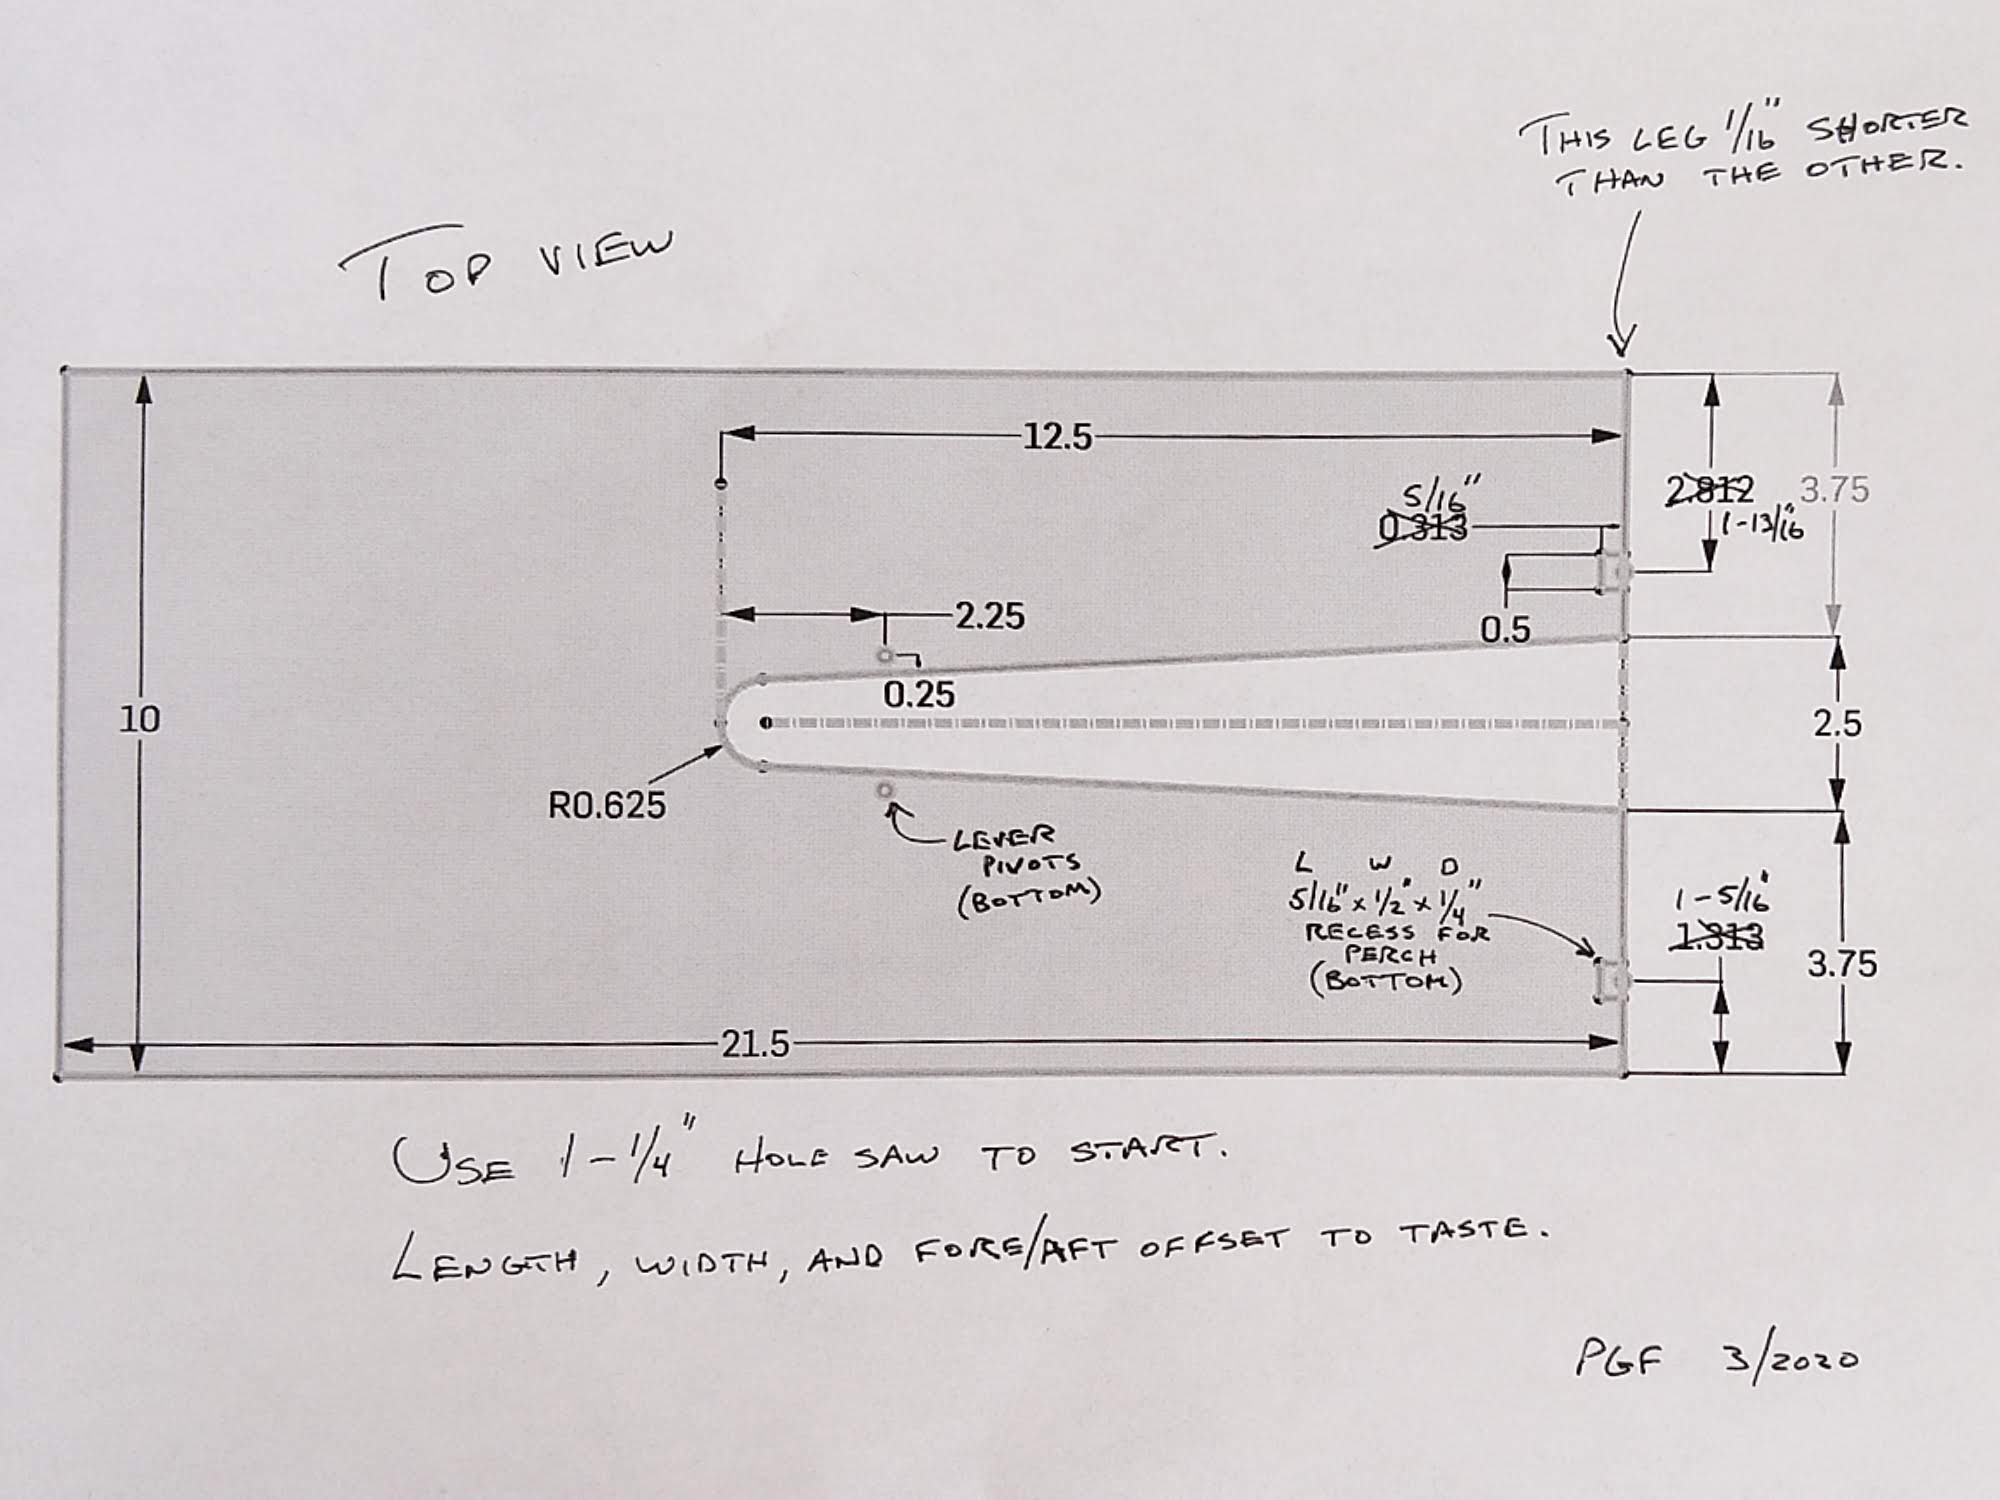
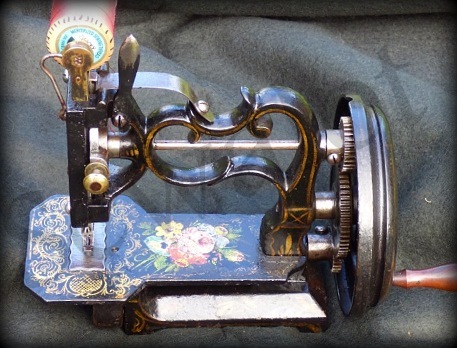
-
Now, thread the lower needle, as described in the next blog section. You won’t be able to get at it as easily, later.
-
With the lockstitch mechanism out of the way, the lower needle can now be swung into its active position. To do this smoothly, and without damaging the lower needle, rotate the hand wheel away from you
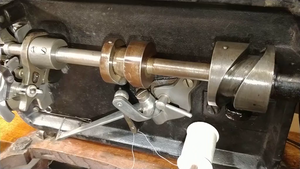 until the eye of the upper needle descends and becomes even with
the cloth plate. (Note that it should be descending.)
until the eye of the upper needle descends and becomes even with
the cloth plate. (Note that it should be descending.)Loosen the lower needle arm clamp, gently swing the arm, and, watching the cam roller, engage the roller in its cam groove. You might need to lift the arm a bit to help it in or out of its clip. It’s easy to jam and drag the point of the lower needle on the bottom of the throat plate during this step, so be careful! Don’t forget to tighten the needle arm clamp when you’re done.
The reverse, if you’re stowing the lower needle arm: Rotate the hand wheel until the upper needle’s eye descends to be even with the cloth plate. Then loosen the arm’s clamp, and wiggle the arm out of its cam slot, and into its clip.
Threading the ABHO bottom thread, for overseaming
| added December 2021 | [index] |
I can’t see that there’s any way of threading the lower needle when it’s in the “engaged for sewing” position. There’s just no way to get at the two holes in the needle after its tucked under the cloth plate. So first, carefully get it into the “stowed” position shown here, as described above.

 The thread goes from the spool, through a guide hole in the “storage
clamp” pillar, then through the eye of the takeup spring. From there
it goes into an eye at the base of the lower needle, up along the
groove on the front side, and back through the eye near the tip.
Leave a few inches of thread, and, with the eye of the upper needle
even with the cloth plate (on its descending stroke), move the arm back
into overseaming position. Carefully and gently! Wiggle the main
shaft to get the cam in the right position. If the upper needle bar
and main cam aren’t in the right place, the lower needle may collide
with the throat plate.
The thread goes from the spool, through a guide hole in the “storage
clamp” pillar, then through the eye of the takeup spring. From there
it goes into an eye at the base of the lower needle, up along the
groove on the front side, and back through the eye near the tip.
Leave a few inches of thread, and, with the eye of the upper needle
even with the cloth plate (on its descending stroke), move the arm back
into overseaming position. Carefully and gently! Wiggle the main
shaft to get the cam in the right position. If the upper needle bar
and main cam aren’t in the right place, the lower needle may collide
with the throat plate.
My machine has two positions for the lower spool: one spool pin on the bottom of the machine, and another mounted to the cabinet. I’m not sure why both are provided.
c.1922 Salter’s Ideal Sewing Machine
| written April 2022 ... | [index] [index by age] |

I don’t have this machine yet [Edit: I do, now.], because a friend found it at an estate sale near Pittsburgh, but I’m pretty excited. Relatively rare, it was made just after WWI, in London, for just a 2 or 3 years. It’s odd in that most of the technology in the machine was well understood by then, and much had been in production in other machines for at least 60 years. And yet the designer, an engineer named Leslie Salter, managed to patent his particular implementation of that technology in 1911. His model ‘A’ went into production after WWI in 1921 (mine is a model ‘B’), and the Ideal Sewing Machine Company was liquidated in 1925.
Salter’s original patent was British (No.30264, as enshrined on the cloth plate), but in 1913 he also patented in the US. His contribution to this machine is that unlike the early Raymond machines (which it is otherwise very similar to), the looper isn’t driven by a shaft running the length of the bed, but rather, it’s driven from the crank end of the machine via a series of very long levers. The Raymond mechanism is already somewhat imprecise (compared, say, to the Willcox & Gibbs rotary looper), but this must be much worse.
 My impression is that the Ideal was a bit of a boutique machine –
marketed as better than it was. It was “sold by such upmarket stores
as Selfridges and Harrods”, according to the ISMACS Ideal page.
Maybe if it had been sold today, it would have been featured in the
“Sky Mall” or “Sharper Image” catalogs: familiar technology in snazzy
new packaging.
My impression is that the Ideal was a bit of a boutique machine –
marketed as better than it was. It was “sold by such upmarket stores
as Selfridges and Harrods”, according to the ISMACS Ideal page.
Maybe if it had been sold today, it would have been featured in the
“Sky Mall” or “Sharper Image” catalogs: familiar technology in snazzy
new packaging.
| updated a month or so later | [index] |
I paid a visit to (and got to meet!) my friend Jim, and finally picked this up. The condition is a little worse than I was hoping, but from the one grainy, partial, estate sale photo that I’d seen before asking him to buy it for me, it would have been hard to know. There’s a fair amount of surface rust on the moving parts, and about half the plating is missing from the stitch plate. And it’s missing the spool pin and crank handle. It’ll be fun to restore it, regardless, and make it sew again.


I don’t know when I’ll get around to cleaning this up and really
getting it working. The crank handle and its screw are missing, and
the screw is unlikely to be a readily available standard size [Edit:
But it is! It’s 4 mm!]. But I did do some partial disassembly, in
order to oil things and assess its condition. I took this video of
the hook motion, driven by a cam on the crank’s shaft that drives a
short lever (hidden by the pillar) that in turn moves the long lever
that runs across the base of the machine. That lever, finally, moves
the hook back and forth. (It’s interesting to compare it to the hook
mechanism on the Raymond machines.)
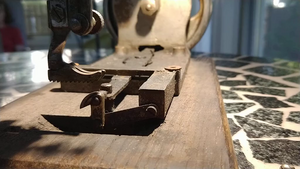
| updated Juneteenth, 2022 | [index] |
 I turned my first crank handle the other day! It’s perfect! Which is
sort of too bad, since I used an old broomstick for the wood. When I
redo it in walnut, I’m sure to screw it up several times. But for
now, I can be pleased!
I turned my first crank handle the other day! It’s perfect! Which is
sort of too bad, since I used an old broomstick for the wood. When I
redo it in walnut, I’m sure to screw it up several times. But for
now, I can be pleased!


| ten days later | [index] |
I love this part. It’s all cleaned up, and ready to go back together.


| additional information July, 2026 | [index] |
Just took the previous four pictures, to contribute some more hard data to a new “Salter tracking” project over on VSS). You might notice the rough ‘A’ cast into the bottom of my baseplate. That’s likely to be just an identifier for the cast used for this particular machine base, and doesn’t correlate to the “model” of the machine. At least, that’s beginning to seem the case from the VSS thread. So my machine is still a style ‘B’, even with the ‘A’ on the casting. The difference in styles has to do with presence/absence of faceplate, and some other small design details. There is no serial number on any of these machines.
A little polishing, a little assembly, some trial and error adjustments, and…
 …it sews! And it looks terrific on a sunny day. Maybe I should
take it to the beach for a little mending, just like in the ads?
…it sews! And it looks terrific on a sunny day. Maybe I should
take it to the beach for a little mending, just like in the ads?


But I have to say: this machine, while it’s very cute and stylish, and has huge “curb appeal”, is really a terrible sewing machine. The action that drives the hook is a series of imprecisely-connected levers, the cam bearing surfaces that drive all of the movement are all soft steel, and there’s a huge amount of friction and stiction in the presser foot action. It all feels much more like a stamped steel toy than the “prestige” machine of the marketing.
On the other hand, it’s kind of sexy. So there’s that.
Oh – one other thing. It’s hard to remember how small this thing is.
Including the wooden base, it’s only about 6-1/2” tall! Here it is, with
a Singer 127, for scale.

| updated late July, 2022 | [index] |
When I mentioned on the VSS forum that I needed to get some walnut in order to turn a new crank handle for the Ideal, a good friend from the forum offered to send me a small box of turning blanks from a black walnut tree that had come down on their farm a few years ago. They’d had it milled and dried, and it’s ready for use. Hard to turn down, right?
I finally had the right combination of free time and weather (since I use my Shopsmith lathe outside in the driveway), and gave it a shot. The new handle came out as well as the first poplar one did, and boy am I glad I redid it, rather than trying to stain the poplar to look like walnut.
The walnut, with just some amber shellac, is a very good match for the machine’s base.

And as a huge bonus, the piece of wood I chose has some nice “figuring” to it (I just learned that word!), which is how “wood people” describe wood that has a cat’s eye effect in the right light, like a Tiger’s Eye gemstone. The technical term for the effect is “chatoyancy”. (I also just learned that term, which, go figure, come’s from the French for “cat’s eye”. :-)
This little video shows the shimmer:
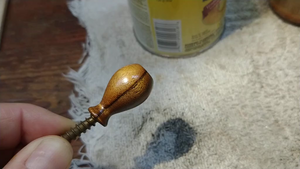
c.1892 Wheeler and Wilson No.9 parts machine and MUTT treadle
(Gone! The head is now a parts machine, and the treadle is now my MUTT.)
| written April 2022 ... | [index] [index by age] |

I picked this somewhat bedraggled machine up quite cheaply. I got it because I’ve been wanting a) to get a treadle for my W&W #9, and b) to put together a “universal” treadle (or MUTT, for Multi-Use Treadle Top, as they’re sometimes called). I have several treadle-less machine heads that I’d like to be able sew with occasionally, and the idea is to modify, or augment, this table to be able to accept those heads. Since I may alter this treadle permanently in the process, it’s appropriate that it’s already beat-up. We’ll see how that project goes. But in the meantime, I have yet another floor-standing machine to put somewhere!
I’m only guessing at the “c.1892” date. No records are available for these machines. My other #9 is pre-1890, and this is 140,000 serial numbers later. As a bonus, it turns out that the bobbin case and bobbin case holder from this head can be moved to my earlier (and nicer) #9, which is great.


 There should be a bar that pulls out from that opening above where the
drawer sits, just under the table top, to hold the dropleaf up.
Someone was fairly enterprising when they cobbled together some parts
and bent wire to make this alternate support! Works pretty well.
There should be a bar that pulls out from that opening above where the
drawer sits, just under the table top, to hold the dropleaf up.
Someone was fairly enterprising when they cobbled together some parts
and bent wire to make this alternate support! Works pretty well.
Creating a MUTT Treadle
The attraction of using a W&W treadle for a Multi-Use Treadle Top is that the band wheel is to the outside of the treadle legs. Many W&W treadles have no support for the right hand end of the axle, meaning that the belt can be fully removed from the treadle without taking it apart. So, I was hoping to find one of those. But this one, which has an iron brace to the outside of the wheel, seemed almost as good – after all, I’m capable of taking belts apart, especially since I’ll probably use silicone belts rather than leather.
 What I hadn’t realized is that the brace will likely interfere with the
belt path for some sewing machines. I’ll continue with my project, but
I’m maybe still looking for the other type of treadle.
What I hadn’t realized is that the brace will likely interfere with the
belt path for some sewing machines. I’ll continue with my project, but
I’m maybe still looking for the other type of treadle.
| a day or two later, the MUTT treadle works! | [index] |


 Well, it seems this will be a successful purchase, and project. My
Singer 15, Singer 237, and
New Ideal, all fit the W&W treadle top,
practically without modification, as these pictures show.
Well, it seems this will be a successful purchase, and project. My
Singer 15, Singer 237, and
New Ideal, all fit the W&W treadle top,
practically without modification, as these pictures show.
To make them all really sit properly level I had to carve some small notches around the edges of the opening. Notches were needed to clear the Singer 237 hinges (blue arrows) and a part of the New Home under-bed casting (green). All the machines will also need a few shims, set in place on the lip of the opening, to keep them stable. (I actually think the Singer 15 would have worked with no notches, and just shims – it’s smaller, underneath, than the 237.) You can see that when the W&W #9 head is in place, the notches aren’t a big visual change. BTW, I used a small laminate trimmer (router) spinning a small sanding drum to make the notches.


I also had to remove the box that sits under the cover to the left of the machines, and I had to remove the oil drip tray. The box can probably be remounted differently, and the drip tray can be lowered, or maybe just replaced with a sling of felt cloth. No big deal.
And one other thing: I’ve discovered that my 1872 American BHO, which I can’t use on this base due to the iron brace I mentioned above, just barely fits into the treadle top for my W&W No.8 (which doesn’t have the brace). It’s close, but it does fit. So that takes care of all the heads I was hoping to find a treadling solution for.
| a week or so later | [index] |
I realized there was at least one more machine that could make use of the MUTT. I don’t have a cabinet for my Singer 101, so to use it I’ve had to pull my 201 out of its art deco cabinet, which is kind of a major operation, involving undoing wiring, unscrewing hinge pins, etc. But I won’t have to do that anymore – the 101 fits in the MUTT just fine. I was even able to tuck the foot controller under the end of the pitman arm, and used the treadle pedal to control the speed while sewing. Amusing.

Also, I was able to remount the W&W box/tray. The right end had to be trimmed
to fit around the bobbin race of the Singer 15, and then even more to fit the
huge undercarriage of the 101.

I was also able to remount the drip pan. I used small wood spacers – three are 1/2” thick, and the one at front right is 3/4”. With those, and just a little bending, it fits well, takes very little extra space above one’s knees, and still accommodates all of my machines.
| updated mid-June 2022 | [index] |
I’ve been getting tired of the look of the fuel/oil tubing I’ve been using as the treadle belt on the MUTT. The yellow/green isn’t exactly subtle. Also, the 1/4” diameter of that tubing was a little big for a couple of machines. It rubbed on the pulley guard of the Singer 15, and the bobbin winder tire couldn’t avoid it on the Necchi (which I’ve also found fits the MUTT perfectly).
Others have used window screen retaining spline successfully, and it’s
very cheap, so I tried it. (Mine was $6.50 for 25’.) I got the
fattest spline they had, at .155 inches (5/32”).
 The hole in the is middle is 1/16” at most, so using a section of screw
threads as a connector wasn’t really practical, at least not if my
own screw collection was to be the source. I tried a small piece
(about 1”) of 12 gauge copper wire (uninsulated), and it seems to
working well. I’ve found a suitable length of spline that seems to
run all of the MUTT’s machines without being too tight, and without
slipping. The joint obviously isn’t very flexible, but I don’t hear
or notice any disturbance as it goes around the pulleys. If I find
that the copper wire slips loose on tougher jobs, I’ll probably try
using some insulated wire for more friction, with perhaps some
hair spray to make it even stickier.
The hole in the is middle is 1/16” at most, so using a section of screw
threads as a connector wasn’t really practical, at least not if my
own screw collection was to be the source. I tried a small piece
(about 1”) of 12 gauge copper wire (uninsulated), and it seems to
working well. I’ve found a suitable length of spline that seems to
run all of the MUTT’s machines without being too tight, and without
slipping. The joint obviously isn’t very flexible, but I don’t hear
or notice any disturbance as it goes around the pulleys. If I find
that the copper wire slips loose on tougher jobs, I’ll probably try
using some insulated wire for more friction, with perhaps some
hair spray to make it even stickier.
| updated March 2023 | [index] |
I realized I didn’t any really nice pictures of the whole Necchi/MUTT
setup. I sew on this rig pretty often, so that seemed wrong.

1920 Singer 127-3
| written May 2022 ... | [index] [index by age] |

This 127 head showed up locally for cheap money. I hadn’t been planning on getting a 127, since it’s very similar to my Singer VS3, but I’m a sucker for a pretty set of decals. Plus, now that I have my MUTT treadle, I’ll be able to sew with it.
The Sphinx style decals are fun to look at, and these are complete, though a bit faded. Parts that should be a brighter white/gold seem to have turned to a pale olive green. They still look good, to my eye, just a little more muted. Singer used these decals on many machines, apparently from the 1890s to the 1950s. Ancient Egypt never goes out of style, I guess. The seller said that it had belonged to their mother-in-law, and that it originally had a treadle.
When I got it, it was missing the shuttle, bobbins, all of the
tensioner parts, a presser foot, and of course, a manual. But the
next day the seller contacted me with a photo… of the
shuttle, bobbins, all of the tensioner parts, a presser foot, and of
course, a manual! So it’s complete! Might never have been, otherwise.


It turned over easily right away, without any cleanup, or even oiling, and the hand wheel clutch disengaged properly.
After a full cleanup, to get rid of the grime and shine some parts up a bit, it looks pretty good. Its serial number is G7952853.

It’s never been obvious to me how the bobbin winder axle on Singer
(and many other brands of) bobbin winders is put together, and they’ve
always been a little hard to clean because of it.

 But I’ve figured out that they’re all just press fit, and (so far, at
least), easy to take apart, with a small hammer and punch. (But, I should
really get a brass punch. Using a steel punch can deform the end of the
axle a bit.)
But I’ve figured out that they’re all just press fit, and (so far, at
least), easy to take apart, with a small hammer and punch. (But, I should
really get a brass punch. Using a steel punch can deform the end of the
axle a bit.)
A vise (with jaws padded with aluminum) squeezes it all back together nicely.

1953 Necchi BU Nova
| written May 2022 ... | [index] [index by age] |

This Necchi BU “Nova” was given to me by my friend Jim from the VSS forum. I had mentioned I was looking for a more “vintage” replacement for my mother’s Singer 237, and I asked him for advice. Among a few others (the Pfaff 130, Kenmore 158, and the Anker RZ were mentioned), he thought the Necchi BU series would be a good choice. And then it developed that he had a spare BU Nova, and would I like it? Since I was already going to be visiting to pick up the Salter Ideal he’d bought for me, it was a no-brainer. I knew it would be a good machine, coming from him.
Necchi is credited with creating the first zig-zag machine for the domestic sewing market in 1932 – the Necchi “BU”. They didn’t start exporting to the USA until after the war, in 1948. They introduced the follow-on and very similar BU “Nova” (my machine) in 1953, and the next model (the BU “Mira”) in 1954. Two machines listed in the vintage Necchi inventory at the Necchi groups.io site have later serial numbers than mine, and original purchase dates of March and August 1953, so I think it’s safe to say mine is from 1953. (In fact, some sources say the BU Nova was only made in 1953.)
It has a motor, and lamp, but since the wiring needed a bit of help, I plopped it on my MUTT treadle and took it for a spin. It’s great. I’ve very pleased.

It treadles beautifully, which isn’t really surprising: electrification in Europe wasn’t fully accomplished until the 1960s, so machines there were designed and offered as treadles long after the they weren’t readily available in North America.
I love the looks of it. Very handsome.


This is my first Italian machine, so it took me a while to figure out the labels on the stitch regulator. I thought they were unit markings. But the scale on the left side, which gives the stitch length in millimeters, is labeled “IN”, and the right side, showing stitches per inch, is labeled “RE”. That made no sense at all until I realized there were two more labels at the bottom of the scales: “AV” and “FO”. Ah ha! The right side labels are in English, for “reverse” and “forward”, and a few minutes on the web gave me the left-side Italian: “retromarcia”, and “avanti” (I think).
After sorting out the wiring, I reattached the motor and gave it a whirl. Holey moley!! This thing is fast! Too fast for me – I’m not good enough to control a racing machine. :-) I know someone that installed a speed reducer pulley on theirs. I’ll look into that, but in the meantime, I’ll just keep treadling it.
| updated January 2024 | [index] |
The original pictures for this blog entry didn’t show off the machine, and MUTT treadle, at their best. So I took new photos, and replaced them all. Same views, just nicer looking.
Speed reduction pulley
| written November 2025 | [index] |
The Necchi BU is my only zig-zag machine, and it’s a good one, so I use it when doing webbing straps, etc. Mostly I treadle it when I can, but for that kind of work I usually need the motor, just to get through the straps with a tight zig zag.
The BU’s only problem is that the pulley ratios and its motor are set up so that it tends to run much too fast, for me. (Maybe nimble Italian tailors and seamstresses liked it just fine – I don’t know!) Necchi sold a variant that had a switchable speed reducer, implemented with a 2:1 transformer on the motor. People say that works well. But it sounded complicated to try and retrofit.
Other folks have discovered that many older Kenmore machines come with a 2-to-1 reducer pulley in the driveline. And those machines seem to be parted out pretty regularly on ebay. This technique, of using a reduction pulley, was explored pretty extensively in a thread on VSS (mostly following on from posts #33 and #55). So that’s what I did instead.

The trick, after some experimenting, was to locate the pulley as low
as possible, without having the edge of the large pulley interfere
with the mounting bolt. That simply involved drilling a second 3/16”
hole in the Kenmore bracket, just below the original.

 Putting it low, like that, gives just enough tension on the top belt, while keeping the pulley
close enough to the motor.
Putting it low, like that, gives just enough tension on the top belt, while keeping the pulley
close enough to the motor.
I chose rubber O-ring belts because they don’t need to be carefully sized, and they can be installed and removed quickly, without loosening the pulley or motor mounts. They seem to be sold usually in two lengths, which cover 10” to 13”, and 13” to 15”. My setup uses one of each. Since O-ring belts can stretch and deform over time, I’ll have to try and remember to remove both belts when converting to “treadle mode”. (Normally only one has to come off when making the switch.)

The machine is now way more manageable at lower speed, and with the lower gearing, it will now sew as much webbing as will fit under the presser foot. (That’s five layers in the picture. It was lighter duty webbing, using a size 16 needle.)
c.1905 Jacoby “Eclipse” Fur Sewing Machine
| written September 2022 ... | [index] [index by age] |

I picked this up simply because it’s so different, and because I really wanted to watch it sew. It all moves, and it even has a needle, so I think I may get to see that pretty soon.
This is a machine for sewing fur hides together. The two furs, or pieces of leather, are pinched with their fur sides together between the two rollers. The top edge is whipped together with a simple chain stitch as the rollers turn. Fur machines based on this design are still used today.
Similar machines were used for glove making as far back as the 1870s: the basic layout of the two-wheel feed and the horizontal needle came from Bruno Rudolph, in Germany, in about 1868 (US patent US99481 in 1870). A later design change, by Claude Boland, eliminated any obstruction between the rotating feed wheels and the floor, and allowed larger hides to be sewn (US202695, 1878). Sellman Jacoby bought out all of Boland’s business in 1897 – patents, stock, storefront, factory, everything. My machine was built by Jacoby, and based on his patent dates, probably dates from the early 1900s. Interestingly, Boland’s machines could be set to sew to either the left or right, and having selected, it didn’t matter which way you drove the input shaft – the machine would still sew in the selected direction. This made treadling much easier. My Jacoby machine has neither of those features: it only sews in one direction, and treadling the wrong way causes it to fail to sew. (Unless there’s some lever or setting I haven’t discovered!)
| updated May 2026 | [index] |
I’ve only just learned about the Krems machine! It turns out that around 1810 (!!), a German inventor named Balthasar Krems (one site says he was a stocking weaver) developed a chain-stitch machine where the fabric was carried on a horizontal circular spiked wheel, and the stitch was formed by the combination of a needle with the eye at the pointed end (take that, Elias Howe!), and a hook on a moving arm. The entire mechanism, except for details, is exactly like the later fur machines made by Rudolph and Boland. There are beautiful pictures of the Krems machine at the Global Industrial Sewing Machines online museum. Given the condition of their machine, I wondered if it was original, or a copy, and emailed them. It’s original! “…found in 1970s in a barn in west Germany”!
I won’t try and direct-link to their detailed photos – their whole museum is worth a visit.
Here’s a link to an excellent video showing how one uses a fur machine like mine. I recommend expanding it to full screen, and using YouTube’s “Playback Speed” setting to slow it down as much as possible in order to see the needle and hook interaction. [ Edit: I also eventually made my own video. ]
My machine seems to include features described in a 1903 patent, so for now I’m calling it c.1905. It came with a spool of thread hand-marked “October 1952”, so it was likely in use at least until then.
Here are some initial just-brought-it-home shots…


 The operator treadles with just one foot, on the right-hand pedal.
The other foot is used to separate the two wheels, for inserting the
furs. The spring holding the wheels together is very strong, so it
makes sense to use foot pressure to separate them.
The operator treadles with just one foot, on the right-hand pedal.
The other foot is used to separate the two wheels, for inserting the
furs. The spring holding the wheels together is very strong, so it
makes sense to use foot pressure to separate them.


The machine is in good shape, and it only took some liberal oiling to
get it all turning properly. First stitches!!

| updated October 2022 | [index] |
It was clear when I got this machine that one of the first things to tackle was the horrible treadle table. It had wrinkled veneer, and either it was shellacked and then stained/painted, or the shellac failed by turning black, but either way the result was terrible. (I actually think the shellac turned black, since the underside of the table is in the same condition, even behind fittings like the treadle irons and drip tray.) Happily it mostly came off with alcohol (to dissolve the shellac) and steel wool.
Here’s a picture showing the pitman arm, half stripped.

What was left after stripping the top wasn’t pretty. This machine was
 well-used. There were dents and dings, and cracked and wrinkled and
missing veneer. I managed to get the ripples to lie flat, using the
iron and parchment paper technique, and glued down what veneer that I
could. I considered patching a spot where some veneer had broken
away, right in front, but decided it wouldn’t look that great even
patched.
well-used. There were dents and dings, and cracked and wrinkled and
missing veneer. I managed to get the ripples to lie flat, using the
iron and parchment paper technique, and glued down what veneer that I
could. I considered patching a spot where some veneer had broken
away, right in front, but decided it wouldn’t look that great even
patched.
 So I simply applied some Restor-a-Finish to even out the color (it
did, but just a little), and then put on a new coat of shellac to seal
it all up. It’s a little jarring to have such a beaten up table top
be all shiny, but at least now I can use it without getting splinters,
and without causing further damage.
So I simply applied some Restor-a-Finish to even out the color (it
did, but just a little), and then put on a new coat of shellac to seal
it all up. It’s a little jarring to have such a beaten up table top
be all shiny, but at least now I can use it without getting splinters,
and without causing further damage.
I also scrubbed/oiled/waxed the irons, and did an initial clean of the outside of the head. I cleaned the front feed wheel, but haven’t polished anything else yet. I have to figure out how it comes apart to do much more.


| updated November 2022 | [index] |

 It took me a while to figure out how to thread this thing again today.
So, in the interest of not having to go through that again, here are
some pictures. First, we go under the initial guide hook, up and
over the tension disks, and through the slot and the pig-tail (first
picture). Then down to the needle clamp, where the thread passes in
front of the little post, and under the little round tension clamper
(2nd picture). It then goes under the needle clamp from left to
right, which lets you draw it forward so that it’s tucked behind the
small curved guide seen in the third picture. This sets it up to come
out under the needle (whose long slot is facing down). The needle is
threaded bottom to top.
It took me a while to figure out how to thread this thing again today.
So, in the interest of not having to go through that again, here are
some pictures. First, we go under the initial guide hook, up and
over the tension disks, and through the slot and the pig-tail (first
picture). Then down to the needle clamp, where the thread passes in
front of the little post, and under the little round tension clamper
(2nd picture). It then goes under the needle clamp from left to
right, which lets you draw it forward so that it’s tucked behind the
small curved guide seen in the third picture. This sets it up to come
out under the needle (whose long slot is facing down). The needle is
threaded bottom to top.

And, just to show that the threading is correct, here are some stitches!
Overcasting two layers of denim, one layer of fluffy terry cloth, two layers of
thin shoe leather, and several layers of an old T-shirt.

| updated April 2023 | [index] |
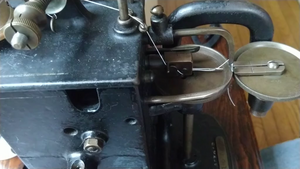 I finally made this video of the Jacoby sewing. The material is fleece.
(There’s a another copy of this on youtube.)
I finally made this video of the Jacoby sewing. The material is fleece.
(There’s a another copy of this on youtube.)
1937 Singer Model 201-2
(Gone! No longer mine.)
| written June 2023 ... | [index] [index by age] |

I’m normally more discerning about what makes it into this blog, and when I pick up machines that are clearly either parts machines, or quick giveaways, I don’t bother mentioning them here.


But this one being in such spectacularly bad straits when I found it, along with looking like it will actually clean up pretty well, earned it an entry. I learned of it through an understated “curb alert” on a local mailing list: “Sewing machine in cabinet - needs repair”. I confess I left the cabinet where I found it. Too much repair needed for me.
But the 1937 201-2 head itself is in remarkably good shape, under all that muck. Very little rust – practically none at all. The mechanics are locked up, but in the downward direction it wiggles all the way down to the bobbin gears, where things are usually easy to free up. The presser and needle bars are also locked up, but again, usually easy to free. Even the button-style speed controller looks to be in good shape.

I’ll bet this sews in no time. It might even be pretty again. And I’ve mentioned before that the 201-2 is one of my all-time favorite sewing machines. This makes the fourth I’ve owned! Three of them were free and those all came to me through the same local mailing list.

| updated November 2023 | [index] |
I did a lot of cleanup on the machine, and, before putting it completely back together, decided to try treadling it. That involved installing the hand wheel from my Singer Model 15. It treadles very nicely. Smooth, as you’d expect from a 201. And quiet, also as you’d expect. It’s really a great machine.

I think, having treadled it, that some of the machine’s “grace” must come from the gear drive. It’s not an efficient drive system, in that there’s extra weight to spin at every step of the linkage, compared to a simple belt or cam driven machine. My theory is that this extra internal inertia smooths out the operation, making it… deliberate. It might take slightly more effort to treadle than a similar model 66, say, but it makes up for it by feeling very controllable. At least, this is how it feels to me.
And it cleaned up really well! Since much of the cleaning involved simply stripping off all of the machine’s shellac, it will never have the shine that it would have once had. But it looks pretty good, and sews perfectly. I think it’s ready for a new home.


| a week later... | [index] |
Well, I never intended to keep this ugly duckling / swan wannabe, so once it was cleaned up I offered it up in a few places, including on the town list where I heard of it in the first place. I’m happy to say it’s staying in town. I hope the new owner is happy with it.
c.1870 Little Wanzer
| written July 2023 ... | [index] [index by age] |

I bought this nice little machine from a collector friend who is thinning his herd of machines. It’s made by the Wanzer Sewing Machine Co., founded by Canadian Richard Mott Wanzer. The factory was in Hamilton (and employed a large percentage of the residents, from what I’ve read). I don’t know quite what the significance of this one giving an address of “Great Portland St., London”. Perhaps made for export and reimported? (The serial number is 46454.) Apparently Wanzer did pursue international sales, and remember that Canada would have still been part of “the empire”. The “Little Wanzer” was adopted as the standard instructional machine at all 7500 Irish schools.


It has an interesting vibrating shuttle, which swings in a vertical arc, and it still has its original marble base. The only other machines I have with that sort of vertical swing are my two ABHO machines. Unlike those, this machine has a normal looking boat shuttle holding a long bobbin.


Haven’t had much time to play with it yet, nor have I cleaned it at all since getting it.
| updated October 2025 | [index] |
There’s a wonderful passage in the 1881 book called “Sewing Machinery”, by J.W. Urquhart, where he describes how to adjust the shuttle to correct a common problem. Given the solution, I hope it wasn’t too common!. Emphasis added. :-)
This is a hand lock-stitch machine in extensive use. The gearing giving motion to the shuttle is of rather peculiar construction, and yields rather fast to wear. The result is a tendency to drop stitches.
Miss-stitches in this machine are usually due to the shuttle failing to go back far enough to allow its point to clear the needle, the result being, of course, that no loop can be made.
The screw upon which the carriage moves is made eccentrical, so that upon releasing the set screw, and turning it to the right or left, the carrier may be caused to advance to or recede from the shuttle race. By bringing it closer to the race, less play is given to the shuttle, which frequently causes it to clear the needle groove. Sometimes, however, this plan is useless, and another must be adopted. Remove the screws and take out the connecting link. This rod, if made a little shorter by bending, will pull the carriage farther back and make the shuttle clear the groove. Make the link red hot, grasp in the vice, and, with a blow from a hammer, give the bend required. Much care is necessary not to twist the link, so as to put the holes out of line. When the link is thus shortened, a little adjusting with the eccentrical screw will set matters right, and give the shuttle the required play about 1/8th inch. …
My machine exhibits this “missed stitch” behavior. I eagerly looked for the set screw, in order to loosen the eccentric pivot bolt, but sadly, this is what I found:
 I think all that remains of my set screw is half of its head. I don’t think
that screw will ever turn again – not in my posession, at any rate.
I think all that remains of my set screw is half of its head. I don’t think
that screw will ever turn again – not in my posession, at any rate.
To thread the shuttle, the bobbin is inserted so that the thread goes
 behind the distribution bar (there’s a hole behind the bar to make
that easy), then across the top of the shuttle and out (and in and
out) of a hole in the far side (or “holes”, if more tension is needed.
In this picture, I see I have the thread goeing behind the bar from
the top of the shuttle. I suspect it should come off the bottom of
the shuttle instead – it would then turn just 90 degrees at the bar,
instead of 180.
behind the distribution bar (there’s a hole behind the bar to make
that easy), then across the top of the shuttle and out (and in and
out) of a hole in the far side (or “holes”, if more tension is needed.
In this picture, I see I have the thread goeing behind the bar from
the top of the shuttle. I suspect it should come off the bottom of
the shuttle instead – it would then turn just 90 degrees at the bar,
instead of 180.
c.1886 Jones Hand Machine
| written July 2023 ... | [index] [index by age] |

 I actually bought two machines from my friend. The Little Wanzer, above,
and this one. While the Little Wanzer is lovely, it’s a little hard to
compare the two directly. Don’t you think? :-)
I actually bought two machines from my friend. The Little Wanzer, above,
and this one. While the Little Wanzer is lovely, it’s a little hard to
compare the two directly. Don’t you think? :-)


The Jones Hand Machine was made in England, produced from 1874 to roughly 1895. Rough serial number dating for this machine (s/n 58620) puts it at 1886.
Official name aside, it is far more often referred to by one of its nicknames, “the serpentine”, or “the cat back”. The shape is certainly compelling, and the decals they used simply glow. Later machines (beginning in 1890) carried an endorsement from Her Royal Highness the Princess of Wales. Woo Hoo! ;-)


 As luck would have it, when I removed the shuttle, for the first time,
to take this picture, the last bit of bobbin thread was only just still caught
under the tension spring. So I can no longer learn how to thread it by
simply looking at it. Guess I need to find a manual!
As luck would have it, when I removed the shuttle, for the first time,
to take this picture, the last bit of bobbin thread was only just still caught
under the tension spring. So I can no longer learn how to thread it by
simply looking at it. Guess I need to find a manual!
| updated December 2024 | [index] |
 Finally got around to finding that manual. :-) It only barely showed me
how to thread the bobbin, but it did an excellent job of showing me
how to wind the bobbin. And I certainly would have gotten it wrong
without it! That little twist of the thread around the horizontal shaft
is somehow where the magic happens.
Finally got around to finding that manual. :-) It only barely showed me
how to thread the bobbin, but it did an excellent job of showing me
how to wind the bobbin. And I certainly would have gotten it wrong
without it! That little twist of the thread around the horizontal shaft
is somehow where the magic happens.

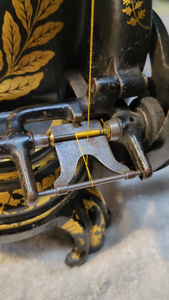
As far as I can tell, the only thing driving the thread back and forth is that the thread is layering beside itself as it winds, gently coaxing it in the right direction. Layer after perfect layer… amazing. Look at the video and tell me you don’t agree!
c.1880 Royal St. John
| written November 2023 ... | [index] [index by age] |

The Royal St. John was made in Ohio by a company started by a fellow named Roswell St. John. The company began as St. John, became Royal St. John, then Illinois Sewing Machine Co., and was eventually bought by Free. (Somewhere in there it also spawned the Union S.M.Co.) The most recent patent date on this machine’s needle slide plate is 1878. A machine owned by a friend shows 1881, so mine was likely made sometime between those dates, c.1880.


Their marketing touted their machines as “the only machine that will run either forward or backward, and continue to sew in the same direction”. Which is to say, it doesn’t matter which way you turn the balance wheel – it will still sew. Most sewists know that terrible things will happen to the thread under the cloth plate if you turn the machine the wrong way, so I guess this (described in US155120) might have been a somewhat compelling innovation.
But is it a must-have feature? I’ve always thought that while always treadling a machine forwards is a little tricky when you first start, it quickly becomes second nature, and experienced treadlers don’t even think about it. The feature appears on a friend’s Union S.M.Co. machine, made in 1889, so the there was a demand for at least 10 years, I guess. I don’t know whether anyone else made a machine using the technology.
My machine (s/n 185058) apparently spent much of its life in a Singer treadle, at least according to the seller, who recalled his mother using it that way from when he could first remember as a toddler. So it seemed entirely appropriate to try immediately to put it into my MUTT treadle. It doesn’t quite fit, but perhaps some sort of adapter can be made.
| updated a couple of weeks later | [index] |
 First, I did manage to make an adapter to allow this head to fit on my
treadle. Wasn’t hard, doesn’t look terrible, and I think I can reuse it
as the the top of a display base, when I get around to that.
First, I did manage to make an adapter to allow this head to fit on my
treadle. Wasn’t hard, doesn’t look terrible, and I think I can reuse it
as the the top of a display base, when I get around to that.
When I picked up this machine from the seller, he told me that the original owner’s grandkids had played on and around the machine for years. (I think he was telling me, without actually saying it, that I shouldn’t expect much. :-) Well, it seems that the kids may have figured out how to unscrew the hand wheel clutch knob, and it is now lost to time.
 As far as I can tell, it was a simple thing. The knob was on a threaded
shaft, and when it was screwed all the way in to the matching threads on
the main shaft, it pushed open a split piece of steel which caused the
hand wheel to bind up and be locked to the main shaft.
As far as I can tell, it was a simple thing. The knob was on a threaded
shaft, and when it was screwed all the way in to the matching threads on
the main shaft, it pushed open a split piece of steel which caused the
hand wheel to bind up and be locked to the main shaft.


A few pictures might help. The last is a picture of the original knob, on someone else’s machine. It’s the only picture of the knob that I’ve found. I think that once I figure out the thread pitch and diameter of those threads that I might be able to fabricate a new knob. We’ll see.
| updated early December, 2023 | [index] |
I made a base for the RSJ using a new technique. I had some walnut
trim leftover from a kitchen remodel on my first house, back in 1986
(no typo!), and I figured it was finally time to use it. The machine
doesn’t need much space to clear the table (less than 1-1/2”), so I
knew this would work.

 Except that I needed a very thin floor. So instead of
using a layer of heavy poster board, set into a groove just above
table level, as I have in the past, I simply stretched out some felt,
applied glue to the bottom edge of the base, and set it down with the
machine on it for weight. Worked well! It also serves as a replacement
for rubber or felt feet.
Except that I needed a very thin floor. So instead of
using a layer of heavy poster board, set into a groove just above
table level, as I have in the past, I simply stretched out some felt,
applied glue to the bottom edge of the base, and set it down with the
machine on it for weight. Worked well! It also serves as a replacement
for rubber or felt feet.
| updated mid-December, 2023 | [index] |
An amazing thing happened. I asked around in various places for pictures and measurements of the Royal St. John clutch knob, with some good success. I was given some excellent photos, and some good measurements. I even found a screw on a Singer 15 with the right threading. (That was nice, because I could actually use that screw to lock the hand wheel, and was able to get the machine sewing, using it.) But even after I knew what the knob should look like, and how big it needed to be, I knew I’d never find one. Which was kind of frustrating.
Until one day I got a message from a fellow on the other end of the continent saying that he had a lathe, and that he’d be happy to make me a clutch knob! Tough proposition, eh?
So Frank from Victoria and I collaborated on measurements, and
drawings, and I did a mockup in wood.


And based on that we revised things just a bit, and… he made one. Amazing.
I’ve wanted a metal lathe for some time. I want one even more, now!


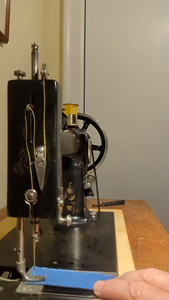 And, finally, a video that shows the magic wheel reversals, while sewing a
single seam:
And, finally, a video that shows the magic wheel reversals, while sewing a
single seam:
1925 Singer Model 128
(Gone! No longer mine.)
| written November 2023 ... | [index] [index by age] |

This cute little machine was offered up on the town email list. The first picture here shows it all cleaned up, but that’s not how I got it, of course. It wasn’t in terrible shape, but decades in anyone’s cellar can take its toll! From the pictures I was initially sent, I’d assumed that it was probably originally sold with a hand crank, with the motor added later, but both the motor and the speed controller are Singer-branded, so it’s likely that it’s always been an electric. That’s convenient – I would have felt compelled to find it a hand crank, otherwise! :-)

The decals are in remarkably good shape, given that much of the shellac is missing. And the bentwood top, other than the missing handle, is in pretty good shape as well, though a lot of the veneer has separated. It even has a key! Really the whole machine just needs a really good spa day. (Edited later: make that 4 or 5 spa days!). The serial number is AA282768.

But the wiring has seen better days – I’ll have to research how it would have been
connected originally, because I’m sure that extension cord wasn’t part of the
original picture.


| updated December 10, 2023 | [index] |


 I did a bunch of cleanup, and rewired everything with a proper
motor/light controller block. I don’t think that’s how Singer had
it all connected, but the barrel connectors that it came with, while
they might have been part of the original solution, are shot.
I did a bunch of cleanup, and rewired everything with a proper
motor/light controller block. I don’t think that’s how Singer had
it all connected, but the barrel connectors that it came with, while
they might have been part of the original solution, are shot.
The motor/light block is safe and reliable, and fairly “period
correct”, so it won out. I also re-glued the failed joints in the
base, as well as some of the bonnet’s veneer, and then, since this
isn’t a particularly rare or valuable machine, spruced up the base and
bonnet with some Restor-a-Finish. It all came out pretty well.
I’d been thinking of converting it to a hand crank, especially since the base doesn’t have any of the usual tell-tale holes for the electrical connections and knee controller bar. But I decided to stay true to the machine, and leave it electric. Besides, the chrome Singerlight lampshade is just gaudy enough to compete nicely with the La Vencedora decals. I like it. Also, this style of controller gives really great low-speed control of the motor. It’s very nice to sew with, and the stitches (to my eye) are perfect.


To be honest, I’d been thinking that I’d probably rehome this pretty quickly after cleaning it up, since electric machines aren’t really my thing, and I already own a similar and earlier Singer VS3, the direct ancestor to this one. But I like this a lot, so I’ll be keeping it for a while, at least.


 One of these days maybe I’ll get a proper replacement for the missing
bonnet handle. Homemade is fine, but not quite the right look.
One of these days maybe I’ll get a proper replacement for the missing
bonnet handle. Homemade is fine, but not quite the right look.

| updated January, 2024 | [index] |
An internet friend very kindly sent me a spare bentwood case handle
that he had in his accumulation of “stuff”. All collectors have things
like that – parts that you can’t ever discard, because they might
 be useful someday. I was happy to help him with his “problem”. The
handle style is one I haven’t seen before. I believe it’s one used on
later machines, so it might well be right for this one.
be useful someday. I was happy to help him with his “problem”. The
handle style is one I haven’t seen before. I believe it’s one used on
later machines, so it might well be right for this one.
| updated March 2024 | [index] |
A very good friend, who does a lot of sewing, and sometimes goes to “sew-ins”, was thrilled when I mentioned this little machine to her. Her other portable machine is much heavier, and apparently cantankerous as well. So she took a look at the 128, and then took it home. I couldn’t be happier that it went to such a good home, with a good friend, and it sounds like she couldn’t be happier with the machine. Win!
Making new screws!
| written February 29 2024 | [index] [index by age] |
I’ve wanted a metal lathe for a long time, and when a VSS friend used their lathe to make a new Royal St. John clutch knob for me, it kind of set the hook and I had to have one.
So I bought a small “mini lathe”. This class of lathe is pretty easy come by, doesn’t cost a fortune, and even though the quality of the original machine isn’t always great, with a little work and adjustment you can usually make it do what you want.

With a lot of YouTube videos and a little practice, I figured out how to use it to make screw threads. And then I was ready to try making some screws that have been missing from a couple of my sewing machines for as long as I’ve owned them (and probably many decades before that).
One is the crank axle for my Home Shuttle. For years I’ve used a poor replacement, made from a modern screw wrapped in aluminum tape to make the diameter work, but I wanted to do it right. The other is the crank handle spindle screw for my Willcox & Gibbs hand crank. For that one, the substitute has been a tiny crank handle and screw from a Singer toy machine, which just happened to fit, but again, I wanted to do it right.
So I got to work, first on the W&G screw. A friend had lent me their
original screw and hand crank handle, so I knew what I was aiming for.
This is a picture of that original handle and screw.

First I turned the steel bar stock down to the right diameter(s) and formed the threads (not pictured, sadly). Then I turned the screw around and roughed in the shape of the head with one of the lathe tools, and used a hand file (with lathe spinning) to do the rest. Once all of those little ledges were gone, I knew the shape was just right. Or, rather, “close enough”. I don’t have pictures from making the Home Shuttle screw, but the process was similar.


To cut screwdriver slots in the screws, I had to call in reinforcements. While I might have been able to figure out a way to make the slots myself, a friend made me an offer I couldn’t refuse: he offered to help me do them on his Bridgeport mill. A Bridgeport is a Very Big Machine. I could barely reach the on/off switch, it’s so tall. And it’s almost 6’ wide. And it weights 1000lbs. It’s a bit of overkill to use a 1000lb machine to make two .045” slots, each less than half an inch long, but it sure made it easy!
Here are pictures of the finished screws, and a little video of the
slitting saw in action. The saw is 2-3/4” in diameter, and .045”
thick. What looks like a ridge around the outer edge is just a layer
of oil, used to lubricate the cutting process.


This last picture shows the screws in place, marked by faint green circles.
The new screws are the brightest/shiniest things on the machines, of course.

I’ll have to remake the wooden crank handle for the W&G. I turned that using my wood lathe, but since it’s designed for the Singer toy machine’s screw, the fit isn’t right with my new screw. It works, but poorly. Edit, August 2024 – I finally got around to turning a new walnut handle to match the new screw. It looks much the same, so no new picture!
c.1860 Charles Raymond (no.3)
| written March 2024 ... | [index] [index by age] |


[ update, November 2025 I’ve corrected my estimate of the age of this machine from 1858 to c.1860. It seems I’d made some bad assumptions about the surrounding patents. ]
I already have two Charles Raymond “New England” style machines. But my first Charles Raymond is basically bare cast iron (no paint at all) and is missing about half of its original parts. I’ve made crude replacements, but they’re a poor substitute for the real thing. I also have my 1861 Charles Raymond, but while substantially the same, it’s quite different in a couple of aspects.
So even though it had been turned into a lamp (!!!), when I saw this
one at auction only a couple of hours away, I bid on it, and I’m
delighted at having won! (Not to mention, “poorer”. ;-)


When I bid, I wasn’t actually sure that this was an 1860-ish 1st model Charles Raymond, though I was pretty sure. The auction pictures were from far enough away that I couldn’t make out the “Patent Applied For” stamp on the spool bracket. On the other hand, I couldn’t say for certain that the stamp wasn’t there, either. So as soon as I picked up the machine (2 hour drive away), the first thing I did out in the parking lot was rub my wet thumb furiously over the brass bracket… and found just enough traces of the stamp to show I hadn’t been wrong. The picture above is after more rubbing, and a bit of finger nail. There was a lot of grunge – no wonder it hadn’t shown in the photos!
I already have a 2nd model Raymond (this one is a 1st model), and as a pair, they’re sort of a microcosm of what I love about old sewing machines:
- Classic New England mill-town origins in Brattleboro, Vermont.
- Clever technology: Raymond had invented a whole new simple way of doing chain stitches.
- Incremental changes: there are several subtle, but useful, refinements between the two models, just a year or two apart.
- Aesthetics: obviously!!
- And last but not least, patent shenanigans! Raymond had lost a patent disagreement with Singer back in 1852. With this machine, Raymond’s patents were completely ignored by all the copy-cats that produced all of the so-called “New England style” machines. And, at the same time, he was being successful enough to be accused once again (this time improperly) of patent infringement by Singer and his patent cartel! As a result, and presumably fed up, he pulled stakes and moved the business to Canada, where the cartel’s patents didn’t apply, and he became quite prosperous.
The decorations are great, but the paint, unfortunately, is
alligatored, and flaking off. I’ll need to form a plan for that,
soon.


| updated February 2025 | [index] |
Well, I formulated a plan, but it didn’t involve me, for a change. For
the first time, I decided to have a machine professionally conserved. I
just didn’t feel comfortable working on the machine with its paint in
such fragile condition. The work was done by a professional conservator
in New Hampshire, who works almost exclusively on antique machines like
this one. She did a beautiful job.


While I’m not a huge fan of the very bright, highly polished appearance, since I’m pretty sure it wouldn’t have looked like this new, it’s the only way to be sure all of the rust and dirt is gone. And I also know that over time the gleam will fade a bit, and that will be fine. I’m very happy with the pictures – now I just need New England to thaw out a bit, so I can go and get it!
Raymond patents, and machine dating
Getting this third Raymond, and having invested in its preservation, have made me go back and revisit the patent research I’d done in the past. There are just a handful of patents by Charles Raymond on file in the US, which isn’t surprising since he moved to Canada in the 1860s, and did most of his work there. This machine has a big “Patent Applied For” stamp on the spool bracket – so if we can figure out which of his patents that refers to, then that should tell us when it was made. And only a couple of the Raymond patents are candidates here, since the others cover features not found on this machine.
updated November 2025 – Sadly, the thing is, none of the patents line up well with these “Patent Applied For” machines. The machines bear no features specifically covered in any of the Raymond patents, except maybe the tensioner aspect of his March 9 1858 patent. But none of the machines actually labeled with that patent look just like the “Patent Applied For” machines, and most of them have a far more primitive thread looper. The “PAF” machines do exactly match the images in the July 9, 1861, patent, except for the extra lockstitch mechanisms described there. That patent was drawn up and witnessed the prior year, in April of 1860. So I’m calling this “c.1860” now.
c.1870 Johnson, Clark & Co. Home Shuttle treadle
(Gone! No longer mine.)
| written April 2024 ... | [index] [index by age] |

Imagine my surprise, when, on the last day of a multi-week vacation, I checked the FB Marketplace ads for sewing machines in my “home” region, and found this delightful machine right on the way home. I’ll have more to say about it later, but in the meantime: I’m thrilled! It has its shuttle, and everything that should move, does. There’s even “loot” in the drawer, though I’m not yet sure if it actually goes with this machine or not.


I already have a Home Shuttle, but it’s the more common hand crank version. I’m thrilled to have the treadle version as well.


The serial number is 42734. The faceplate confirms my belief that Gold Medal acted as the manufacturing arm of Johnson Clark & Co., since it states “Manufactured by the Gold Medal Sewing Machine Co. for Johnson Clark & Co”. There’s also a “26” stamped on the frame of the machine under the front slide plate, and also on the underside of the front slide plate itself.
The rear slide plate bears a prominent “Patented July 28 1868”, as well as a list of earlier patents.


| updated early May, 2024 | [index] |
Couple of things to write about today. First, the “loot”:
 Often when I get a machine, either the drawer is missing entirely, or,
if it’s there, it’s empty. Not this time! There’s some fun stuff in
there. Starting at about 3 o’clock, and going clockwise, first we have
some things that definitely go with the machine: a hemming foot, a
cloth guide, with its thumbscrew, and a hemming attachment. The
little curved end closest to the camera fits over the front edge of
the cloth plate when it’s installed. To its right is the shuttle/bobbin
that fits the machine. Continuing around, there are two
extra, different, shuttles, neither of which fit the machine, though they’re
all clearly from the same maker, with the same arrangements of holes and
thread guides. Along with the shuttles are 3 extra bobbins, only one
of which fits the machine. Then there’s a key-shaped screwdriver, an
actual key (triangular), and a hemmer that’s far too modern for
1870-ish. Then finally, in the middle, I believe those are button hole
cutters. One is broken, but the near one is complete. It would cut
the slot and hole for a keyhole-shaped buttonhole – you’d use it like
a punch, pushing the sharpened shaped end against the cloth.
Often when I get a machine, either the drawer is missing entirely, or,
if it’s there, it’s empty. Not this time! There’s some fun stuff in
there. Starting at about 3 o’clock, and going clockwise, first we have
some things that definitely go with the machine: a hemming foot, a
cloth guide, with its thumbscrew, and a hemming attachment. The
little curved end closest to the camera fits over the front edge of
the cloth plate when it’s installed. To its right is the shuttle/bobbin
that fits the machine. Continuing around, there are two
extra, different, shuttles, neither of which fit the machine, though they’re
all clearly from the same maker, with the same arrangements of holes and
thread guides. Along with the shuttles are 3 extra bobbins, only one
of which fits the machine. Then there’s a key-shaped screwdriver, an
actual key (triangular), and a hemmer that’s far too modern for
1870-ish. Then finally, in the middle, I believe those are button hole
cutters. One is broken, but the near one is complete. It would cut
the slot and hole for a keyhole-shaped buttonhole – you’d use it like
a punch, pushing the sharpened shaped end against the cloth.
 And what about that crazy looking thing at about 1 o’clock? Well, that
seems to be the attachment to end all attachments. Patented by H.M. Hall,
in April of 1869, this thing does it all. By rearranging various of those
wires, either utilizing their specialized or their plain ends, one can
create various means of folding and guiding cloth into the path of the needle.
The patent details at least 13 different arrangements of the
wires, which will help you with binding, hemming, ruffling, quilting, or
installing braiding, biasing… you name it. Remarkably, if the
patent is to be believed, mine has all of the little parts needed to
do anything that Mr. Hall envisioned.
And what about that crazy looking thing at about 1 o’clock? Well, that
seems to be the attachment to end all attachments. Patented by H.M. Hall,
in April of 1869, this thing does it all. By rearranging various of those
wires, either utilizing their specialized or their plain ends, one can
create various means of folding and guiding cloth into the path of the needle.
The patent details at least 13 different arrangements of the
wires, which will help you with binding, hemming, ruffling, quilting, or
installing braiding, biasing… you name it. Remarkably, if the
patent is to be believed, mine has all of the little parts needed to
do anything that Mr. Hall envisioned.
The other news is that I’ve finished disassembling the machine, and have cleaned it all up. That’s good. What’s bad is that I discovered a pretty severe break. I’m hoping it won’t matter.
I’m sure I didn’t cause this – it must have been cracked already. There’s evidence that someone else has had the machine apart, and maybe they broke it? Whatever. You can see that the shuttle race is in two pieces. It’s a pretty clean break, and the way it’s attached to the machine, there’s a screw holding each piece, symmetrically. So it might go together okay. Otherwise I’ll have to have it welded. [ Later edit: In fact, once screwed together, that break makes absolutely no difference to the operation, or, really, the appearance, of the machine. Whoever cracked the shuttle race was very, very, lucky! ]


Regardless, everything’s ready for me to start assembling tomorrow.

| a week or so later | [index] |
Reassembly of the machine is done, but there are some issues I’m still working through. The feed dogs hit the cloth plate on their way up, and I can’t seem to adjust things enough to stop that from happening. I’m sure I’ll get it eventually.
But in the meantime, this happened. I swear I didn’t mean to completely
disassemble the treadle in the front hall… really!

| updated June 2024 | [index] |
Forgot to put up some final “mostly done” shots. I still need to do some adjustments, and create a tensioner of some sort, but it looks good.


| updated July 2026 | [index] |
As pretty as it is, it’s been hard to justify the space for this second Home Shuttle… especially since I’ve been unsuccessful in recreating a tension mechanism. So it’s found a new home.
Royal St. John with Mother-of-Pearl
| written May 2024 | [index] [index by age] |
I told my friends on the VSS forum about a local ad that I’d seen for this machine, and one of them was interested, despite living in the next timezone west (which is a very long way from here!). So they made arrangements, and I picked it up to await their arrival.
Since I wrote a bunch about my own Royal St. John earlier, I won’t say much here, but this one has some nice Mother-of-Pearl (MOP) on the bed.


c.1879 Heberling Running Stitch Machine
| written June 2024 ... | [index] [index by age] |

I’m pretty excited to have found this at an auction (though sad that I unknowingly outbid a friend for it!). It’s different than every other machine I own – it doesn’t sew a lock stitch, or a chain stitch. It sews a “running stitch”, which is what you’d sew by hand, with a regular needle that has the eye at the rear end. The stitches, made with a single thread, would go through the cloth, back up, down through, etc.


It’s tricky to make this kind of stitch by machine, but many inventors tried. Some machines required that the operator take hold of the needle every few stitches, and reset things to prepare for the next few. Another technique required sets of pincers on each side of the cloth, which mimicked one’s hands in passing the needle to and fro.
This machine uses cogs to form tiny folds in the cloth, and to push those folds continuously over the point of a threaded needle. The needle hides, “floating”, in a groove in the center of the (multiple) cogs, curved in just such a way that it will ride between the cogs, unable to escape. As the cloth is forced between the cogs in folds, it is also forced onto the needle. (Or needles: you’ll see that my machine has two grooves, so could have sewn a double seam.)
Two different sets of cogs were available – one set had 7 teeth per cog, I have the set with 11. I haven’t yet figured out what that translates to in stitches per inch.
I hadn’t thought, at first, that there would have been much reason to build a machine to make the running stitch in 1878, since the lock- and chain- stitch machines were so well established already. But then I learned that these machines were sometimes called “gathering” machines. Unlike with those other stitches, the cloth can be moved along the thread of a loose running stitch, and pulled to form tighter or looser gathers and ruffles.
 In this image, taken from one of John Heberling’s patents, the cloth
would be drawn in from the right. The needle rides in a groove cut in
the center of each cog, and so isn’t affected by their teeth.
In this image, taken from one of John Heberling’s patents, the cloth
would be drawn in from the right. The needle rides in a groove cut in
the center of each cog, and so isn’t affected by their teeth.
But I didn’t say my machine would sew! Given the rust, it might never, even if I could find or make the very unique needle that it takes. But the major moving pieces do move, stiffly, so there’s hope!


Singer 76-1
 Interestingly, Singer made a version of this machine, a fairly close
copy, until 1948 (according to the ISMACS website). It was such a
close copy that I can’t help but think that Singer purchased the rights
to the machine from Heberling. It appears in a 1905 Singer catalog, and
with this image in a 1908 catalog.
Interestingly, Singer made a version of this machine, a fairly close
copy, until 1948 (according to the ISMACS website). It was such a
close copy that I can’t help but think that Singer purchased the rights
to the machine from Heberling. It appears in a 1905 Singer catalog, and
with this image in a 1908 catalog.
Singer maintained (fairly) accurate records of production, and those records are still available. As far as I can tell, Singer allocated just 1300 serial numbers for models called (in the listings) “76” (1200) or “76-1” (100). They were all allocated from 1904 to 1924, with most (1200) of them allocated in the first 9 of those years. This seems to contradict the ISMACS 1948 closing date, and also seems like a very small production history.
Heberling Cleanup


 This machine is among the most rusted I’ve ever tackled. I don’t know
if the quality of the steel was a factor, or the nature of the rust,
but the corroded areas are far more pitted than I’ve seen anywhere
else. In addition, the rust got under the plating, making most of it
simply flake off when cleaned. The cloth plate was hit especially
hard – I had thought it would end up shiny, but it wasn’t to be. :-/
This machine is among the most rusted I’ve ever tackled. I don’t know
if the quality of the steel was a factor, or the nature of the rust,
but the corroded areas are far more pitted than I’ve seen anywhere
else. In addition, the rust got under the plating, making most of it
simply flake off when cleaned. The cloth plate was hit especially
hard – I had thought it would end up shiny, but it wasn’t to be. :-/

 These closeups really show the nature of the pitting.

 Unfortunately, many of the small blades on the cogs have been bent,
presumably from abuse. I’ve straightened a few, but haven’t tried
them all. Some are actually broken off altogether, so I need to be
careful in how hard I try.
Unfortunately, many of the small blades on the cogs have been bent,
presumably from abuse. I’ve straightened a few, but haven’t tried
them all. Some are actually broken off altogether, so I need to be
careful in how hard I try.
But for all that, it really cleaned up pretty well, considering. (Sunshine helps any machine!)


In addition to the shiny parts, there was rust on the body of the machine as well. It’s hard to remove rust from painted areas without damaging the paint, so basically I don’t really try. That shows, especially, on the base of the machine.


Between the bent cog teeth and the difficulty of making or finding a needle (I’m not sure which would be harder!), I’m pretty sure this machine will never sew again.
But it’s very interesting to think about the process of sewing with it.
The thread comes off the spool, and then I imagine you’d thread the funny curved needle like you would for hand stitching. There are no thread guides, so it would be straight from spool to needle. You’d set that needle in place, nestled among the cogs, and lower the upper “cog carrier” to meet it.
Then you’d start turning the machine, and feeding the cloth. The material would be gathered and sewn, and then it would accumulate behind the machine until you got to the end of the material, or until you couldn’t manage the thread and cloth anymore. And if you stopped in mid-piece, or something went wrong, then I think you couldn’t restart. I guess you’d have to take out the stitches and begin again.
All very different than sewing with a more “normal” sewing machine!
| updated November 2024 | [index] |
My Heberling is stamped with the text “HEBERLING RUNNING STITCH SEWING MACHINE CO. / MOUNT PLEASANT, OHIO USA / PATENTED JUNE 04 1878”. Nothing more. I’ve just learned that machines later than mine have two more patent dates, both from 1880, and also have a serial number. And since there are more lines of text, it was all moved to the far (inner) side of the cogs and needles. So that pushes the manufacturing date on mine back before mid-1880.
But even more exciting than that: the Heberling that has the extra patent dates also has needles!! I’ll see if it’s okay if I share a picture.
Wheeler and Wilson Mirror Cabinet
| written late July 2024 | [index] [index by age] |

On a (somewhat misguided!) whim I picked this up, because a) it’s
cute and clever, and b) I thought I could put my Wheeler and Wilson No.9
in it. Also, c), I was pretty sure I could find room for it. Sadly,
while ‘a’ still holds, neither ‘b’ nor ‘c’ has worked out. I think I’ll
be rehoming this pretty soon.

W&W made a couple of variants of this cabinet. The other, more common, version has a glass front, rather than a mirror, and behind the glass is a set of fake book spines. Just the thing to make your living room look more educated than it really is! This one is a little more practical than that – the mirror tilts, so that you can easily use it to examine the hemline of the dress (or jeans?) you just sewed for yourself.


There are flippy levers, at the top and bottom corners of the door, which
serve to support the top at the right height when it’s opened up.


When I first opened it up, and tried spinning the wheel with the
pedal, I was baffled when it was stuck… but only in one direction!
And then I realized that the 100+ year old brake, made from a simple
swinging rubber-tipped lever, was just doing its job, exactly as intended.


Unfortunately (for me), this cabinet was designed to hold a W&W “D-9”
model, which came after the No.9 that I
own. There are a couple of differences between the models that
prevent the No.9 from fitting. The drip tray is too shallow for the
cast iron “snout” on the bottom of the No.9 (which supports the bobbin
case), and the slide plate on the No.9 protrudes with a
downward-curving lip on its left end that collides with the cabinet’s
cutout.

 Over time, the cabinet frame has developed some “rack”, which is to
say, the front opening is no longer quite square. That means that the
door doesn’t close properly. To “fix” this, I added a small (stained
and shellacked!) block at the bottom corner of the door, that gives
something to support that corner, if you lift the door enough to get
the block above the cabinet floor before closing. Not a true fix,
obviously, but it makes it all look and work better.
Over time, the cabinet frame has developed some “rack”, which is to
say, the front opening is no longer quite square. That means that the
door doesn’t close properly. To “fix” this, I added a small (stained
and shellacked!) block at the bottom corner of the door, that gives
something to support that corner, if you lift the door enough to get
the block above the cabinet floor before closing. Not a true fix,
obviously, but it makes it all look and work better.
1914 New Home hand crank with floral decals
| written September 2024 ... | [index] [index by age] |

Well, that worked out really well for everyone! The Wheeler and
Wilson cabinet I wrote about just above, which I really didn’t have
room for, and couldn’t use, now belongs to an avid (and excited! :-)
collector in Pennsylvania, and in return, they gave me this lovely New
Home hand crank.

I’ve always liked the delicate colors in this floral
pattern, and this machine’s decals are very well preserved. Haven’t
had much of a chance to play with it yet, but given that everything
which should move, does, I’m very confident it would sew if I threaded
it up. And I think it will clean up nicely. [ Edit, 7/2026: I
still haven’t cleaned it up, but as predicted, it does sew, nicely. ]


1947 Singer 201K
| written November, 2025 ... | [index] [index by age] |

I rehomed my Singer art deco #42 cabinet to a friend earlier this year, in an attempt to reclaim some floor space in the house. (The sacrifices we make!) I still have the 201-2 head that was in it, and I had plans to convert it to be treadleable, so I could use it on my MUTT. But when I started getting serious about that conversion, I realized I was going to have to source a bunch of parts (grooved handwheel, replacement belt guard, new bobbin winder), and then, when I was finished, I’d have a pile of unuseable 201-2 parts: handwheel, motor housing, etc. Plus, there would be one fewer 201-2 machines in the world, which would be a shame. So I decided instead to simply find a 201K, which is what I was trying to create anyway. Duh.
Trouble is, the 201K isn’t all that common in the US. They were built in the UK, where they were mostly treadled (or given belt-drive motors). In this country we mostly got the 201-2 with the potted motor. So I started my long-term search by posting a note in the “Wanted” section of VSS. Well, wouldn’t you know that within an hour, someone had replied with a Facebook Marketplace link to a nearby machine, for low money. I certainly didn’t expect such quick results!
I picked it up this morning. It was made in Scotland, at the Kilbowie factory in Clydebank, in 1947, and it bears a “Great Britain” decal on top to prove it. (s/n EE112818) It was dry and dusty, and very, very, stiff to turn. But it wasn’t stuck! Whew. Lots of oil and rocking the hand wheel and moving the levers later, it sews! And it might be in the nicest shape of any 201 I’ve owned. (This is my fifth!)
 But the cabinet? Not so much. The seller had advertised “Cabinet
needs some TLC”, and included this picture. It’s worse than it looks –
some of those gashes are pretty deep!
But the cabinet? Not so much. The seller had advertised “Cabinet
needs some TLC”, and included this picture. It’s worse than it looks –
some of those gashes are pretty deep!
| updated a week or two later | [index] |
I’ve used a product called “Howard’s Restor-a-Finish” in the past on not-terrible-but-not-nice finishes, with some success. I’ve mostly stopped using it, because it’s not really the right thing to do to a valuable (or at least, “worth something”) antique. As examples, given a do-over, I probably wouldn’t use it again on my Wheeler and Wilson No.8, but probably would on the Singer Model 66 Treadle.
Anyway, on this cabinet? Well, the type 40 “library table” was made by the millions (it seems like, anyway), and this particular cabinet will never be mistaken for fine furniture again. So, Restor-a-Finish it is! And as usual, it did a surprisingly good job. I also reupholstered the bench while I was at it. Huge improvement, just with a new cover. In any case, the new owner of the cabinet (and its new occupant, my 1947 201-2) seemed very pleased with it, and that’s really what counts.


c.1876 Weed Family Favorite
| written July, 2026 ... | [index] [index by age] |

Having freed up a little space in the house, and having been watching the classified ad (FB Marketplace) for this machine for months, I decided I might as well get it. The price was right.
I’ve never even seen a Weed before today (that I recall), so it’s kind of a new adventure for me. It has some interesting features, like the rotating bobbin winder, the very unusual tension mechanism, the treadle brake “toggle”, and the built-in casters, that I’ll enjoy looking into. (s/n 223308)
These pictures are all pre-cleanup, so far. I’ll augment them with nicer
ones later, I hope.
 The top should clean nicely, hopefully without a refinish. The big issue
will be that the glue joints in the table have failed: the top is
locked to the treadle legs with six screws, three from each leg into
the top. Sadly, they prevent the table from expanding/contracting, so it came
apart. I think it will glue back together well – I just need to
figure out how to keep it from happening again.
The top should clean nicely, hopefully without a refinish. The big issue
will be that the glue joints in the table have failed: the top is
locked to the treadle legs with six screws, three from each leg into
the top. Sadly, they prevent the table from expanding/contracting, so it came
apart. I think it will glue back together well – I just need to
figure out how to keep it from happening again.
The table is also missing its drop-leaf. Which means it probably also used to have one or more drawers in a stack, though I haven’t seen the tell-tale screw holes yet. [ Edit: Yup. Missing drawer stack too. C’est la vie! ]
The tensioner is a nice design, where the thread runs between two
plates that keep it clamped with spring pressure. (My unseen thumb is
forcing the plates apart from below, in this picture.) And of course we
need an obligatory shot of the underside. The thumbnut visible near
the center of the photo adjusts the stitch length. I’m hoping that
doesn’t require tilting the head back, since that would mean derailing
the belt every time I need to adjust the stitch!


The shuttle is a Weed No.3, according to the helper
list at ISMACS.
And I’m told the needle is a Boye #8, though I haven’t yet verified that
that’s what mine is.

Apparently Weed felt it was important to keep the machine from running
backwards (it’s called out sternly in
the manual),
so the treadle wheel has a brake. So far, the metal-on-metal contact between
the brake and the wheel doesn’t seem to do much. Perhaps it should
have a rubber or leather sleeve.


But one of the slickest features is the retractable casters on the treadle.
Simply pushing on the little pedal extends the casters and raises the whole
machine. Flicking the pedal back up causes the treadle to thump down to the
floor. Not quite as elegant on the way down – oh well!

| The End (for now) | [index] |