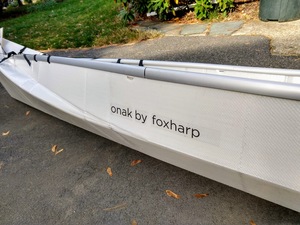
Living with our Onak folding canoe
This page is intended to document our experience with our Onak folding canoe, which we received in August of 2017.
[ update, September 2021: We’ve had a renewed enthusiasm for our Onak lately, and have made some big changes. That stuff starts further down the page. ]
If you want to ask about anything here, or just make comments, drop me a line at pgf@foxharp.boston.ma.us . But remember – I’m not an expert – just an owner!
The pictures are all clickable for larger versions. And if you want to skip the text, and just look at pictures, click on any picture and then use the arrows (or click on either half of the larger image itself) to navigate.
- Background
- Transport
- First damage
- New end cap buckles
- Our Onak, revisited!!
- Better buckles
- Even Better buckles
- Don’t lose the V Braces
- Gunwale Bags
- Full Rigging Change
- Surprise! Hull shape affects stability…
- Wheels!
- Heel cutouts
- Gunwale disaster
- Thwart design #2
- Are we done yet? Maybe.
- Assembly / Disassembly Instructions
- New Name!
Background
| written 8/23/2017 | [index] |
We’ve owned a beautiful Old Town Penobscot 16 Canoe for a long time. We love it. We’ve camped with it, we’ve paddled with our dog in the middle, we’ve used it on lakes, rivers, and bays. But now that our two vehicles are a Mini Cooper convertible and a Ford Transit camper van, we have no way of transporting it. The van could do it, in theory, of course. It has a hitch, but we have no trailer, nor do we want to travel with a 40’ (combined) rig. The van also has a roof, but it’s way high off the ground (9 feet), and you can’t walk on the it without a rack. Even with a rack the canoe might well interfere with the roof vent.
So we didn’t get to canoe at all last year.
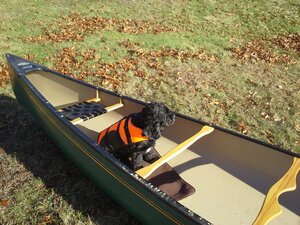
This year we splurged to solve our problem, and bought a folding
canoe, by Onak. When it arrived from Belgium it looked like this:
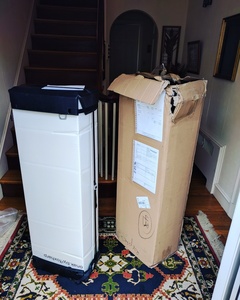
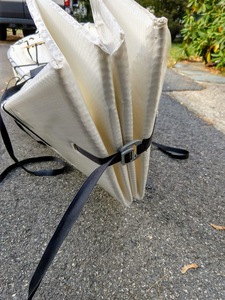
That’s what it looks like when it’s all folded up for transport. It also has small wheels that let you drag it through an airport when it’s folded up – those aren’t yet attached in that picture.
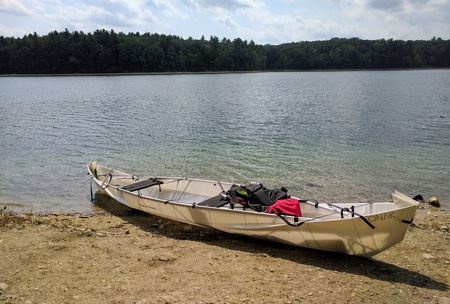
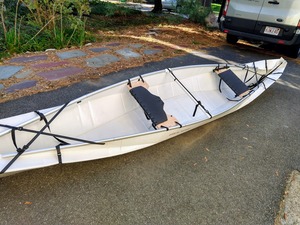
When it’s assembled into a canoe, it looks more like this.
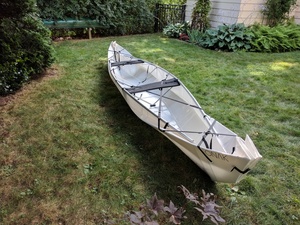
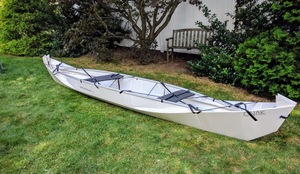 It’s 15 feet long, but weighs only 40lbs (including the collapsible
paddles!), and as you saw above, it folds up small.
As for assembly? Our best time is about 20 minutes, way down from the 2 hours it took the first time we tried! But mostly it takes us around 30 minutes – it’s not something we do on a daily or even weekly basis, and there’s some re-learning every time.
So it works really well as luggage, but as a canoe? The jury’s still out on that one. It’s the most tippy canoe we’ve ever paddled. We haven’t gone over yet, and we’re getting the hang of keeping it stable, but our Old Town feels like a battleship in comparison. We’re growing used to it, and getting better at staying smooth, but adding an active dog may be the true test.
Transport
| written 9/1/2017 | [index] |
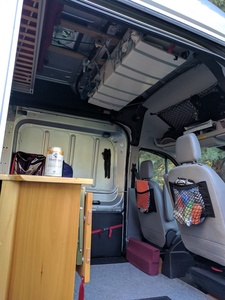
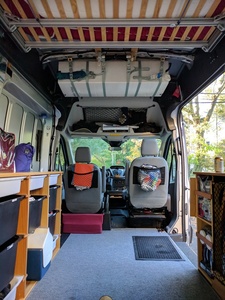
We weren’t sure where we’d put the canoe in the van, but figured we’d find someplace to stow a 48”x16”x10” box. Somewhat to our surprise, it ended up on the ceiling, where it only barely affects Paul’s headroom.
By storing the paddles and aluminum gunwale rails separately, the part that’s on the ceiling only weighs about 26lbs.
First damage
| written 10/16/2017 | [index] |
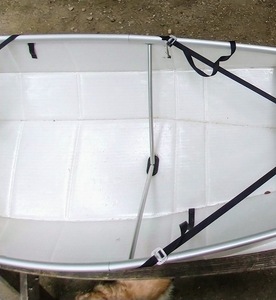
Much to our horror, we’ve just realized that the front seat of the canoe has been torn.
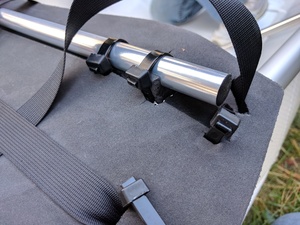
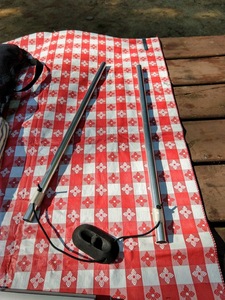
We think this resulted at least partly because the zip ties that secure the aluminum poles to the bottom of the seat were just a little loose. This let the poles get out of position in their slots, and they no longer supported the seat so well. Those poles are actually slightly longer than the slots that are meant to hold them. This, along with the slightly loose zip ties, let the poles move from side to side, slipping out of the end-most zip tie.
Perhaps we also also weren’t diligent enough about getting the long seat support straps extremely tight – that might have contributed.
In addition: instead of having traditional thwarts, the Onak has
V-shaped contraptions that stabilize the sides and the bottom of the
canoe at the same time. One of these V-shaped braces is directly
under the front seat.
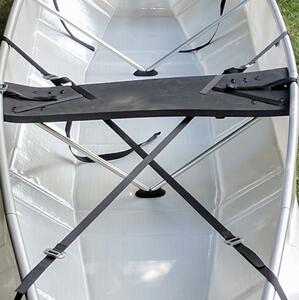
It turns out that it’s really easy to kick that support out of the way if the paddler in front tries to kneel – their feet will surely collide with the aluminum poles. When that happens, the ends of the seat aren’t well supported.
Anyway, we’ve learned our lesson – the paddler in front (almost always Paul) has learned not to kneel, and we’re more careful about getting the front seat tightly fastened.
New end cap buckles
| written 10/24/2017 | [index] |
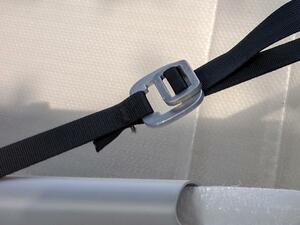
The little buckles that are used to fasten all of the straps are very clever, and we assume they’re also very strong. They have one terrible property, however: if you join the two sides without immediately applying tension to the join, or if you join them and subsequently release tension, the two halves of the buckle will most assuredly fall apart, and you’ll need to start over on that part of the assembly.
When under strong tension, they work well – they’re quite difficult to undo without relieving some of the pressure. And because they’re so strong when under tension, their behavior when the strap goes slack is (mostly) excusable when assembling the canoe.
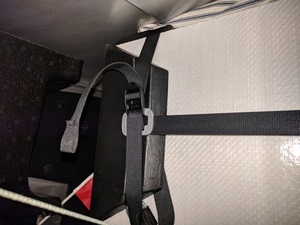
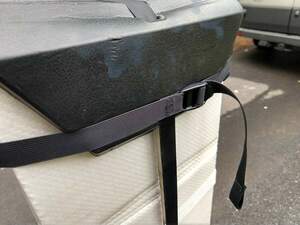
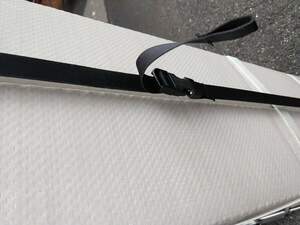
But when folded up, the black end caps that cover the ends of the white “rolled up” canoe plastic are also held with those buckles. We find it very difficult to get the end caps on quickly, since the straps that goes around the caps keep coming undone as one pushes on the flapping sides of the cap. It’s hard to describe, but that’s okay, because there’s an easy solution. Since overall strength isn’t as big a requirement when the canoe is folded up, we can stop using those buckles.
First, by slipping a standard non-releasing strap adjuster onto those
straps, you end up with a cap that stays “cap-shaped” while you
install it, without the frustration of having the connector falling
apart.
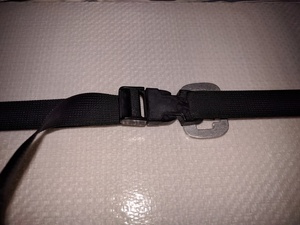
Likewise, putting side release buckles on the long straps that pull
the caps together also eases packing – simply connect the buckles and
tighten, again without anything falling apart.
 Using these four replacements also eliminates any worry that these
straps might come undone by catching on something as the canoe is
being transported, perhaps in the luggage compartment of an airplane
or bus.
Note that the original buckle parts can all stay in place on the straps, so they’ll still be there if you prefer using them one day.
| updated, September 2021 | [index] |
After happily using the modified straps (as described above) for some
time, I realized we had no intention of ever undoing the modification.
So I went ahead and removed the Onak buckles from the straps, leaving
only the new plastic hardware.
Our Onak, revisited!!
| written September 2021 | [index] |
Oh my, how time passes.
Our excitement with the Onak canoe faded somewhat over the last few years. It was too difficult (for us) to put together, especially if several months had gone by between uses, and it was too unstable (I refuse to believe that this is just “us”, since we’re veteran canoeists) to be really enjoyable.
But lately we’ve again been wishing we could easily get out on the water sometimes when we’re away in our van. We looked at the newer options out there, but decided that since four years ago we spent about $1600 (!!) on this thing (including shipping from Europe, of course), we should see if we could make it work.
So. I’m going to write some new blog entries here, documenting changes we’ve been making to our canoe. Spoiler alert: we think they’re a success!
Better buckles
| written September 2021 | [index] |
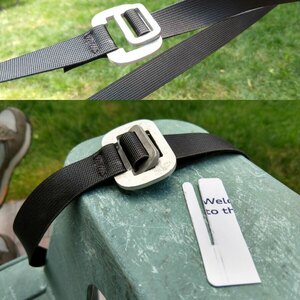
The first thing was the damn buckles. Anyone who has one of these canoes knows that while the Onak aluminum buckles are very strong when tightened, but they can easily fall apart when slack. I’m sure every Onak v1 owner has been frustrated by this. You start tightening the pairs of straps that cross the hull, and when you pull too hard on one of them, the other falls apart. Argh!!
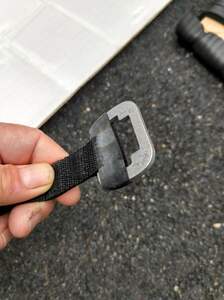
The first simple hack we tried was made with scissors from the width
of a credit card or hotel door key. It doesn’t affect the function of
the buckle at all, except to keep it from falling apart when loose.
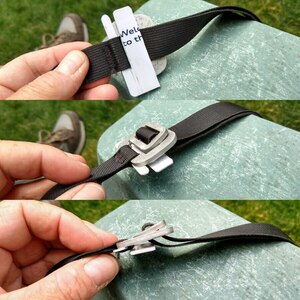
This trick works pretty well, and I had high hopes, but it wasn’t quite good enough. The two halves of the buckle will still sometimes fall apart when you don’t want them to.
Even Better buckles
| written September 2021 | [index] |
Still thinking about how to make the buckles work properly, one day I played with some rubber bands, and came up with a much better way to deal with the issue. It works, and it works very, very well.
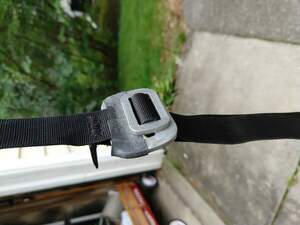
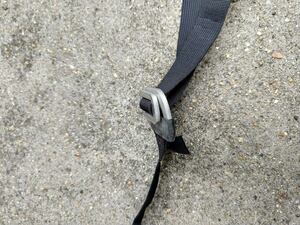
First I used a simple rubber band wrapped a couple of times around the rear of the buckle, and it showed promise, but the real answer came when I took a pair of scissors and cut an old bicycle inner tube into rings. (The diameter of the tube was about 3/4”.)
Installing the resulting short, stout, bands over the rear of the female half of the buckle gives the small “male” piece a relatively firm “platform” to keep it from falling out when there’s no tension. But since it’s rubber, you can still easily separate the halves when you need to.
It works perfectly, and if you make no other changes to your Onak, you should try this.
Don’t lose the V Braces
| written September 2021 | [index] |
As I mentioned earlier, the Onak doesn’t have a traditional “thwart”, i.e., a brace that runs side to side across the canoe, from gunwale to gunwale. Instead it has two rods formed into a ‘V’ shape. They serve to brace the gunwales, and also to brace the floor of the canoe. There are two of these V-braces.
There are three pieces to each brace – the two rods, plus a small rubber pad that they rest on, which keeps the rods in position on the floor of the canoe. Compared to the rest of the parts that make up the canoe, these six pieces (four rods and two pads) are by far the smallest, and I’ve always worried about losing them, especially the pad, while folding or unfolding the canoe. The little rubber pad would be very hard to replace. Also if the canoe were to capsize, and the rods were kicked out of position, the pad might just float away, and the rods might sink.
The first thing I did was take some small scraps of closed-cell foam rubber, and I shoved it into the ends of the tubes. This trapped air inside the tubes. The goal was to seal the tubes so that they will float, rather than sink.
I then drilled a small hole through the rubber pad. I drilled from side-to-side near the end (rather than top-to-bottom), because I wanted the pad to always have firm contact with the floor of the canoe (i.e., no string underneath). I used a piece of wire to pull a piece of nylon quick-drying string through that hole. I tied a thick knot in both ends of the string, and taped the string to the bottoms of the two tubes. The knots keeps the string from simply pulling out from under the tape.
The tubes and rubber pad will all float, and with them tied together, there’s far less chance of losing them.
Gunwale Bags
| written September 2021 | [index] |
We carry the canoe in our van, and when you travel in a van you always
try to control things that might make clanking or vibrating sounds while
you’re driving. You never get rid of them all, but you try very hard
to control the ones you can!
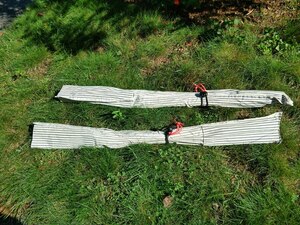
The bags are probably overkill for most people, but even just having a small bungee cord loop (the kind with a ball on it is excellent) for securing the gunwale sections together is great for keeping the pieces for two sides of the canoe organized, and also lined up in the right direction for easy assembly.
Full Rigging Change
| written September 2021 | [index] |
Let me start by saying that you could save yourself a lot of work by visiting the Onak website and simply buying their Onak-X model. I’m not ashamed to say that we copied most of these ideas directly from their latest model. Having gone to the effort of making all these changes to our v1 canoe, I thought I should share them. Almost everything I know about Onak’s latest offerings, and the changes they’ve made, comes from their (excellent!) assembly manuals and videos. You can find them all on their website, under “Installation”. Also, the folks that answer their email address were incredibly helpful and supportive when I had questions. Thanks, Onak!!
The only straps that we didn’t modify are those that clamp the noses together. They work fine, so we didn’t touch them. Everything else is new, including new seats. (For the most part, we did reuse the original webbing, but not the buckles.)
Original Rigging
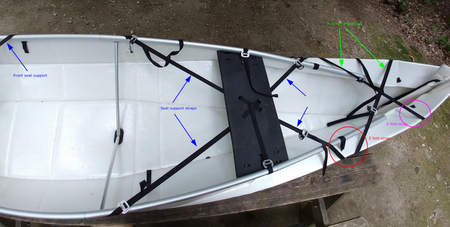
To understand what we’ve changed, it’s probably a good idea to start by describing the original rigging.
(There’s also a full resolution copy of that picture here)
The rigging of the front and rear ends of the canoe are roughly symmetric, so the picture only shows one end. There are two main X-shaped strap “structures”, but they accomplish more than two tasks. It’s a very clever design – but like many first release products’ clever ideas, it’s perhaps too clever. In my opinion, it ends up being confusing for the user, and a little hard to use.
The X closest to the end of the canoe (green arrows) I’ll call the “hull forming straps”, and the X that passes under/through the seat I’ll call the “seat support straps” (blue arrows). Those are their main functions – one set pulls the sides of the hull into shape, and the other holds up the seats. But that’s not all they do.
First, at the end closest to the nose, the hull forming straps pass through the hull and end at the inner piece that I’ll call the “V fold” (violet circle). It’s a simple flap of the canoe that has to be kept folded, and that’s done with the end of the hull-forming straps.
Second, note that the hull forming straps and seat support straps are actually the same straps, and where they meet in the middle (red circle) they also serve to compress what I’ll call the “Z fold”, because that’s the shape of the side of the hull at that point. The arrangement of the straps there (they go through the hull, and travel up and over the gunwale) pulls that Z into shape.
So when you tighten any of those X straps, you affect a couple of different things. Getting it all balanced while assembling the canoe is a little tricky, and remembering what to tighten to accomplish a specific task (if, for example, the Z-fold needs to be compressed) can be confusing.
And there’s one more thing: Do you see all the buckles in that annotated photo? I count eight buckles, and every one of them will fall apart if that strap segment loses tension at any point while you’re assembling the canoe. Even using my trick for those buckles, you still have to figure out which halves mate together, and then mate them. It’s a lot of stuff to do. The new rigging replaces all of those with simple “strap adjuster” (also known as “ladder lock”) buckles which never come completely apart.
New rigging
The rigging on the Onak-X has evolved (through two revisions) such that each of those functions mentioned above (seat support, hull formation, Z-fold, and V-fold) are now implemented completely separately – there’s a different strap for each.
You can see our own implementation (again, copied from the Onak-X) of
this in these annotated pictures.
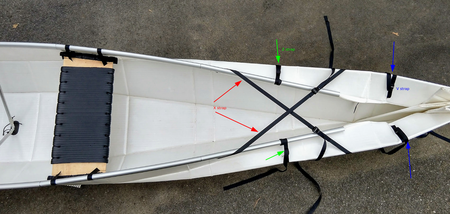 (Full resolution copy of the
top view here)
The V and Z folds have their own dedicated straps (blue and green
arrows), the X straps (red arrows) do nothing but compress the hull,
and the seats rely on their own straps (violet arrows, in side view)
for support.
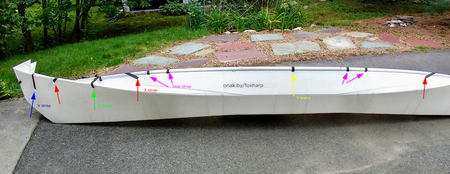 (Full resolution copy of the
side view here)
This separation of function might not make the canoe faster to assemble, but it makes the process more methodical, and it’s now completely clear which strap needs to be adjusted to effect any given change to the canoe.
Now I’ll go through the straps one by one, and provide details about the new implementation.
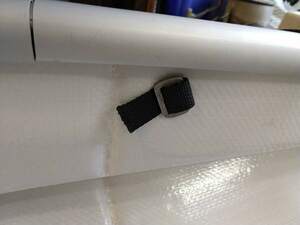 One term I’ll use is the “strap stop”. This
is what I call the piece threaded onto the end of a strap, or into the
middle of a loop strap, which keeps a strap from simply pulling through the
plastic wall.
Nose strap
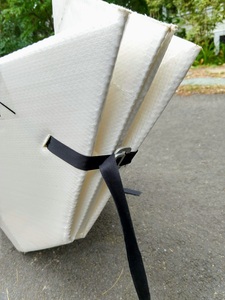
Again, the nose straps are unchanged. The connector here must be very, very, strong, so the Onak connector is appropriate. Also, we’ve rarely had a problem with this connector “falling apart” while assembling.
V strap
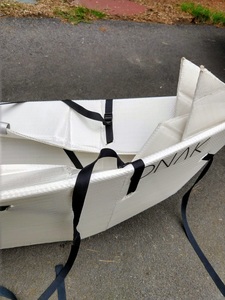
Each strap that controls the V fold uses a pair of existing slots in the hull, which were originally for the end of the original X straps. A much shorter strap now simply loops through those two holes. There is a strap stop on the inside of the outer surface of the hull, so you can pull up on the strap to tighten it without the buckle pulling toward you.
Z strap
The Z strap also use existing holes in the hull. I’ve rigged it like the V strap, as a simple loop, with a strap stop against the inside of the outer hull wall. It doesn’t use all of the available holes.
On the Onak-X they do a more clever threading of this strap, but that turns out to be a problem on our v1 canoe. Two of the three holes fall directly on one of the “packing creases” in the hull, i.e., the folds used when rolling the hull to pack it away. If you try to thread through more than just one hole, there’s too much friction to easily move the strap stop away from those creases when folding the canoe. And if you put the stop on the one hole that’s not on the crease, then there’s not enough length between the strap stop and the buckle to let the hull lie flat for folding – the stop and buckle conspire to keep the Z-fold folded just a little bit.
I know I didn’t explain that very well, but the conclusion is that a simple loop is all you can do, and even so you have to be mindful when packing the canoe to move the strap stop off the folding crease.
X strap
In principle, the X straps should be incredibly simple. Each is just a long strap running across the canoe, with a strap adjuster buckle in the middle.
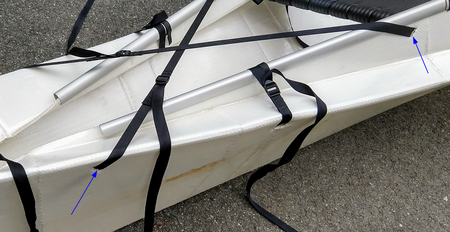
But the X strap was the most problematic in our conversion. First, the X straps on Onak v2 and Onak-X are in a different place than they were in v1, and we thought perhaps we should mimic that change. So we needed new slots in the hull for the straps. The picture shows the location of the new slots.
Second, one of our goals was to eliminate the need to reconnect buckles when assembling the canoe. That means these straps, which cross the hull, need to be very long, otherwise they can’t remain attached when packing the canoe for storage. (If you think about it – all of the V, Z, and X straps need to be longer when the canoe is folded for storage than when it’s “a canoe”.)
The trouble is, the Onak v1 doesn’t have enough webbing, in long enough pieces, to make all the X straps. I had a lot of trouble finding more webbing that was compatible with our buckles (I’ll include more on this below), and in the end we used some new webbing we bought to lengthen the X straps.
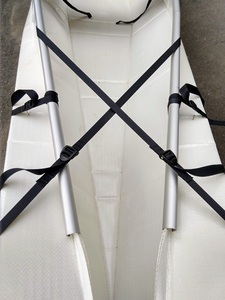
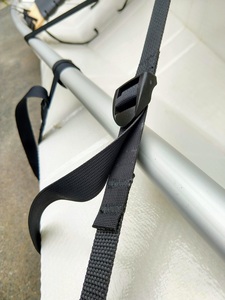
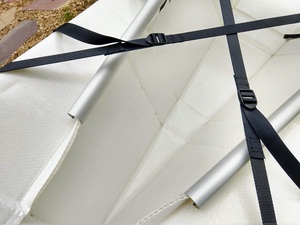
The “fixed” side of each X strap (the side with the buckle attached) uses new webbing. It doesn’t need to slide or do anything fancy, so the fact that it’s thicker doesn’t matter. (Although, it is much harder to get two layers of it through a slot in the strap stop. A pair of needle nose pliers helps with this.)
In addition, we lengthened the “free” side of each X strap (the side you pull on) with new webbing. I think we added 15”, and then adjusted it so that the strap could be fully tightened when forming the canoe, without the buckle hitting the splice between new and old. Having done this, the new webbing, plus the 46” (approximate) of original webbing is just enough to make it possible to fold the canoe without taking the X buckle apart. (Some of our buckles are thicker than others – you’ll see them both in these pictures – and I think it’s important that the thicker ones, when the canoe is stored, end up in the “hollow core” that is formed when you roll one end of the canoe. This requires that the X straps be even longer than they otherwise would.)
Seat straps
The seats are hung from a simple adjustable loop that applies the passenger’s weight to the gunwales of the canoe.
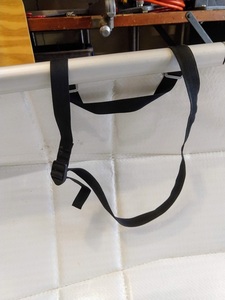
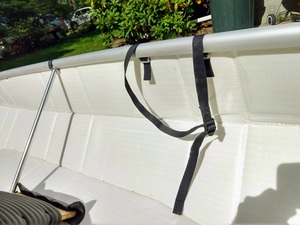
While we designed the new seats to be adjustable, We really expected them to sit tight against the gunwales, as pictured here.
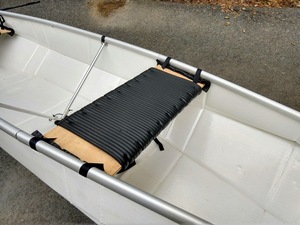
But on our first voyage we quickly realized that this put our weight much too high. So we were glad that we designed in some flexibility. We now adjust them so they hang several inches below the gunwales, and we let them tilt, since we kneel when we use this canoe.
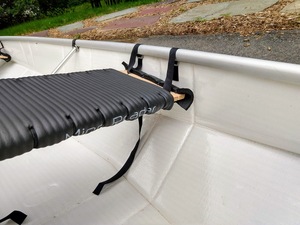
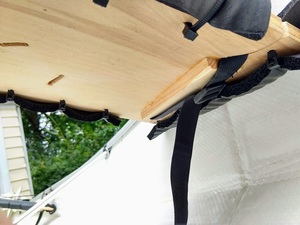
The straps fit into curved slots at the ends of the seats. There’s a
wedge-shaped piece glued to the bottom of the seat between the slots to take up some of the slack that forms naturally when the strap goes around those bends. (The slots where the straps enter the seat are at a 45 degree angle to the side of the canoe, and the wedge angle is 15 degrees.)
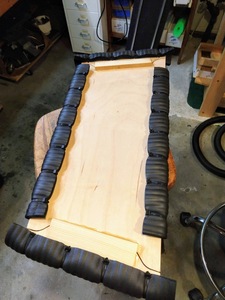
We had to put four new slots in the hull for the new seats – one new strap slot for each end of each seat. Each is forward of the original seat-hanging strap, and the space between the old slot and new slot is 5”. (The seats are 9” wide, and the straps are about one inch from each edge.) You can see the new slots in the annotated picture of the side of the canoe, above. The seat slot to the right (i.e, toward the front of the canoe) in each pair is the new slot.
Note! It’s important that the slots for the straps in the hull be closer together than slots where the straps go through the seats, otherwise the seat won’t tip in the correct direction when pushed. If the slots were exactly the same distance apart, the seat would stay level as our weight pushed it backward, and if the hull slots were further apart than those in the seat, the front edge of the seat would go up as the seat went back, which would definitely be wrong. In our design, the distance between the inner ends of the slots in the hull is 5”, and on the seats it’s 6”. So when our weight pushes it back, it tilts to support us.
V-brace
[ Note: see later blog entries. We no longer use the V-brace. ]
We only use one of the original V-braces, and it’s relocated to the very center of the canoe where there were already existing strap slots (originally for the rear of the front seat support straps).
It attaches using the original T-shaped metal fittings. The new position does mean that there’s no preformed depression in the floor of the canoe to help keep it in place, but we haven’t found that to be a problem.
Gunwale straps
The ends of the aluminum gunwales have always had a slight tendency to pop off of the hull wall. They’re normally fine, but sometimes when there are unusual forces on the canoe, for instance when flipping it over to spend the night upside down, they’ll slip off. This happened with the old canoe rigging, and also with the new.
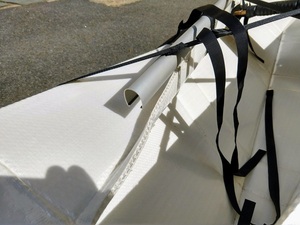
We’ve added some small hook-and-loop (“Velcro”) straps which seem to help. They’re sold as “wire ties”, for keeping computer and other cables together. We put them through the same strap slot as the Z strap, which is closest to the end of the gunwale. They would be more effective with their own small slot, closer to the gunwale end, but we’ll try this for now.
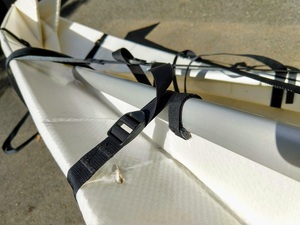
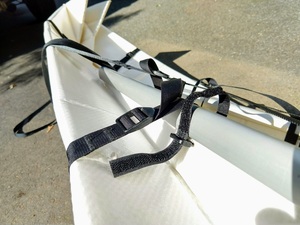
[ Note: we no longer use these. The gunwales seem to stay in place without them. ]
Making holes in the hull
Clearly you don’t want to make very many holes in the hull! But to
add a new strap, you may need a new place for it to go. It’s important that the slot be angled correctly for the strap to flow through it naturally. I marked the slot locations on tape, and used a T-bevel tool to help with reproducing the same angle on multiple slots.
I used a very sharp chisel to make the new slots. I put the hull on
a piece of scrap wood, and could easily cut all the way through with one strike of the hammer. Doing this twice, to both edges of the slot, helped with cutting out the excess material. In some cases I also did some final trimming with a utility knife.
Design Constraints
There were a number of things to consider when doing this project. (This hard thinking is what gets the folks at Onak the big bucks! ;-)
Buckle strength: The replacement buckles need to be strong enough not to break when the canoe is in use! The nose buckle is under the most stress, so we left it alone. For the others, we chose a buckle from strapworks.com that was recommended to us. Since we don’t truly know the strength of these buckles, we also carry some spare “field repair” buckles. We also used these on two of our X straps when we ran out of the first type. They seem very strong, but also cost over 10 times more than the others did.
Buckle thickness: The new buckles must be thin enough to be folded between the layers of the packed canoe. Clearly thinner means “less strong”, so there’s a tradeoff there.
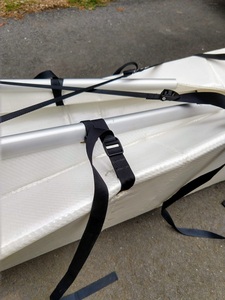
Strap thickness: The straps used by Onak are very high quality, and also very thin. This lets them work smoothly and easily with any buckle we’ve tried. But it’s very difficult (for me, at least) to find straps of that thickness and quality. The thinnest polyester strap I could find was too thick to work smoothly with the buckles that I chose. In fact, it was far worse than “not smoothly” – it was almost impossible to pull through the buckle. You can sort of see the difference in this poor photo.
The Onak webbing is .035”/.89mm, and the best replacement webbing I could find is .062”/1.57mm. Perhaps I didn’t look hard enough?
- Our inability to find matching webbing forced us to do the strap splicing on the X straps that I described above. I wanted to use polyester webbing, because it seems to be recommended for wet and outdoor environments. (I assume the Onak webbing is polyester, though I’ve been unable to verify that.)
Strap lengths
The original straps for the v1 canoe were:
- 4 x 47” X buckle straps
- 4 x 44” X free straps
- 2 x 44” cross-seat straps
- 2 x 59” rear seat supports
- 2 x 91” front seat supports ```
The new straps required are:
- 4 x 39” V strap
- 4 x 35” Z strap
- 4 x 30” X strap (buckle side)
- 4 x 67” X strap (free side)
- 4 x 11” seat strap (buckle side)
- 4 x 21” seat strap (free side)
Those numbers (for the new straps) include enough for looping through the buckles and strap stops, and for leaving enough of a “handle” when loosened for packing the canoe.
But after all that careful measurement, in the end, I ignored the second chart. I simply used the original straps as-is, without cutting them, since the leftover length wouldn’t be useful anyway. (I did cut the 91” pieces in half, and used both halves, and I also cut 4 of the straps to create the 8 seat straps.) Overall, as I described above, the only webbing I added to what Onak provided was for the four “buckle sides” of the X straps, and the four 15” “lengtheners” for the free side of the X straps.
Surprise! Hull shape affects stability…
| written September 2021 | [index] |
The first time we took the canoe out after it’s full re-rigging treatment (above), well… it was a disaster. We practically flipped (at least felt like it) several times. We couldn’t sit on the seats – we had to kneel to keep our weight low, and when our active 23lb dog jumped from side to side it felt like we might fall in the water, almost every time.
Lowering the seats helped a lot, but not enough. Somehow it felt as if maybe changing all of the straps had made the canoe’s stability much worse. It was depressing – having a canoe that’s easy to assemble doesn’t really matter if you don’t want to paddle it! :-/
We came home from that trip, and I had several days to think before we went out again. At some point it occurred to me that with all of the work we’d done, we might have changed the beam (width) of the canoe. Moving the V-brace to the center of the canoe, for instance, might have had an effect. (I know I’m probably supposed to call the width of the canoe its “beam”, but I’m going to stick with “width”. Hey, I’m just a layman.)
But I didn’t know how wide it was supposed to be! None of the documents that came with the canoe gave that information, and of course the the Onak website has long since stopped listing the specifications for Onak v1. But archive.org came to the rescue! I found an old version of the website from 2018, which gave the number I wanted:
465 cm (183”) x 85 cm (33.5”)
The width of 33.5” was wider than I’d remembered, but I assumed it was correct.
Then I measured our canoe, as we’d just been using it, with just the
single central V-brace. It was only 28 inches wide!! It was much, much too narrow! I cut a
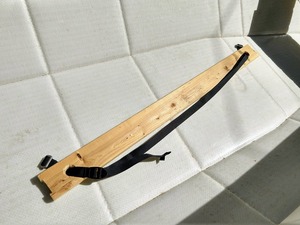
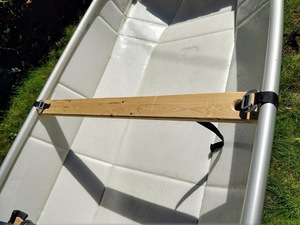
piece of scrap wood to the right length, and on our next trip out, we
eliminated the V-brace and installed the wood as a thwart.
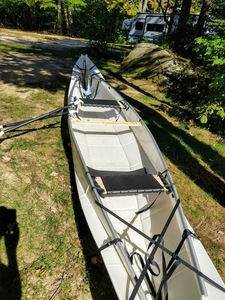
| Warning! [See below](#gunwale-disaster) before making a thwart like this!!! | [index] |
With the width of the canoe set to 33.5”, the difference was dramatic! All of a sudden the canoe was comfortable and stable. I paddle in the front seat, and I could barely notice when our dog, behind me, moved from side to side. We never felt like we were about to tip over. The canoe was completely transformed! Needless to say, we were ecstatic.
I wanted to see whether the canoe had been 33.5” wide before we did all of the strap replacements. After returning home, I reassembled our canoe (still with all the new straps, of course – we can’t reverse that) and put the two original V-braces in their original positions. The width in that configuration was 31.5”. So it was much wider than how we were currently using the canoe, but a bit smaller than the specifications. The difference could be in the new straps, or perhaps the canoe had never been 33.5” in the past.
Assuming the new straps didn’t affect the width too much, I think our canoe has always been narrower than it was meant to be. Have we always made our straps too tight? Does the floor of the canoe flex more than the designers thought it would, when the V-braces are installed, allowing the gunwales to become closer? Who knows? All we’re sure of is that when we set the width to 33.5”, the canoe is more stable than it has ever been before.
Once we knew we liked the new width, we had to figure out how to keep
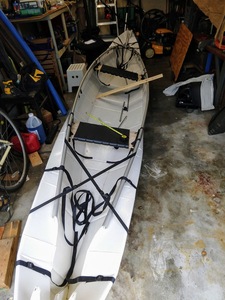 the new thwart in place. The solution also had to hold the gunwales
on, since the thwart is now a very convenient handle to use when
moving the canoe. And from experience, I can tell you that without
being fastened, if you pick the canoe up several times using the
thwart, one of the gunwales will pop off. :-)
This is what we came up with. It uses the Onak buckles at the ends of the strap to connect to the canoe, but no tightening is done there. The “male” pieces of those buckles are simply sewn to the ends of the strap, and aren’t adjustable – they just serve to hook the strap to the female buckle halves. The tightening is done using the strap adjuster under the thwart.
I hope to soon make a prettier version, which can serve as proper canoe yoke. It would be nice to be able to carry this very light canoe comfortably on my shoulders!
| updated, a week or two later, in mid-October | [index] |
Oh no!! Failure! After our first lengthy paddle with the new thwart, very bad things happened. See below before making a thwart like this!!!
Wheels!
| written in early October 2021 | [index] |
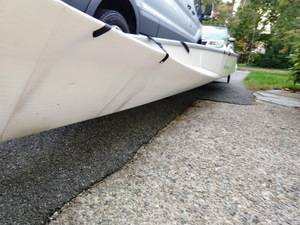
Once in a while it’s convenient to assemble the canoe some distance from where it will be launched – for instance, if the parking area is far from the boat ramp or beach. It’s not that hard to carry a 37lb canoe: either one person can do it, using our new yoke/thwart (see previous post), or two people can carry it, one at each end. But I’ve always thought there must be a way to use the wheels that are part of the “carrying case” to help roll the canoe.
Here’s what I came up with. Take the end cap with the wheels, and
move the strap that normally goes around the end cap so that the straps
now look like this, and you can flatten it out.
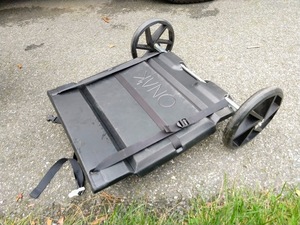
Nothing needs to be unbuckled, or even adjusted very much. (If you have the original Onak buckles still, you should replace them. Really, trust me, you’ll be happier.)
After making the end cap look like the picture above, turn it over, and
tuck the wheels under the end of the canoe. Loop the long strap
(the one that normally holds the end caps to one another) all the way
around the canoe.
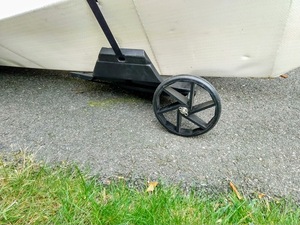
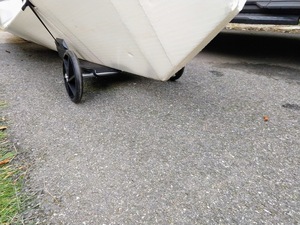
You end up with a long, low, wheeled “cart” which doesn’t steer very
well, and won’t go over big bumps very well (because the wheels are so
small), but it sure beats carrying it on your shoulders!
Heel cutouts
| written mid-October, 2021 | [index] |
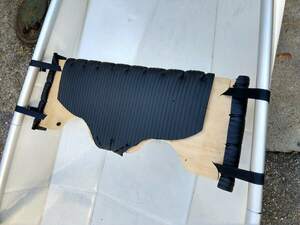
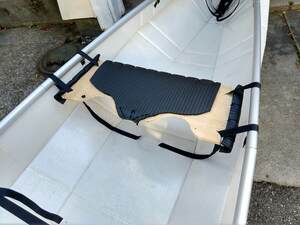
I keep my seat hung fairly low, to keep my center of gravity low. This
means there isn’t a lot of room for my feet under the seat. In particular,
my heels hit the seat, and it’s quite uncomfortable. These cutouts help
a lot. (I always paddle up front, so those cutouts face the stern of
the canoe.
Gunwale disaster
| written mid-October, 2021 | [index] |
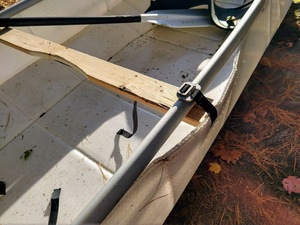
Look closely at the next two photos. Clearly, this shouldn’t happen. :-/
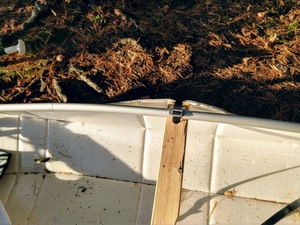
The gunwale has slipped off of the hull of the canoe, the canoe has contracted to the width it “wants” to be, and the thwart is severely distorting the side where it presses.
I had convinced myself that wrapping the strap over the top of the gunwale would act to keep the gunwale in place on the plastic hull, but clearly that didn’t work. Also, the thwart is probably too long, causing too much pressure on the hull. I think that forcing the hull out to 33.5” wide was overreaching – I think the original width specification on the Onak website may simply have been incorrect. So, back to the drawing board.
Happily, the plastic the hull is made from is incredibly strong, and while it’s a little bit crushed where the thwart was pushing on it, it’s still intact, and not permanently bent. “Whew!”
My first thought was to simply revert to using an original Onak V-brace, but one with somewhat longer “arms”, to keep the hull wider.
I made
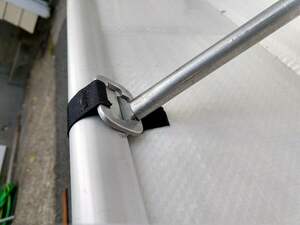
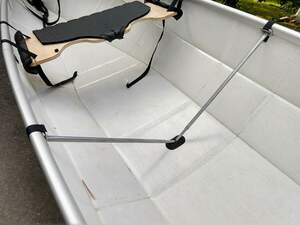
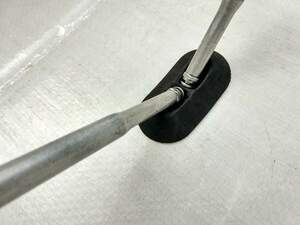
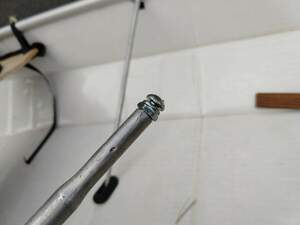 a new set of arms from some old camping tent poles, and, by creating
threads in one end, was even able to make them adjustable. By using
this new V-brace, and by “locking” the gunwale in place by poking the
T-shaped connector through the now-unneeded buckle loop, I was sure the
“loose gunwale” problem was solved.
I could see that the bottom of the V-brace was causing a bulge in the
floor of the canoe, and so to remove some pressure from the floor (and
because I believed from earlier experience that making the canoe wider would make it
more stable) I added a lightweight thwart.
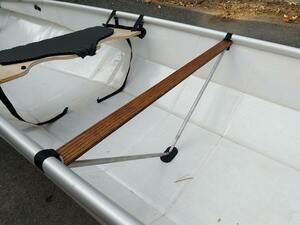
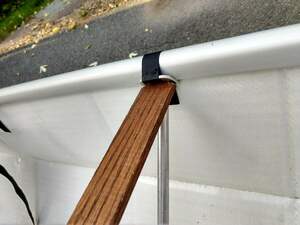
But… we went for a paddle, and while the gunwales stayed in place, and the we all stayed afloat :-), the canoe was once again very unstable – much like we’d experienced earlier. We had our dog (Casey) with us, and when he jumped from side to side, fascinated by waves, other boats, and water splashing on rocks on the shore, it unsettled the canoe tremendously. It was a windy day, and even the wind gusts and resulting waves made for uncomfortable, unstable paddling.
But then something interesting happened: Casey knocked the wooden thwart loose, and the canoe became narrower, but the instability was unaffected. Hmmm. Shouldn’t it have gotten worse?
Since we were in research mode, we went back to the dock, removed the new V-brace, and reinstalled just the thwart. And that fixed the instability! Even though the gunwale-to-gunwale width hadn’t changed. The only conclusion was that it was the V-brace pressing on the floor, and causing the hull to be “rounder”, that caused the instability.
So, the conclusion?. We didn’t want the V-brace, we did need a thwart, the gunwales had to stay firmly locked onto the hull, and the thwart couldn’t press on the plastic hull directly.
Thwart design #2
| written mid-October, 2021 | [index] |
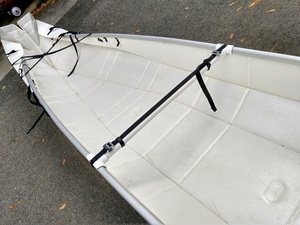
This is the new design, made from 1” PVC plumbing pipe, and a couple
of “tee” connectors that I modified to slip onto the gunwales.
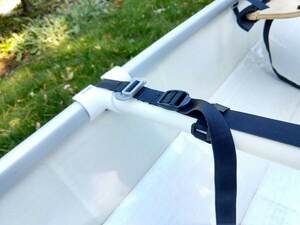
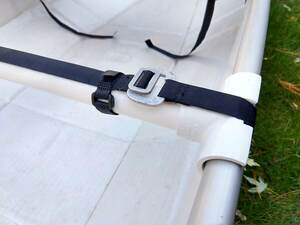
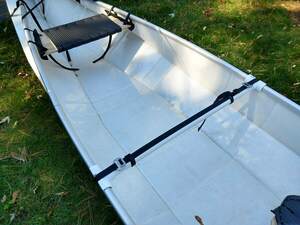 The thwart only pushes on the gunwales, which should keep the hull from
deforming. The shallow slot on top of each endpiece allows the strap
to keep the thwart from moving fore and aft.
What doesn’t show in those previous photos is that the gunwales are
very securely locked on, because the strap is wrapped twice
around the gunwale. These straps are longer than those that held the
V-brace in place, and had to be “harvested” from excess length
at the ends of the straps at the V folds.
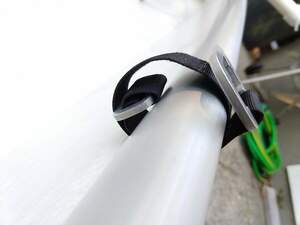
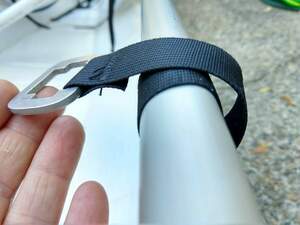
We haven’t tested the new thwart yet. If you don’t hear from us in a week, send help. ;-)
Are we done yet? Maybe.
| written just a few days later, mid-October 2021 | [index] |
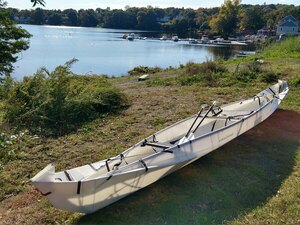
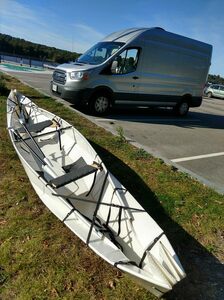
Well, we’re just back from a lovely paddle on a nice hometown lake. I
hate saying “We’re finished”, but I’m cautiously optimistic – all of
our changes seem to be working, and working well. I’m sure there will
be tweaks here and there, but we’re very happy with our canoe now. It
was a fair amount of work, but well worth it, in our opinion.
Assembly / Disassembly Instructions
| written October 2021 | [index] |
Assemble and attach the gunwales. The curved side should be up, i.e.
toward the inside of the hull.
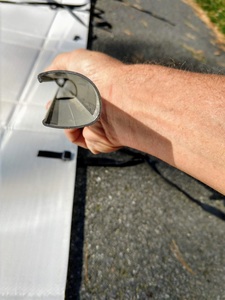
No straps should be caught between the gunwale and hull.
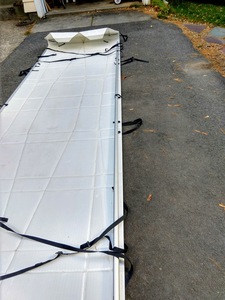
Stand the hull on edge (not pictured) to make it easier to press down hard on the gunwale to press it in place. If assembling on dirt, perhaps install both gunwales loosely before standing the hull on edge, to keep the dirt out of the edge of the hull. Tighten the gunwale/thwart “lock” straps .
Then comes a series of steps to be repeated at each end.
Tighten the X straps to make hull edges vertical.
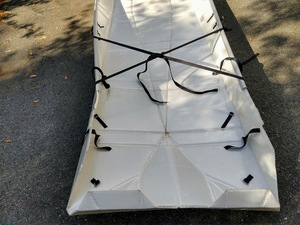
Tighten the V and Z straps to a large palm width.
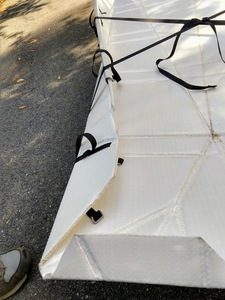
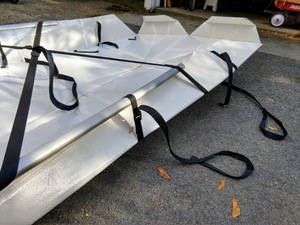
Tighten the X straps until nose can hold a “W” shape.
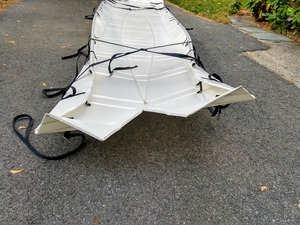
Half tighten the noses, keeping them folded correctly.
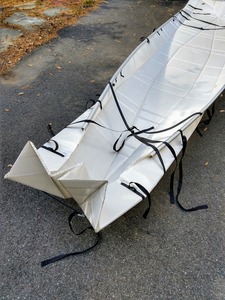
Finally, re-snug the X straps, and then go and repeat all of that for the other end of the canoe.
Install the seats loosely, with the heel cutouts on the front
seat facing stern. (Picture shows noses still loose – they should
have been tightened.)
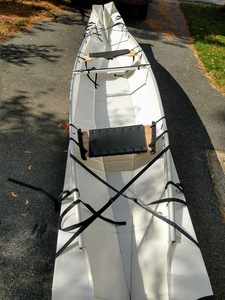
Tighten the V strap to “several fingers”, tighten the Z strap to palm or small hand width (across the strap), and tighten the X straps to smooth the angle to the nose.
Toss all the strap tails into the canoe – they’re a tripping hazard! (Don’t
ask me how I know!)
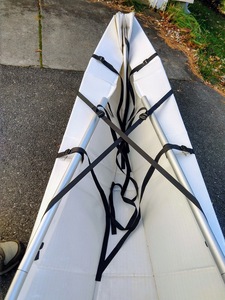
Finally, recheck all of the straps.
When disassembling the canoe, order isn’t so critical. It’s easiest to remove the seats and thwart first, then pop the noses, and then walk around and loosen everything else. Remove and bundle the gunwales, then roll the hull from the two ends. Secure it with some holding straps, and install an end cap.
There are two “cavities” in the rolled canoe. One holds the two seats, and our two self-inflating life vests (side by side, one inverted). The other holds the two gunwale bundles, the knee pad, the paddles, and the thwart. (Actually, we usually carry the paddles separately, to reduce the weight hung from the ceiling of the van.)
New Name!
The canoe came to us adorned with the partial URL “onak.by/foxharp”. Onak originally set up the cleverly-named onak.by website as a place for owners to upload their travel stories. Nothing much came of it, though, and they have abandoned the domain. So the URL isn’t much use anymore.
Well, we’ve made a lot of changes to the boat, and we realized we could very easily simplify that URL, and give the canoe a new, more appropriate name! We think it deserves it.
| The End (for now) | [index] |
