Low-key camper van conversion
(Much of this page was initially created in mid-February, 2016. Later additions are appended to the bottom, and are dated.)
(If you want to ask about anything here, or just make comments, drop me a line at pgf@foxharp.boston.ma.us)

- background
- history
- first modification! (rear door handles)
- thinking about the bed
- designing and building the rigging
- designing the bed frame
- thinking about curtains and privacy – 2/24/2016
- designing cabinets – 2/24/2016
- the bed parts arrived! – 3/5/16
- building the cabinets – 3/8/16
- driver-side cabinet finished! – 3/21/16
- designing cabinets, part #2 – 3/22/2016
- making things from whole cloth – 3/26/2016
- keeping the air fresh – 3/31/2016
- passenger cabinet, finally done – 4/1/2016
- the “couch” – 4/10/2016
- odds and ends – 4/16/2016
- action shots – 4/10/2016 - 4/15/2016
- oiling the cabinets - 4/25/2016
- swiveling the front seat - 6/12/2016
- mosquito netting - 6/17/2016
- interior sliding door handle - 6/17/2016
- intermediate slider doorstop - 6/21/2016
- cargo area light switches - 7/18/2016
- replacing the floor - 7/24/2016
- shore power - 7/29/2016
- electrical panel - 7/29/2016
- oh no!! first dent! - 8/5/2016
- action shots – 8/2016
- more details on the bed – 9/1/2016
- center console internal details – 9/3/2016
- overhead cargo net – 9/21/2016
- batteries: how many zots we got?
- keeping the rain and drips out – 10/4/2016
- hodgepodge – 10/24/2016
- software!! – 11/23/2016
- power outlets – 12/19/2016
- console cubby – 4/27/2017
- headlight switch switch – 5/3/2017
- rear door handle – 6/7/2017
- another hodgepodge – 6/21/2017
- rear door propper – 6/30/2017
- more storage, small stuff – 7/7/2017
- more storage, bigger stuff – 7/7/2017
- rear mosquito netting – 7/19/2017
- new windows!!! – 7/20/2017
- shower hook – 8/11/2017
- canoe! – 9/25/2017
- Insulation! – 10/10/2018
- Leaks! We’re taking on water! – 04/2022
- More action shots, relaxing at “home” – 02/16/2023
- Battery and fridge – 10/23/2023
- Smallest coffee table – 6/12/2025
background
We needed to replace one of our cars recently (late 2015), and found that we were totally bored with everything we looked at. So we decided to turn our next vehicle purchase into an adventure.
The result was this 2016 Transit Cargo Van. We took delivery in early January. It’s a tiny thing. :-)
We can’t decide whether to call it “The Spare Room” or “The Cottage”. We’ll probably just call it “the van”.


It’s pretty big: 20’ long, 9‘2” high. It has 6‘9” of standing headroom
inside (in the middle – it’s shorter on the sides). It’s a cargo van,
so there are no bench seats in back. Behind the driver and passenger
seats there’s 11 or 12 feet of empty space, all 6 feet wide. You see
why we think of it as the spare room.

The goal is to turn it into a camper van. Think “Do It Yourself” RV. It’ll be simple: no grey or blackwater tanks, no LP gas tanks. It’ll no doubt have some insulation, some power (both 12V and 110V), some cabinets, maybe a sink fed by jerry cans, perhaps a porta potti, and a place to sleep. It might have solar panels someday – we’ll see what our usage pattern is, and whether we feel we need them.
There aren’t many windows yet. Ford won’t sell windows that open, and the aftermarket glass companies don’t have their act together for the Transit yet. So we’re waiting a bit on that front, and will make do with the windows on the slider and rear doors.
history
We’ve done this before. Back in the 80s we had a Toyota Van that we traveled cross-country in, and down to Florida and Texas. Oh, and we took it around Nova Scotia, too. It came with seats that folded down to a double bed. We added curtains, a small table, and used a lot of odd boxes and milk crates for storage.


We also outfitted a Chevy Van in the 90s. We built our own pull-out couch/bed from angle iron and plywood, and again made curtains, and upholstered the couch cushions and bolsters ourselves. Milk crates were still part of the furnishings.


Practically the only thing certain about this next conversion is that there will be milk crates involved.
first modification! (rear door handles)
But back to the current behemoth. Okay, it’s not much, but it satisfied a need, and gave us a project on an otherwise idle Sunday afternoon. For some reason, the Ford cargo vans don’t have any handles on the inside of the rear doors. There’s a tiny latch that will let you out (we’ll need to improve on that someday – it’s at ankle height [Edit – we finally did!], but worse, there’s nothing to grab to close the door. So in the finest FoxHarp tradition, we crafted a couple of door handles from nothing but scrap materials found around the house.


thinking about the bed
The door handles were amusing, but the real first order of business is “a place to sleep”.
The plan is to have a bed that hoists to the ceiling when it’s not in use. That’s one of the reasons for such a tall van.
The first steps in doing that were making sure a bed would actually fit up there. We want a bed that’s at least as wide as a queen, though it doesn’t have to be the full 80” long that that implies.
So we built a simple frame as a mockup, and tried it out.


Eventually the real bed frame will rest on countertops along the
inside walls, but the mockup just hangs there. The goal is for Paul
to not have to duck his head while walking around. Julia will probably
not have a problem. Given that, it seems that there’s just enough
room for a 4” mattress on top of a frame that’s an inch or two thick.

designing and building the rigging
Hoisting the bed means we need a system of pulleys, and a hoist mechanism, that a) fit in the van without detracting from the headroom, and b) can lift at least 100lbs – better make it 200 to be safe. (The lift never needs to lift us – just the bed.)
Paul has been playing with an online CAD program called OnShape lately, which is kind of fun to use, and hugely helpful when designing things that have dimensional constraints.
This is a top view of (the right half of) the design (ignore that the drawing
says “front” up in the corner):
 That picture probably might not make much sense – there’s a lot missing
from the drawing.
That picture probably might not make much sense – there’s a lot missing
from the drawing.
Ropes will lead up from the bed to pulleys at the tops of the walls. To maximize lift, these pulleys are built right onto the ceiling ribs.


The rest of the pulleys, and the hoist itself, will be mounted to a pair of wooden slats that run the length of the ceiling. These are mounted using existing holes in the ceiling ribs.


The trick to mounting things to the van ceiling and walls is to use threaded inserts, which are made to install into holes in sheet metal. You push the insert through a hole, then use the tool to cause the long part of the insert to mushroom apart behind the sheet metal, locking the insert in place.


Seems like a lot of pulleys, but it all went together pretty
easily.

With the pulleys and ropes in place, it was time to do some load testing. The shopping bags each hold 27lbs worth of bricks. The predicted weight of the frame and bedding is around 100lbs. Hand cranking is easy, though it takes a while. Using an electric drill is a lot faster, but the drill does strain a bit. We’re looking into lighter mattress options (the plan until now has been a 28lb 4” foam mattress from Ikea), but it seems we’ll be okay no matter what we choose.

designing the bed frame
The frame will be made from 8020-style extruded aluminum. It’s not cheap, but it will let us create a very thin, very rigid bed platform. We’ve slept on too many saggy bedframes and mattresses in bad hotels to create one of our very own.
The design looks something like this, though we’ve simplified it
a bit since this was drawn, making it lighter in the process:

thinking about curtains and privacy – 2/24/2016
The current plan for curtains is to use fleece (nice because it’s
quite opaque, and doesn’t need hemming) which will be cut to fit the
windows and held in place either with small magnets or dots of
velcro. Julia started in on making the first pattern the other
day.

For the windshield, we got an excellent sunshade from Amazon. It completely covers the huge windshield, yet packs up pretty small. [ Edit: “ExtraGrandeJumbo 83x40” is the size to get. ]


designing cabinets – 2/24/2016
We will have cabinets! The bed has to sit on something when it descends.
We’ve started
with mockups, to get a sense of how much space we’ll have left.

The driver side cabinet will be 12” deep, the passenger side will be just 8 or 8-1/2” deep. That will leave not quite 4 feet between them – room for chairs, sometimes a small table. There will be a couch (of some sort) across the back, in front of the rear doors.
the bed parts arrived! – 3/5/16
So much time was spent on designing the bed that it was almost an anticlimax when all the parts we’d ordered arrived. But only “almost” – it was actually pretty exciting.


It was cold out, and dark, so of course the work had to be done in the
living room. ;-)
Assembly was pretty quick. Only one tool was needed –
a 3/16” ball-end allen wrench.


We bought some 1/4” x 1-5/16” lattice strips at the local bigbox, and
then iterated on how best to attach them to the frame, and finally
came up with this: ripped a set of 3/4” x 1/8” strips, drilled holes
in just the right places, and stitched them with 20 feet of 1/8” shock
cord.


All the time spent calculating weight distributions, poring over the 8020 spec sheets, and creating multiple designs paid off. The frame is plenty rigid for the two of us. Bonus: the actual final weight is quite a bit less than predicted: the frame, including wooden slats, weighs just 66 lbs. Add a 28 lb mattress from Ikea and we’ll still be under 100 lbs. The ceiling pulleys will be happy about that.
Okay… so let’s install it in the van!


It’s sitting on milk crates now (Remember? We told you there would be milk crates…), but eventually it will sit on the cabinets, which will be about 8” taller.
We then took a break to trim 5” off of our 80” queen-sized Ikea mattress. That gave us a chance to finally see how much room we’d really have when the bed is raised.

Yes!! There’s still about 2 inches above Paul’s head. We were hoping for at least an inch, so this is great. And, of course [we had to make an action video][video]!
That’s all the excitement we can take for today. The only other thing we’ve done is come up with a means of firmly tethering the bed to the rear of the van, using climbers’ carabiners and slings. We’d rather it not decapitate us in the event of a sudden stop. ;-)

Hopefully the next update will be about progress on the cabinets.
[ Edit: There’s now another web page which describes the bed assembly and rigging in more detail. ]
building the cabinets – 3/8/16
With the bed mostly finished, it’s time to build something to set it on when it’s in the lowered position. The design for the left side cabinet is pretty complete, and has been through several iterations, so it’s ready to be built. The passenger side needs a little more work.

So, off to the lumber yard, and started making sawdust in the driveway. They’ll be made from with poplar, in standard dimensional lumber sizes, partly because dealing with sheets of 3/4” plywood is really kind of a pain, and also because we have no idea how one is supposed to finish the edges on things you build from plywood. If only there were someone in Paul’s family we could ask. ;-)
In any case, it was a fine day for working in the driveway. Cell phone cameras just don’t capture sunsets very well. (The operation in progress in the photo is making the countertop, which needs to be wider than the 11-1/4” that you get from a 1x12 board.)

driver-side cabinet finished! – 3/21/16
Of course it took quite a bit longer than planned and expected, but we expected that, right? And probably should have planned on it. :-)
Anyway… the “chest-of-Ikea-drawers” on the driver side is built and bolted in. It still needs to be finished (we’ll take it back out for that), but we’re not sure what we’re going to do yet. We like oiling furniture because it’s easy to apply and maintain, but the top at least will probably be poly’ed.

The drawers are from the Ikea “Trofast” line of kids’ storage furniture. They’re not the abolute most efficient use of the space in the cabinet (note how narrow the drawers get toward the bottom), but they made the project attainable, for us. They’re supported by aluminum channel from Lowes that fit the 1/2” rim prefectly.
The drawers are supported by a seemingly endless number of small aluminum channels which all needed to be cut, deburred, drilled, and countersunk. The drawers are held closed by a simple turn button. There’s a small rubber washer squished under there which keeps the lever from moving without a helping hand.


Edit (9/24/2017) – A couple of thoughts on the drawer toggles:
First, the initial screws we used were very rough on the underside of their heads, and it turned out they were chewing up the top surface of the toggles. This, coupled with the rubber washer which we put between the toggle and the cabinet, meant the toggles kept loosening up while driving – the wood itself was getting chewed thinner, and the rubber washers kept compressing. So now the screws have been replaced with higher quality, and the single rubber washer has been swapped out for two nylon washers. All in all the “action” is smoother, and they now hold their tightness adjustment properly. (The screws are slightly longer this time, too, for better bite.)

Second, if doing this over, we might have given the free end of the toggles a big of an angle cut, or maybe rounded – anything but a simple square end. It turns out that the top row often get pushed up against the underside of the countertop, and when they do there’s no real purchase for the end of one’s finger – they’re hard to get a “grip” on in order to swing them down out of the way without pushing pretty hard on the end of the toggle for good “traction”.

designing cabinets, part #2 – 3/22/2016
Next up is the “built-in” for the passenger side. This one will be both simpler and more complicated – simpler because there won’t be all those drawers to design around, but more complicated because it needs to be as shallow as possible.
The next cabinet needs to leave at least 48” free across the floor, measured from the driver-side cabinet. We have a 24”x48” folding table we’d like to use in either orientation, and anyway 48 is a nice number. It would feel silly to end up owning a 20’ cargo van that couldn’t hold a sheet of plywood lying flat on the floor. Currently there’s only 49” from the driver-side cabinet to the passenger wheel well, and the new cabinet needs some support in front of that. The wheel well is just 7-1/2” deep, so space is tight – if the whole cabinet takes even 8”, there will only be 48-1/2” of floor left. It should just work.
 There won’t really be something sticking out of the countertop – that
thing represents part of the van wall, and the countertop will be cut to go
around it. The big open space in the middle is currently reserved for
our folding chairs, but could also hold shelves in the future. But just
in case you think this stuff all happens on a computer using CAD? Here’s
a dose of good old-fashioned WAD – whiteboard assisted design:
There won’t really be something sticking out of the countertop – that
thing represents part of the van wall, and the countertop will be cut to go
around it. The big open space in the middle is currently reserved for
our folding chairs, but could also hold shelves in the future. But just
in case you think this stuff all happens on a computer using CAD? Here’s
a dose of good old-fashioned WAD – whiteboard assisted design:

making things from whole cloth – 3/26/2016
Time out for projects that don’t involve sawdust. We need curtains, and our Ikea mattress was 5” too long when we bought it. (75” is a common length for RV mattresses, but the only place we could actually lie on and try a 4” mattress was Ikea, where mattresses are standard sizes.) Happily, the cover on our Ikea mattress zips off, and was amenable to minor surgery to shorten it.

The curtains (“window covers” would probably be more accurate) are pretty simple. We had finished cutting the fleece panels to size earlier, and Julia figured out where we needed to put our magnets. The magnets came from a set of refrigerator magnets that look kind of like push-pins – the magnets were little tiny things. We found that using a bit of hot melt glue to hold the magnet in place, and a little more surrounding the magnet to hold another patch of fleece on top of it, worked really well.

 We had a good day doing cabinets and curtains in the driveway.


keeping the air fresh – 3/31/2016
The scariest project so far, by far, was installing our ventilation fan in the roof. Ventilation is pretty important, because we have no openable windows as yet, people and dogs exhale a lot of water vapor, and we have a small propane heater – propane gives off a lot of water vapor when it burns. (No, we won’t be sleeping with the heater on.)
So. That means we were going to have to cut a square 14” hole in our roof. Ahem.
It’s pretty simple, really. First you mark where you want the hole
to be, and then you cut out the part in the middle.

Okay, it’s not quite just that simple.
You also have to
cover practically the whole roof with plastic to keep the hot metal
chips from burning the paint, and the whole inside of the van to keep
chips out of every nook and cranny.


You also have to cover yourself, for similar reasons.

A test cut is a good idea, to get a feel for the saw. We tried an
oscillating multitool first, before reverting to the tried and true
jig saw. The van roof has channels in it, for rigidity, which make
the cutting surface uneven. A small shim taped in place made it
level.


When you’re finished with the cutting, you file the edges smooth,


and then you clean up, using a vacuum, a brush, and a magnet.


Then it’s a matter of drilling holes in order to screw down some adapters (which compensate for the curvature of the roof) and the fan mounting flange,


and then sealing it all up with a bunch of waterproof tape
(Eternabond) and goop (Dicor self-leveling lap sealant).


Writing this, it turns out we’ve never taken a picture of the completed installation, from either inside or outside. Stay tuned.
[ Later … ]
Here’s are pictures of the inside and outside. The weather
has changed a bit since the install was done a few days ago!


passenger cabinet, finally done – 4/1/2016
The fan took precedence over carpentry due to a stretch of of beautiful weather last week, but since then there’s finally been time to finish off the passenger side cabinet.

It’s still not quite
done – there’s one more shelf to add, and a flip-up countertop
that will extend further into the slider door opening, but the whole thing
is bolted down, and good enough for photos.


We’re especially proud of the nice fit we got near the door frame.

Just a note on these cabinets – if you’re an amateur woodworker, and
you don’t own a jig for making pocket screw joints, you need one.
Trust us on this. The major maker of jigs is from Kregs – they
make excellent jigs, and the screws are annoyingly pricey, but they do the job
perfectly – far better than drywall/construction screws. And if
you do it right, the joints are mostly hidden. Here’s a shot
of a pocket screw joint, in progress – almost every joint on the
cabinets looks something like this:

Sometime soon we’ll be pulling both cabinets out in order to sand
them, and give them an oil finish. The tops will be polyurethaned.
But they’re very functional already.

the “couch” – 4/10/2016
“Couch” seems like too nice a word for something sitting on milk crates. (We said there would be milk crates involved, remember?) “Padded bench” might be a better name for it.
Basically what we built is a hinged top for a set of five milk crates that sit across the rear of the van. The bench top is cut to fit the outlines of the door opening, and of the aft end of the two side cabinets, and a piece of 3” foam was carved (isn’t that why it’s called a carving knife?) to match that shape.


(The backrest of the couch will be the van doors themselves, cushioned by some big pillows.)
The hinge in the bench top lets us get into the milk crates from either the front or rear of the bench. The bench top also serves to keep the contents of the milk crates, and the milk crates themselves, in place. To do this, the top is locked into end panels using four sliding barrel bolt locks, one on each end of each hinged panel.


In addition, a strong rim mounted underneath each hinged half keeps the
crates from sliding out from underneath, unless the barrel bolts on
that side have been releases, and the benchtop raised. (That rim hasn’t
been installed in the second picture here.)


We have no pictures of sewing the cushion cover, but the act of getting the
cover onto the cushion was definitely worth preserving!

odds and ends – 4/16/2016
In addition to the major components, mostly covered above, there have been many small projects, some necessary, some just for fun.
a little more countertop
When the bed is in the descended position, there’s not much working
surface left on our countertops. In particular, there wasn’t
really room to make coffee, which one could easily imagine doing
before stowing the bed. So we added a flip-up countertop extension
just big enough to hold our butane stove for boiling water in the
morning. An added advantage of using the stove there in general is
that cooking smells will tend to leave the van, rather than be trapped
inside.


The hinges came from amazon.
After those pictures were taken, the flip-up gained some little
turn-buttons along the edges, that can be rotated up in order to
keep the stove from sliding off the edge if it gets bumped.


(By the way – the beautiful countertop covering is temporary, until we can oil the cabinets, and polyurethane the tops.)
there are actually two beds in this van
We’re bad dog owners, and don’t completely restrain Lucas when traveling. (Yes, we understand the possible consequences.) He’s always had the back seat to himself in our cars, but giving him the entire rear of the van while under way seemed a bit much. For the most part he just lies in his bed and sleeps, but sometimes he sits, and he needed a backrest. We added a rotating barrier to the front end of the driver-side cabinet to help hold him, and his bed, in place. It rotates up for when we’re parked and don’t feel like banging our shins into it for a while.


van leveling
Campgrounds and parking spaces are rarely flat. Beds, on the other hand, want to be level. So you need to level your van. (We also have the option of leveling the bed within the van. We sometimes use that for fine tuning, but the first step is always to level the vehicle first.)
Making some ramps to put under the wheels is easy. We cut up some 2x6 lumber that was taking space in the garage and made a pair of simple three-level ramps – we can get 1.5”, 3”, or 4.5” of lift, on any two wheels. But figuring out how much to lift which wheels has been a problem in the past, often involving multiple iterations of driving on and off the ramps, usually at the end of a long day.
So were happy to learn this trick: The premise is that you make a scale model of your van and your leveling blocks, and level the model first. You then know exactly how to level the real thing. (We got the idea for this gizmo from a post on the sprinter-source forum by Dave Orton.)
We used pennies to represent the 1.5” thickness of the 2x6 layers that comprise the ramps, and a wooden block to represent the van. Pennies are about 1.5mm thick, so that makes a convenient scale of 1mm to the inch, or about 25:1. The wooden block is cut to be about 1/25 the size of the rectangle defined by the van’s tires.
Here it is in action: After parking the van, the spirit level (sitting on a counter inside the “crooked” van) shows we have some leveling work to do. The pennies are stored in the block of wood itself, and the spirit level swivels to let them out. Putting two pennies under one corner, and three under another, levels the block:


We then drive the van onto the same number of ramp layers…

and amazingly enough, the van is now level!

This process works perfectly, each and every time.
[ Edit: If doing it over, We might not use the level itself as the door which keeps the pennies into their hideaway. Sometimes the cover doesn’t get closed properly, and the screws can loosen up. It would be more accurate if the level were fixed firmly to the block of wood. ]
overhead bin bungee
Finally (and this is an addendum – forgot to add it to this section
originally), we added a shock cord along the shelf above the front seats,
to help keep things we store up there from falling off onto our heads.
We ran a single length of 3/16” bungee cord (from the hardware store) from one end to the other, passing
right through the plastic in the center section.


A future change might be to have the bungee exit the center section almost as soon as it enters, run across the outside of the top, and then reenter in order to immediately come out the side. This would leave a length of bungee lying flat across most of the top of the center part, giving us one more place to slip small things where they would be held in place.
[ Edit: We eventually did make that change. It’s very practical, as
the next picture shows. BTW, the cubbies themselves can be fairly easily
removed with a bit of gentle prying around the edges. This makes stringing
the bungie cord pretty easy. ]

action shots – 4/10/2016 - 4/15/2016
Time for a test! Lucas and Paul headed west from Boston, for 5 days of driving. Great trip! Things worked pretty well, once some of the initial squeaks and rattles were taken care of.


oiling the cabinets - 4/25/2016
While we were staying in Santa Fe on a bit of a vacation, Paul had time to oil all of the wood that went into the cabinets. That involved removing them each in turn from the van, removing most of the hardware, sanding it all, and applying several coats of natural Watco Danish Oil. We’ve used this stuff on other projects in the past, always with good results.
Happily, Santa Fe has pretty much perfect weather for doing that kind of work outside!


And then of course it all got reassembled, and put to use.


There’s still some polyurethaning to do, particularly for the countertops, and for some of the surfaces exposed to the doorway, where the cabinet often gets a bit wet if it rains and we don’t close up immediately.
swiveling the front seat - 6/12/2016
We can finally use the front passenger seat while we’re camped!
We’ve been planning on this for a while, but we were pretty sure it
was going to be hard. Turns out it didn’t take more than a half day,
being pretty relaxed about it. Turns out that after you’ve cut a hole
in the roof of your van, taking a saw to the sides of the seats is
pretty easy. Here’s a shot of the end result:

We also have a much more detailed writeup, with more pictures of the installation process. It’s pretty detailed, so it doesn’t seem really appropriate to include it all here.
mosquito netting - 6/17/2016
Mosquitos are the bane of camping. We had no trouble out west, in New Mexico and Utah, but during the trip back east they started rearing their ugly little pointy heads.
So we’ve been busy. As it happens, we had never thrown out the netting we’d devised for our old vans, so sufficient netting material was already on hand.
All of the netting can be left in place while driving the van, which will be convenient when going for short excursions from a multi-day campsite.
netting for the slider door
The large door panel is held in place by thin rods, contained in the hem of the netting, that tuck behind the rubber trim strip that goes around the door. In a passenger van that trim strip would cover the edge of the door frame, the paneling, and any upholstery, but in the cargo van the inner half of the U-shaped channel is empty, since the walls are bare.


On the forward edge of the door, a 1/4” fiberglass rod tucks nicely
between that rubber U-shaped channel and the big steel grab handle.
(In the pictures that rod is actually a long strip of wood which
didn’t work well. It’s since been replaced by the rod.) Using the
sewn-on handle loop, it’s easy to tug the rod and its netting out from
the door edge in order to enter or exit. That rod is a little over 5’
long – it came as a 10’ length from Grainger, where it was quite cheap if
you’re able to pick it up at one of their locations.

 There’s a large magnet helping to hold that front upper corner in
place, so that opening the netting doesn’t cause the top of the netting to
come undone.
There’s a large magnet helping to hold that front upper corner in
place, so that opening the netting doesn’t cause the top of the netting to
come undone.
On the upper edge of the netting, another 1/4” rod fits into the
rubber U-channel from above, and the downward curve of the door frame
at the ends keeps it in place. (The top rod is exactly 4’
long – it’s an orange snow plow driveway marker from Home Depot.)


At the rear edge it’s a little more complicated, because of our
cabinets, and the S-curve shape of the door edge. Above the curve we
used a thin flat piece of wood tucked into the rubber channel. A
couple of strong magnets keep it from popping out of place.

Below the S-curve the netting tucks (with the assistance of another thin strip of wood) between the door edge and our cabinet.
Finally, to keep the netting closed on the bottom there’s a line of
doubled-up washers sewn into the bottom hem, to keep it weighted down.

netting for the windows
On our old toyota van we had netting that attached to the outside of the front doors with magnets. The downsides of that arrangement were that the netting would get all wet if it started raining. That was annoying, but in addition you’d close the window, and then when you opened it again the wet netting would stick to the glass, and the magnets would pull loose, and you’d have to leave the van to fix them. You also couldn’t drive anywhere with the netting in place.
So this time the netting goes on the inside. We were hoping to attach the magnets using the same hot-melt glue technique we’d used on our curtains but it turns out that hot-melt glue doesn’t stick to our mosquito netting – it just pulls right off. That immediately upped the amount of work: every magnet would need to be sewn on. Have you ever sewn something involving a bunch of little magnets? Here’s a hint: sewing machines, scissors, seam rippers, and even pins are all made of steel. Hilarity ensues. :-)
The magnets came from a set of “Magnetic Pushpins” we got at amazon.
In the first picture, the completed window net is simply stuck to the
side of the van, to show its construction.

The strip of wood that extends part way across the bottom is simply a
paint stirring stick (painted green), the kind you get for free when
you buy paint. It’s 14” long, about 1-1/4” wide, and 1/8” thick. It
fits the narrow channel beside the window perfectly, and doesn’t
interfere with the window traveling up and down at all. The magnets
all stick to the outer edge of the door’s frame – positioned there,
they lie in between the two rubber strips that contact the door when
it’s closed.


interior sliding door handle - 6/17/2016
Inspired by a tip from jonsobi, on the Transit forum, we added an
additional pull handle to the trailing edge of the slider. That
door can be balky to close sometimes – it closes most of the way,
but the rear edge doesn’t turn its corner quickly enough, and it doesn’t
latch.
 Having a handle back there means we won’t have to re-open the
door in order to slide it shut again, harder this time, making more and
more racket each time we try. Now we can just give this new handle a
hard yank in order to latch the rear edge of the door.
Having a handle back there means we won’t have to re-open the
door in order to slide it shut again, harder this time, making more and
more racket each time we try. Now we can just give this new handle a
hard yank in order to latch the rear edge of the door.
intermediate slider doorstop - 6/21/2016
A guy who goes by the nickname “Dakota” has a blog called “Traipsing About”. Topics vary, but often focus on his Sprinter RV conversion. Tucked in there somewhere is a little gem where he talks about his intermediate door stop.
The problem with the big sliding door on a van is that it only has two stable positions: closed, and fully open. Mercedes or Ford will sell you an OEM solution for keeping the door just partly open, but those solutions are expensive, bulky, and hard to install. Dakota came up with a much simpler solution, and at the expense of small “buh duh bump” when you open or close the door, you gain an intermediate stopping point. Dakota sells his little widget, and hopefully will sell many more – it’s a clever idea.
After an email asking if his device would work on the Transit didn’t get an answer within 12 hours (the horror!), it seemed we had to make our own. (“Instant-Gratification-Are-Us!”) We used the dimensions on his blog post (3” x 1/4” x .1”) to cut one on the bandsaw from a sheet of 3/8” nylon. So it’s a little wider (3/8”) than his 1/4”, but that dimension doesn’t matter much. The wheel rest notch roughly matches the curvature of the door track’s roller.


Don’t know how well the double-sided tape that was on hand (i.e., “found in the junk drawer”) will hold up, but after 4 days camping in Acadia, including some rain on the way there, it’s seems just fine. If it gets lost, VHB tape will hold the next one, for sure.
(By the way: Dakota did reply to the email within a day, and didn’t disapprove when shown pictures of our version. Again: hope he sells many more.)
| updated years later: late April, 2021 | [index] |
Well, that first try at a door stop lasted about 6 months. I had used really junky double-sided tape, and it simply fell off.
So I made another, of the same design, using a piece of cutting board this time. I had used an “Epicurean” brand cutting board to make a luggage rack for my motorcycle, and was really impressed with the material – very strong, cuts and mills easily. It’s an epoxy composite of some sort. I used scraps from that project to make the second doorstop, and attached it with the thin spongy double-sided automotive tape from 3M. That lasted much longer – through the 2020 season – but since the tape is soft (a bit spongy), I think the ends of the thin little ramps flexed every time the door roller went over them, and they eventually cracked. The whole thing got progressively shorter, until the last remaining bit gave up last fall.
So this is my third try. I’d probably have just bought one of the aluminum ones I linked to above, but the price is up to $55, and I’m too cheap for that. :-) This time, I used scraps from the same cutting board, but I simplified fabrication by changing the design. Instead of essentially two ramps, connected in the middle, this one is two independent ramps. I used the same cutting board material. I cut one wide ramp, using my bandsaw, and used a sander to smooth things out and make the short bevels. Then I cut that wide ramp down the middle. It was way easier.


I used a very thin layer of JB Weld to secure it. Hopefully this one
will last forever. We’ll see.

BTW, while researching what to do this time, I saw on the Ford Transit forum that someone had made a multi-position stop from a length of thin aluminum bar stock, with rounded notches ever 6” or so. Interesting idea!
cargo area light switches - 7/18/2016
There are four ceiling lights in the rear of the van – two in the very rear, and two just inside the slider door. We replaced the bulbs with LED “festoon base” bulbs very early on, to reduce power draw. (We were able to find bulbs that matched the original color almost exactly, and which were just a little bit brighter. Only $5 for all four from amazon!)
The problem is, Ford does a really odd thing with a lot of their trucks and vans – there’s no switch to control those lights. The lights will come on when you open any of the doors, and will go off 30 seconds after you close them both (unless you lock the doors, in which case they go out immediately). If you leave the doors open, the lights will go off about half an hour after they were opened. And then they’ll go on again when you close them. There’s simply no way to keep the lights either completely on, or off. You can imagine that this is kind of a pain when you’re camping.
Should be easy to just add a switch, right? Actually, no, not so easy.
The Ford wiring controls both the power to the bulbs, and
also the ground connection. So while you can keep the lights off by
adding a simple switch to either wire, you can’t keep them on by simply
switching the power wire to an always-on 12V source – you need to switch
the ground side as well. Here’s the professionally-drawn schematic of
our solution:
 Paul was an electrical engineer in college.
Can you tell? ;-) There’s a DPDT switch to switch the lights between
“van power/gnd” and “constant power/gnd”, individual SPST switches for
the front and rear light pairs, and a dimmer, for good measure, which
only operates when the lights are on “constant” power, so as not to do
anything surprising to the Ford electronics.
Paul was an electrical engineer in college.
Can you tell? ;-) There’s a DPDT switch to switch the lights between
“van power/gnd” and “constant power/gnd”, individual SPST switches for
the front and rear light pairs, and a dimmer, for good measure, which
only operates when the lights are on “constant” power, so as not to do
anything surprising to the Ford electronics.


The switches are mounted up high, above the slider door. They’re mounted
in a wall cubby, to keep their protrusion to a minimum – the bed travels
very close to the walls and would hit them otherwise.

Sure seems like a lot of work to control the lights in a way that Ford should have allowed in the first place.
replacing the floor - 7/24/2016
Our van came with a full vinyl floor covering, which is actually
pretty good. It has a thick felt backing that is contoured to match
the corrugations in the sheet metal of the van’s metal floor, giving a
reasonably flat, durable surface. If this were a work van, it would
be more than sufficient.

The trouble is that over the several months we’ve used the van the felt backing has compressed, and the corrugations have started to become apparent. One spends a lot of time barefoot, and on one’s knees, while living in a camper like ours, and even though we have an additional rug on top of it, those ridges in the floor were annoying. (By the way, we also had to evict an errant pea that somehow got under our mattress early on.)
A company called Bedrug makes custom fit liners for pickups and vans that are reputed to solve this problem. The model we got is called the “VanTred”)
So, working in a sunny driveway in the middle of a heat wave (“Doh!”),
we spent the day removing most of the contents from the rear of the
van, including the cabinets, installing the new floor, and reinstalling
the cabinets.

The heat probably helped the new floor flatten out quickly – it looks like
it would be stiff if cold.
 It seems well made, and it fit the floor contours of the van exactly.

 The new floor consists of foam underneath, to match the corrugations, and a
layer of vinyl on top. That vinyl layer is definitely not as heavy
duty as the Ford cargo floor we took up – it’s easy to tell that it’s
thinner. Since we use a rug on top we’re not too worried about that
durability, but we might store the old floor in the attic for a while,
in case we want to double up on the top surface. (We’d scrape the
felt from the old floor first.)
The new floor consists of foam underneath, to match the corrugations, and a
layer of vinyl on top. That vinyl layer is definitely not as heavy
duty as the Ford cargo floor we took up – it’s easy to tell that it’s
thinner. Since we use a rug on top we’re not too worried about that
durability, but we might store the old floor in the attic for a while,
in case we want to double up on the top surface. (We’d scrape the
felt from the old floor first.)
The only fitment surprise came at the slider doorstep – it seems that the
Bedrug folks assume you might not have the “finished” plastic threshold at
that door, so their floor comes right to the edge of the step.

That means
the plastic step cover won’t fit unless you trim the bedrug, and make
some holes for the fasteners.

So we put the old floor back into the van, on top of the new, and marked where we’d need to do some trimming. The bedrug floor cut easily, and a spade bit worked well for drilling the couple of holes we needed.


After that, the only problem was that the new floor is a little thicker than the old one – perhaps 3/16”? (It’s a little hard to measure.) It was enough that our cabinets couldn’t be reinstalled without elongating the holes that the wall-mount bolts go through.
It’s now all back together. One can still tell where the corrugations are, especially when on one’s knees, but they’re much less pronounced, and it’s all much cushier. Let’s hope it stays that way!
And while out checking on the “knee feel” just now, our neighborhood
turkey and her young’un wandered by:
 (Which has nothing at all to do with the van, but it’s kind of cool to
have a neighborhood turkey.)
(Which has nothing at all to do with the van, but it’s kind of cool to
have a neighborhood turkey.)
shore power - 7/29/2016
At some point, RVers adopted nautical terminology for their electrical connections. When you plug your camper or trailer into an electrical outlet to give it power, it somehow magically becomes a boat, and what you’ve done is connect to “shore power”.
Our power needs are modest: when it’s cold we run a small electric heater to take the chill off (and that’s all it does – even 1500 watts doesn’t do all that much for an uninsulated van in sub-40 degree weather), and in the summer we sometimes run a small box fan (far more helpful). In theory we should need the ability to keep our battery topped off while camped, though in practice we use so little battery power (just the lights, the vent fan, the radio, and adjusting of the power windows and seats) that we can last many days without worrying about the engine not being able to start.
In any case, so far we’ve been running an extension cord out the door of the
van for the heater and fan. That works, but the extension cord gets pinched
in the door, and it’s kind of messy and in the way. Taking a lead
from some folks on the Ford forum, we made it all much neater. There
are some pre-existing holes at the base of the B-pillar on the driver side
which are ideal for this. We cut off about 6’ from the male end of a 12 gauge
extension cord, added some grommets to the holes (one of which had to be
enlarged a bit), and fished the cut end into the van.
After figuring out where the outlet would be mounted, we cut the cord
to length and attached the outlet.


There needed to be a bracket of some sort to keep the extension pigtail
from dangling on the ground. Happily there was Yet Another pre-drilled hole
(we’ve probably only drilled one or two “new” holes in the van since we
started this project!)
just under the edge of the frame that we could use. We installed a
rivnut, and found a 1/4”-20 eye bolt. We pried it open (i.e.,
effectively turning the eye-bolt into a hook) just enough to accept
the extension cord. The cord can now be unhooked and
reattached by feel – no need to crawl under the van.


The surface mount outlet box (which we painted to match the color of the van)
mounts nicely on the sloped area at the bottom of the pillar. We mounted it
with 3M Dual-lock, which is kind of like velcro, but much stronger.
The advantage over using screws is that the position can be adjusted a
bit, and if we ever need more room, perhaps while working on the seat,
it will be easy to get the outlet out of the way. There’s a plastic
shroud that covers much of the area where it’s mounted – that had to
have a large notch cut out to accomodate the outlet. (It was very
convenient to be able to move the outlet a bit when the notch we’d cut
didn’t quite end up where it should have.)

We said above that we don’t need a battery charger. But lacking any other way to keep the batteries topped off (a solar powered charger will someday be a much better solution), we got one for peace of mind, and installed a second outlet on our (usually hidden) electrical panel to power it. The charger is always connected to both the battery and the outlet – a call to customer support assured us that this setup is safe for both the battery and charger. The van may be parked in the driveway for many weeks at a time, and now we’ll be able to easily plug the van in to make sure the battery doesn’t drain. (By the way, this charger, a “Battery Tender Power Plus 3”, is bargain-priced at Costco. They have an exclusive deal with Deltran, and sell it for just $40. Similar chargers are usually about twice as much.)

electrical panel - 7/29/2016
It seems we never posted about the electrical panel
itself. It’s simply a piece of 3/4” board that we had, mounted on flanges
in order to set it back as far as possible (about 3”) from the surface
of the interior wall.


Before commiting to that, we looked up examples of several of the prospective occupants of the panel (battery charger, solar controller, fusebox, etc), and they all seemed to take less than 3” of depth. As it turns out, a thin surface mount outlet box, plus an electrical plug along with its cord’s strain relief, is a bit more than 3”, but it’ll do.
The first thing mounted to the panel was a Blue Sea six position fusebox, visible a couple of images above. The fusebox is fed from one of the Customer Connection Point terminals on the driver seat pedestal. Those terminals are fused for 60A each, so the wire to the fusebox is 10 gauge. The ground wire goes to the customer ground point on the floor between the two front seats. There are currently three circuits served by the fusebox: the MaxxFan ventilation fan (5A max draw), the cargo lights (.35A max draw), and the Batter Tender Power Plus 3A charger (3A max load).
oh no!! first dent! - 8/5/2016
It finally happened. Happily, the dent is a small one, and it’s on the inside of the van. Unhappily, the other side of the dent – the bulge – is on the outside of the van.
To keep our electric heater from bouncing and rattling in a most annoying
way while driving, we bungie it to its shelf. The bungie cords are a pair
of those ball-end bungie loops that are really intended for helping support
a tarp, but which are very useful for all sorts of things.

A few weeks ago, while fastening things down, the bungies slipped apart. We didn’t notice it at the time, but the resounding THWACK! we heard was one of the plastic balls hitting the outside wall of the van. You can barely see the small dent it made in the outside wall, above and behind the heater in the picture above.
It’s a lot more obvious from the outside:

Ironically, it wasn’t noticed at all until Paul got the notion to actually wash the van. All of a sudden it stands out like a sore thumb. There’s a lesson there somewhere.
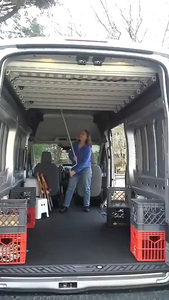
action shots – 8/2016
Haven’t posted any “in-use” pictures recently. Here are a couple of
shots from a pretty morning in New Hampshire’s lovely Pillsbury State
Park. The coffee’s almost ready!


And looking back, it turns out there are no pictures of
the bed in the “down” position. When the bed is down we’re usually
going to bed, sleeping, or getting up, and taking pictures just isn’t
at the top of our list. So here goes:
 Looks pretty comfy, eh?
more details on the bed – 9/1/2016
At some point we promised more details on how we constructed the bed, and its mechanisms. That’s now available in a separate “Raised Bed Design Details” web page.
center console internal details – 9/3/2016
We’ve been thinking that there should be a way to make better use of the space taken up by the center console between the two front seats. The top is divided into awkward compartments, the front panel has a coin holder we’ll never use and some switches that we’ll probably never use either. And there’s a lot of wasted space inside. We might just remove the coin holder and the switches and make a cubby hole in which to stick things – the usual paraphernalia of road trips, like candy bars, gas receipts, sunglass cases for sunglasses you lost long ago. That sort of thing.


This picture shows an unused connector deep down inside. No idea
what it does – should probably find out, in case it’s interesting
or useful.

[ Edit: That’s connector C12-A, part of the “modified vehicle wiring”. It provides switched and unswitched power, two general purpose unused connections to C11-H in the engine bay, as well as connections to the left and right front turn signals (?). Search BEMM for “Modified Vehicle Wiring Connectors” ]
overhead cargo net – 9/21/2016
We considered installing a second shelf above the overhead shelf that’s already present above the driver and passenger seats, but in the end decided that just a cargo net would probably serve to hold the very light things we might put up there. We’re thinking sweaters, hats, gloves, and other things like that.
So we got a cargo net from Amazon, and went to work.
It’s a little hard to keep the net stretched out while trying to figure out
where to attach it, so the first thing was to make a lightweight frame to hold
it while we worked.


With that to keep the net in the shape we wanted, it
wasn’t hard to measure (many times!) and mark the locations for the corner
anchors.

In the end it seemed worthwhile to make that frame a permanent part of the installation – it will help ensure that the headliner doesn’t deform due to the new stresses pulling on it. By slipping the X-shaped frame into the gap between the headliner and the roof, and screwing through the headliner and into the wood (the holes were all pre-drilled), the net is very well supported, and the headliner reinforced.
We added some small clips in the middle of the cargo net’s upper and
lower shock cords to help support it. Sadly, there’s a sounder/beeper
of some sort glued to the top surface of the headliner, right in the
middle, which was in the way. As a result, our extra clips had to be
installed off-center so that we didn’t screw right into the beeper.

By the way – if you’re planning on doing this – the 3 orange pegs that hold
the headliner up along its rear edge will pop out with a good pry. Having
a set of automotive trim tools, like you
can get from Harbor Freight, helps a lot with this sort
of thing.

Here’s a picture of the final product, in use. Works well, and we were
able to empty an entire large storage bin, which can now be put to other
uses.


batteries: how many zots we got?
Most RVs have separate batteries for a) starting the vehicle, and b) running all of the “camping” stuff. That guarantees that even if you overuse the lights and the stereo and the TV and the microwave and the hair dryer and the espresso machine that you’ll still be able to start the engine and drive home for some much needed relaxation. ;-)
But our van’s not like that. It came with a factory option for dual batteries, which are connected in parallel and are used for the usual car-starting duty. While we could have added a second battery, or battery bank, for the “camper” stuff, we decided not to. We don’t use, or even have, most of the appliances listed above – our electrical needs are small. We use the LED lighting at night, sometimes we listen to music for a while. And we charge our cell phones. So far that’s been about it.
But as the weather cools down, we’re thinking of getting a couple of 12V electric blankets or mattress pads, both for our bed and for Lucas. Plugging in heating elements means we need to have a much better idea of how much juice we’ve got in our batteries, and how long it will last.
We got a Victron BMV-702 battery monitor to help us do that.
 Like most battery monitors, the Victron unit keeps track of your battery’s
state of charge (SoC) by keeping track of how much current flows both in
and out of the battery. To do this, one inserts a big fat low resistance
shunt into the ground return path to the battery. Our shunt
has a resistance of just .0001 ohms, and a current capacity of 500
amps. (It’s that big in order to handle the load of the starter
motor, and we know it’s big enough because the whole electrical system
is protected by a 470A fuse.) The monitor continuously samples the
voltage across the shunt, and translates those readings into total
amp-hours into and out of the batteries.
Like most battery monitors, the Victron unit keeps track of your battery’s
state of charge (SoC) by keeping track of how much current flows both in
and out of the battery. To do this, one inserts a big fat low resistance
shunt into the ground return path to the battery. Our shunt
has a resistance of just .0001 ohms, and a current capacity of 500
amps. (It’s that big in order to handle the load of the starter
motor, and we know it’s big enough because the whole electrical system
is protected by a 470A fuse.) The monitor continuously samples the
voltage across the shunt, and translates those readings into total
amp-hours into and out of the batteries.
The existing negative wire to the battery needs to be connected to one
end of the shunt. The other end of the shunt is attached to the
negative battery terminal with a new cable. To size the cable, we
made a couple of prototypes, first using rope, and then using plastic
tubing to better mimic the stiffness of the eventual heavy-duty cable.

 The nice guy at the local Interstate Batteries dealer was able to copy
our prototype exactly, using 2/0 welding cable. He even got the relative
angles of the end lugs right.
The nice guy at the local Interstate Batteries dealer was able to copy
our prototype exactly, using 2/0 welding cable. He even got the relative
angles of the end lugs right.
The one catch is that the stud that the Ford cable normally attaches to is
only 6mm, and the shunt bolts are 10mm.

 Since we didn’t want to cut off and replace the end of the Ford cable
(in case we remove the shunt someday), we needed an adapter. By
asking around at some electrical supply companies, we found a place
that could sell us a short length of copper/brass “bus bar” that would
do the trick. In fact, they let us have it for free. We donated to
the shop coffee fund in thanks. Just a short chunk was needed, along
with a new hole to accommodate the bolt on the shunt.
Since we didn’t want to cut off and replace the end of the Ford cable
(in case we remove the shunt someday), we needed an adapter. By
asking around at some electrical supply companies, we found a place
that could sell us a short length of copper/brass “bus bar” that would
do the trick. In fact, they let us have it for free. We donated to
the shop coffee fund in thanks. Just a short chunk was needed, along
with a new hole to accommodate the bolt on the shunt.

That worked nicely, and we installed the shunt on the back of the
driver seat pedestal.

 The additional red/black wires go to a temperature sensor which does
double duty by attaching to the positive battery terminal – it both
measures the battery temperature (important, since battery capacity
decreases with lower temperature), and picks up 12V power to keep the
meter running. The shunt connects trivially to the little round meter
(which contains all the smarts) with an ethernet-like plug-in wire.
The additional red/black wires go to a temperature sensor which does
double duty by attaching to the positive battery terminal – it both
measures the battery temperature (important, since battery capacity
decreases with lower temperature), and picks up 12V power to keep the
meter running. The shunt connects trivially to the little round meter
(which contains all the smarts) with an ethernet-like plug-in wire.
The meter needs a 2” diameter hole, easily cut into the cargo liner
panels with a hole saw. Plugged it in, configured the capacity of
our battery bank (140Ah, for the record), told it how low we’re willing
to run our batteries (down to 60% full), and we were done.


keeping the rain and drips out – 10/4/2016
It turns out that we’ve never talked about our little rain awning, which we
made sometime back in June. It still feels like a prototype that
should be replaced soon, but the fact is that it mostly works, so
we’ll probably live with it for some time. (As an aunt and uncle of
Paul’s used to say: “If a job is worth doing, it’s worth doing well.
If it’s really worth doing, it’s worth doing poorly!”)

The sides of the van have a slope to them. This means that when the
slider door is open, rain can fall directly into the door opening,
getting the countertop, among other things, all wet. In addition,
there’s a fair amount of van wall above the door – any rain that
hits that area will also run down and drip into the door – there’s no
lip or gutter to divert it.

A shipping fiasco with Grainger had left us with a spare 10 foot
length of 1/4” fiberglass rod left over from the mosquito netting
project. Armed with that, the rain
fly from a long-unused tent, and some strong magnets, we went to work.
The fiberglass rod feeds through small sewn “tunnels” in the rain fly,
and the ends are held captive at the edges of the fly with
reinforced pockets sewn from nylon webbing.

The result is that the rod is forced into a curve, and this curve
defines the front edge of the awning.

The “excess” material formed by this bow is held to the wall of the van
with fairly strong magnets we got at Home Depot. The whole awning hangs
from those magnets. The hooks on the magnets aren’t strictly necessary,
but they do provide a handle, which is pretty important when trying to
detach them.

The hem on the “wall” edge of the rain fly has a piece of
rope threaded through it. This creates a barrier that keeps the
slippery nylon from slipping out from under the magnets if tugged at
by a gust of wind, and also helps one set the magnets right at the edge of
the fly when putting it up. The outer dangling corners of the awning
can be staked out for a little more covered area if need be, and also
to help control the awning in wind gusts.

It works fairly well. It requires no poles, and prevents light rain from
entering the doorway. We still get drips into the doorway once the
awning material is saturated, but most water is deflected. The first
time we used the awning we didn’t have enough magnets (we now use 8 of
them), and we didn’t have the rope inserted into the hem as described
above. The awning blew off in some strong gusts – about half the
magnets stayed behind on the van, the others were scattered. The next
thing to do is make little “socks” for the magnets. It’s likely that
eventually they’ll be dropped in some iron-rich dirt, and that dirt,
which will be impossible to remove completely, will scratch anything
it comes in contact with. The little socks would hopefully keep them
clean.

| Updated, August 2022 | [index] |
The long white fiberglass rod that we used for the edge of the awning was kind of a pain to store, and, truth be told, we didn’t use the awning much. A couple of reasons: we rarely set up and stay for more than a day, so the overhead was a little high – we can’t drive with the awning up, especially not if it’s staked out. Plus, when it was staked out, just getting in and out of the van would change the tension on the guy lines.
So, first, to solve the storage problem, I replaced the fiberglass rod with
sections of bungeed tent pole from an old tent. So right away the whole
thing became tiny enough that even if we never use it again, it will no longer
be in the way. Second, I figured out how to ‘stake’ it with magnets to
the walls of the van, rather than needing true stakes. It seems to work
just as well as before, and now it’s more stable. We can even move the
van a bit without taking it down.


We’ll see if we actually use it more.
hodgepodge – 10/24/2016
Just found several old pictures of things we intended to share, so here goes:
front curtains
We’ve talked about our curtains previously, but sometime later (when we realized we were going to a bluegrass festival in the van, and were going to need more privacy) we made a new pair for the front windows. After mocking up what we needed to get the shape right, we ended up with a pretty simple design. In the middle, support comes from a small S-hook that hangs from the visor hinge. The front corner is held down on the dash by a 4” length of iron bar that nestles across a natural pocket in the formed plastic dashboard. At the rear, we have magnets that hold the rear edge against the B-pillar. (Our sunshade takes care of the rest of the windshield.)


lights
Camping in a steel shell lends itself to using magnets for all sorts
of things. We’ve found a couple of very handy lights that work well
for us.

We have about six of the oval-shaped flashlights – they’re good for area lighting on our countertops (using the side array of LEDs, while stuck to the top of the window frames), and when you’re heading outside at night it’s easy to grab one to use as a regular flashlight (using it in a different mode: there are a couple of LEDs on the end as well). Those are available in lots of places.
The flexible lights are the stars of the show, though. They’re great for reading, or for aiming at a pot while you’re cooking.
seat-back cargo nets
You can never have too much storage space. A co-conspirator on the
Transit forum
pointed out these neat cargo nets that stick to the
carpet-covered seat backs using velcro. Very handy, and at $3.50 each
on ebay,
hard to pass up!

voltmeter
This voltmeter from Amazon
isn’t so necessary now that we’ve installed our over-featured Victron
battery monitor, but it was essential
before that, and still handy to have. It’s very accurate, as
confirmed by both the Victron and a “real” multimeter.

software!! – 11/23/2016
Some coworkers of Paul’s used to joke that no project was complete until it could send mail. That was usually the indication (back in the day) that all the other useful features had been implemented, and that the team was just starting to play.
The van can’t send mail yet, but at least the software part of the project has begun. Finally!! ;-)
The Victron battery monitor we installed has a serial interface (like an old COM port on a PC, but more primitive) over which it can do logging and reporting of the data it collects. Victron sells a USB adapter for that serial port, which is nicely opto-isolated (so you hopefully won’t fry either your van or your laptop by accident). With one of those interfaces, and a modicum of programming skills, we can now generate nifty graphs of power consumption, voltage levels, battery temperature, power in use, and that sort of thing. Here’s a simple plot from yesterday of battery current and voltage. The van sat all day, doing nothing:

You can see that no current was drawn, and the voltage was constant, except when the door was opened just before 6:30AM. (Yes, we were up!) There’s a big negative current spike as the van comes awake, then it levels off at about 1/2 Amp (the dashboard is “alive” during that time, the 12V outlets are operational, etc.). About half an hour later the van’s “battery saver” features kicks in and shuts everything off again. The voltage drops during that half hour, but comes back afterward.
So, that’s not very interesting, but as we start adding more power consumers (like electric blankets, and maybe someday a fridge) it’ll be good data to have.
Paul’s software for reading the battery monitor is open source, of course.
power outlets – 12/19/2016
There are three power outlets in the van as it came from Ford – two on the dash console, and one in the very rear of the van. Two problems: they’re not well positioned for where we usually want 12V power while parked, and they’re controlled by the van’s brain, which shuts them off after 30 minutes. That’s not very convenient for charging your phone.
So we got some 12V receptacles from ebay, and mounted them in little poplar boxes to match the cabinets. We actually started the project back in October – just took a while to write it up.
Making the outlet boxes was fun. (Pulling the Shopsmith into the
driveway to make sawdust on a good day always is.) We didn’t have the
correct hole saw for the receptacles, and that provided a nice excuse to
get out the jigsaw, which rarely gets used. The disk sander was also
vital, to get the angles right so the boxes would mount vertically on
the sloped and tapered C pillars.

Snaking the wire through the walls, encased in split-loom “conduit”,
took a lot of fiddling. The goal was to come out the little hole right
under the “window” opening, and it turns out that’s kind of hard to do.
We were successful in the end, but if you do this, be careful! Those
sheet metal edges are sharp!!

After oiling the boxes, and mounting them to the pillars with 3M
Dual-Lock, they look good and work well.


A word about 3M Dual Lock – it’s fantastic stuff. If you have a turnpike toll transponder in your car, it’s probably held to your windshield with some small pieces of Dual Lock. Think of it as industrial strength velcro – it has a powerful hold, but can still be separated when you need it. And if you need to peel it off the wall or the thing that it’s holding up, the adhesive gives way nicely. When mounting wood pieces, a couple of coats of quick-dry polyurethane fills in the pores of the grain so the Dual Lock will stick properly.
The only annoyance is that even if you buy black Dual Lock, the
squishy adhesive layer is white. Happily, a black Sharpie applied to
the edge of the adhesive before mounting it fixes that problem, as you
can see in this “before and after” shot:

Also – be sure and leave clearance for the stuff. It’s probably 1/4”
thick when all is said and done. You can see the white adhesive
layers, as well as the thickness, where the cover for the battery
monitor shunt mounts on the driver’s seat base. (I hadn’t yet learned
the Sharpie trick, and it doesn’t work so well after the Dual Lock is
in place.)

console cubby – 4/27/2017
It’s spring, when a young (!?!) man’s fancy turns to thoughts of working on the van once again.
As we’ve said before, the console setup on the Transit has always seemed really stupid. The layout of the pockets on the top shelf doesn’t really fit anything we own, we haven’t used a coin holder in a car since the 80s, and the “upfitter” switches, intended for controlling accessories and add-ons, aren’t wired in a useful way, and we’re always flipping then on and off with our knees, so it’s just as well that we can’t use them.
So we took things apart, removed the switches and the coin holder,
and made ourselves a new storage cubby.


In case any fellow Transit owners want to try this trick at home, we’ve also done a more detailed writeup of the cubby install, which includes detailed dimensions for the cardboard cutout.
headlight switch switch – 5/3/2017
When we ordered the van, we neglected to check the box for Daytime Running Lights – not sure why not, since we usually enable that feature on our vehicles. And it turns out that even a 9’ tall 20’ long van can benefit from extra conspicuity – Paul almost pulled out from a stop sign into the path of another Transit, identical (except that we aren’t plumbers) to ours in color and size. The houses behind it were backlit by the low winter sun, leaving the van in shadow. The silver paint job completed the vanishing act. It was a textbook example of how DRLs could help.
We could probably get used to always turning the headlights on, but the van isn’t very good about reminding us to turn them off – it will chime loudly if we open the driver door, but in the van we very often leave via the side slider. No chimes in that case, and we really, really, really, don’t want to leave the lights on when we go off for a long hike in the middle of nowhere.
Happily, thanks to a tip from another Transit owner, we’re all set. The headlight switch module is “smart”, in that it controls two levels of exterior lighting as well as dimming the dashboard illumination, all with just 3 wires: power, ground, and data signal. The van’s brain can detect when the headlight switch is broken, and when it does so, it puts the lights into a failsafe “always on” mode. So, simply disconnecting the headlight switch causes the headlights come on and stay on whenever the ignition is on.
Disconnecting the switch works well, but there will be times when we actually do want the headlights to stay off – maneuvering a bit in a dark campground, boarding some ferries, etc. So we installed a switch for our headlight switch.
The cupholder pops up and off. It’s easiest to get it started by
popping the single rear clip first, which can be done by prying the
cupholder away from the surface behind it. There’s room for at least
two small switches on the front curved surface.


 Our new switch controls the power to the headlight switch. The yellow
wire is the power lead. (The connector can be reached and unplugged
via the small access panel below the switch. The headlight switch
itself doesn’t have to come out.)
Our new switch controls the power to the headlight switch. The yellow
wire is the power lead. (The connector can be reached and unplugged
via the small access panel below the switch. The headlight switch
itself doesn’t have to come out.)

The switch, btw, is a “Philmore 30-16081 SPST w/ Amber LED”. I chose not to try to get the LED to do anything at all. It’s always off. So the “ground” terminal on the switch isn’t used. The other two terminals (“load” and “power”) are used as a simple single pole switch to make or break the wire connecting power to the van’s headlight switch.
So if you look at the picture, I’ve cut the yellow wire (actually yellow/red I guess). I connected one end of the cut wire to the “load” terminal of the switch, and the other to the “power” terminal. It doesn’t matter which wire goes to which terminal. (I’ve read that if one of the switch terminals is brass, then it’s the “ground” terminal, but I can’t say that for certain.)
By the way, another good place for installing an extra switch would be
in one of the spots that Ford provided, on either side of the
instrument cluster. One of those spots in our van is unused. There’s
nothing really clipping the blank in place – it just slides out once you get
a thin tool under its edge.

One could probably mount a simple mini toggle switch by drilling a round hole in the existing plastic blank. For something maybe better looking, user Hein on the Transit forum has an ebay shop that carries a replacement blank with a nice looking switch.
rear door handle – 6/7/2017
The Transit cargo vans have a really stupid latch release for
opening the rear doors. There’s a little recessed lever down at about
shin height which has to be pushed diagonally toward the floor
to open the door. You can see it in this old picture – it’s the
dark oval shape about a foot from the floor near the edge of the door
that Julia’s not working on.

I guess they think you won’t use those doors very often (and happily, we don’t).
But in the interests of both safety and convenience, we finally did something about it. The recessed lever is below the level of our couch seat – we can get to it, but it’s not easy.
Turns out it was easy to fix. By installing a pulley,
 drilling a small hole in that recessed lever,
 drilling another bigger hole in the windowsill, and installing a grommet,
 and running a cord to connect it all,
 we now have a knob we can pull, in an easy to reach location.

Not bad for an afternoon’s work, working entirely with materials already in the house. (The pulley is clearly overkill – it was left over from the bed rigging project!)
another hodgepodge – 6/21/2017
A few other small projects got done this spring.
flasher button cover
This one is kind of silly. It turns out that when Paul
uses the radio menus while driving, he reaches over with his
right hand and pushes buttons with his index finger while stabilizing
his hand with his thumb and pinky on the dash. His pinky always ends
up activating the button that turns on the hazard flashers (which are silent
in operation).

You’d think this would be avoidable, but time has shown that
technical creativity was required. So, to end the embarrassment of
driving down the road with all the flashers going, we created a small
cover for the button.


tupperware umbrella rain deflector
The design of the air filter enclosure on the Transit is almost criminally
negligent. The lid of the air box fits inside the bottom of the air box,
and while there’s a bit of a gasket (it’s the edge of the filter itself,
which gets crimped between the enclosure’s top and bottom), any failure of
that seal will let any water that hits the outside of the air box run
right into the bottom of the box. That’s the dirty side of the filter,
so the water will then get sucked into the filter material. To
compound this problem, the water runoff from the windshield and
the wiper trough was poorly managed – a heavy storm along with a
clogged drain opening or two will result in rain water pouring onto
the top of the air filter enclosure, and from there possibly into the
air box.

Many people have reported hard starting/running due to frozen air filters, and many more have reported moldy, disintegrating filters.
The best fix (since there’s none coming from Ford) is to add an
additional cover to the air box. This unholy creation, based on a 12
quart Sterilite brand dishpan, was invented by a fellow Transit
forum member and has been dubbed the “Tupperware Umbrella Rain
Deflector” by the forum. It seems to work.


the trade of all jacks
The compact (but very heavy!) tire jack normally lives under the passenger seat in the Transit cargo vans. Our seat swiveler made it very difficult to access that area, so the jack had to move. Happily, this is also an issue on the passenger vans, which sometimes have extra heater equipment under that seat. So there’s already a pre-threaded location for creating a sturdy new jack mount in the rear of the van. We did lose a bit of space from within of our rear milk crates, but we were able to move a bunch of tools (which are divided into smaller/lighter packages, and are easier to handle) to under the passenger seat. Overall, it was a good tradeoff.


cellphone holder overkill
If this had been readily available on Amazon, it would have been a lot less trouble! But a magnetic wall-mount cellphone holder for a Nexus-6-size phone apparently just isn’t a hot product. Reports are that this one does work nicely, and besides, it has a bit of… flair?


fire prevention in a drawer
And last, we finally figured out where to mount the fire extinguisher,
such that it we won’t kick it or snag on it, but still be able to get
to it quickly:

rear door propper – 6/30/2017
Spent yesterday morning creating yet another hopefully-useful van accessory from scrap materials found around the house. It’s what we do best.
Sometimes it would be nice to get some air through the rear doors – the windows in those doors don’t open. We can’t just leave the doors open, because they’re what we lean against when we sit back there. So, a handy door prop to the rescue!
[Disclaimer: once again, one of our projects is at least partly inspired by something designed and sold by Hein, of Impact3D, on his ebay shop. His design looks far stronger and more durable than ours, not to mention more attractive. But lets face it: we really like making things ourselves. Everyone else should buy from Hein. ;-) ]
Our door prop is made from 3/16” aluminum. Steel would be better, and could probably then just be 1/8”. While the door does latch shut, engaging on the pin of the door prop, this is in no way a secure way to lock up your van – the interior door handle and lock post aren’t far within the door, and sneaky hands or coat hangers could probably reach them. Plus, with this design, you could probably just bend the prop in order to disengage the pin from the latch. (Using a U-bolt, as Hein does, instead of a pin, would defeat the bending attack.) But this is still useful for relatively safe parking places – the kinds of places you might lock your vehicle with the windows part way down. (Especially in the furthest-closed position, there’s not much of a gap left, and even bending the prop would be difficult.)


The design is available as a pdf. Some notes: The “pin” is a 1-1/4” 1/4-20 bolt. The threads are covered with two layers of shrink-wrap tubing, giving it a diameter of 5/16”. Without that covering the bolt threads would tear up the vinyl cover on the Ford latch mechanism. The extra 1 inch extension at the left end of the drawing is the “handle”, which is bent “into” the drawing page (and as shown in the photos). Our handle is wrapped with some lead foil, and then some rubber “rescue” tape. The lead is to make the rear end of the handle heavy enough to make the door prop lie flat by itself when in the shortest position. (And ignore the extra hole seen in the photos – it’s either a mistake, or, preferably, an expected result of iterative design.)
more storage, small stuff – 7/7/2017
Two storage-related projects this week! Storage is always important in a van.
First, the “small” storage. As we’ve said before, we have a hate/hate relationship with the top of the console in the Transit. The little molded pockets hold nothing at all usefully. (Well, the cupholder works, but there are already two of those at the ends of the dash.)
Happily, there’s a little extra space around the edges of the top, and
clear space underneath. We were able to take a 1-1/4” PVC tailpiece
extender and, along with an assist from a hole saw and
some hot-melt glue, create a nice place to store our pens and pencils:


 The picture shows the Home Depot part number(s) for the tailpiece
extender, which was really perfect for the job. (Well, perhaps dark gray
or black would have been better. Beggars can’t be choosers.)
The picture shows the Home Depot part number(s) for the tailpiece
extender, which was really perfect for the job. (Well, perhaps dark gray
or black would have been better. Beggars can’t be choosers.)
more storage, bigger stuff – 7/7/2017
When we finally (after a year and a half of ownership!) removed
the upper panel of cargo liner from a rear sidewall, we were
surprised at the size of the wall cubbies in there. They’re
only about 4” deep, but they’ll hold a thin blanket, or extra clothing,
or some dirty laundry, or spare kitchen staples: pasta, bags of rice,
etc. All space is good space.


So we got two rolls (one per side) of white ribbed “Plast-o-Mat” 10’ x 24” shelf liner (no shipping charges for ship-to-store at True Value or Ace hardware stores), and some really tenacious 3” polyethylene tape, also in white, and lined the cubbies.
The first step was to use a razor blade to trim off some of the excess goop that helps the sheet metal skin of the van hold its shape, giving the plastic liner a more uniform surface to cover.

Next we took a 12” section of plastic liner that we knew would be
extra (we only needed 6’ from a 10’ roll), and figured out how to do
the cuts to fit around the partitions between the cubbies. We wanted
as few cuts as possible. After a couple of false starts, we came up
with a scheme that puts all of the cuts either inside of or above the
hollow partitions. In addition, by not positioning the vertical cuts
right where the partition braces meet sheet metal, but rather, offset
by a half inch, we created small flaps that cover some of the
messiness of those areas.


The final liner is all one 6’ long piece. We decided to have the ribs
in the plastic liner face the wall, for two reasons: a) the ribs,
plus the gaps between, will provide a tiny bit of cushioning for the
wall, and b) the smooth inner surface will hold tape much more
readily than the ribs would. In these pictures, the upper set of short 1/2” cuts that
form the little flaps (and which do appear on the PDF) are missing.
oops. We had to add them later.


By rolling the long strip up, from top to bottom, we formed a thin roll that could be slid in from the back end along the bottom of the cubby space, and then unrolled in place. It sounds easier than it actually was.
After test-fitting it all with masking tape, we use the “real”
tape to put it all together. While doing the folds which line the
two ends of the space we ended up cutting out excess material with a
razor blade, which made that all somewhat neater.


Some 3/16” shock-cord and and stick-on wire/cable holders (plus
zip-ties) finished the job. Just bungies are sufficient to hold
things in place, because in our van the bed completely covers
the cubbies when it’s in the raised (driving) position.


There are still some slightly sharp edges around the openings of the cubbies. They’re not too bad, but could easily tear a plastic bag being pulled out of the cubby, for instance. Some rubber or plastic edging would probably help. A layer of tape would work too, but it’s hard to make that really neat, especially at the corners.
The detailed measurements for the liners are in a PDF diagram. Note that there’s a 3” allowance at each end for folding the plastic to line the ends. So, for instance, the first cut from the left edge will really only be 7” from the rear of the van, and not 10”, as measured on the plastic. To clarify: as measured in the van, the first cubby partition has supports which meet the wall at 7” and 12-3/8”, measured from the rear. The plastic will have a little plastic flap to cover the base of those supports, so the actual cuts will be +/- 1/2” from those measurements: 7-1/2” and 11-7/8”. Then, add 3” to allow for the foldover at the end, and you come up with the 10.5” and 14.875” which appear on the PDF.
By the way, to use that polyethylene tape you will either need a
helper or a tape dispenser, and preferably both. The stuff sticks to
itself really easily, quickly turning 12” of tape into a handful of
trash. We made our own dispenser:

rear mosquito netting – 7/19/2017
Up until now we haven’t been able to leave the rear doors open much, since they’ve had no bug barrier. We’ve now fixed that, with five yards of noseeum netting, a sewing machine, and a handful of magnets. The “joint” between the two panels is a simple 14 inch overlap – we’ll see whether that’s okay in practice. Having the new netting will hopefully mean we can also get some nighttime use out of our new door propper


new windows!!! – 7/20/2017
We’ve always intended to install more windows in the van, and have been waiting for some aftermarket window company to produce windows for the Transit that have an awning tilt-out. CR Laurence finally came through, and we decided to start by adding glass to the passenger side of the van. Because that’s where the slider is, that’s the side that’s usually facing the pretty stuff, or the more private side of a campsite.
We had someone else do the installation – we could have done it, but it would have been way more nerve-wracking than the ceiling fan, and the cost wasn’t that much more than the windows themselves.
We had to remove the passenger side cabinet for the installers to do their work, and the only hitch came when it came time to reinstall it – turns out the countertop had to be trimmed by 3/8” of an inch to clear the new window frames. Oh well.


shower hook – 8/11/2017
Okay, it’s not really just a hook, and an over-designed one at that. We wanted a way of hanging up our MSR Dromedary shower bag on the rear doors, and didn’t want whatever we came up with to scratch the paint. So we designed a hook to fit the many narrow vertical slots in the rear doors.


The hook happens to be symmetric. Ours is cut from some 3/16” sheet nylon that we already had, with some wood blocks to keep it stable, and, let’s face it, to make it look nicer. (After all, a bent coat hanger wrapped in duct tape would probably have served the purpose just as well!) It was easy to cut on the bandsaw, using this PDF as a pattern, held in place on the nylon with double-sided tape. When printed, the hook should be exactly 2”x4”. Ignore the extra little sharp tip at each end – just cut the notches out completely. The notches reduce the total height of the hook to exactly match the length of the slot in the door (15/16”).
canoe! – 9/25/2017
We’ve owned a beautiful Old Town Penobscot 16 Canoe for a long time. We love it. We’ve camped with it, we’ve paddled with our dog in the middle, we’ve used it on lakes, rivers, and bays. But now that our two vehicles are a Mini Cooper convertible and a Ford Transit van, we have no way of transporting it. The van could do it, in theory, of course. It has a hitch, but we have no trailer, nor do we want to travel with a 40’ (combined) rig. The van also has a roof, but it’s way up off the ground, and you can’t walk on the it without a rack, and even with a rack the canoe might well interfere with the roof vent.
So we didn’t get to canoe at all last year.

This year we splurged to solve our problem, and bought a folding canoe, by Onak.
Edit: Our Onak canoe now has its own blog.

It’s 15 feet long, but weighs only 40lbs (including the collapsible
paddles), and it folds up small. It even has wheels (when folded) so
you can drag it through an airport. We weren’t sure where we’d put it
in the van, but figured we’d find someplace to stow a 48”x16”x10” box.
Somewhat to our surprise, it ended up on the ceiling, where it only
barely affects Paul’s headroom.

By packing the paddles and gunwale rails separately, the part that’s on the ceiling only weighs about 26lbs. (Now that we have the strapping figured out, it’s time to order some new straps, in a uniform and more subtle color. ;-)
So it works really well as luggage, but as a canoe? The jury’s still
out on that one. It’s the most tippy canoe we’ve ever paddled. We
haven’t gone over yet, and we’re getting the hang of keeping it
stable, but our Old Town feels like a battleship in comparison.
We’re growing used to it, and getting better at staying smooth, but
adding an active dog may be the true test. As for assembly? Our
best time is about 20 minutes, way down from the 2 hours it took the
first time we tried! But mostly it takes us around 30 minutes – it’s
not something we do on a daily or even weekly basis, and there’s some
re-learning every time.

Insulation! – 10/10/2018
| This section added long after the fact, in May of 2023 | [index] |
We realized at some point that the van could really benefit from at least a little bit of insulation. We use almost all of the space in the walls for storage, so we can’t do much about that, but we figured insulating the ceiling, and what parts of the walls that were feasible, couldn’t possibly hurt.
So we ordered a roll of Thinsulate insulation from Hein (who I had met on the Ford Transit forum) at his ebay store (https://www.ebay.com/impactproducts)
 Because it’s held up with spray adhesive, we had to mask everything
pretty carefully before starting. Both surfaces (the van, and the
insulation) were sprayed, allowed to get tacky, and then the insulation
was positioned. Carefully. Because you only get once shot at it.
Because it’s held up with spray adhesive, we had to mask everything
pretty carefully before starting. Both surfaces (the van, and the
insulation) were sprayed, allowed to get tacky, and then the insulation
was positioned. Carefully. Because you only get once shot at it.


We got better at it as we went along, but overall it came out pretty well.

Because we had enough insulation left, we went around and pushed and
pulled it into smaller cavities. Given all of the unbroken thermal
path from the exterior walls and roof to the inside surfaces of those
beams, I really don’t think that insulating inside those spaces does
much.


And since we were on a roll, we made a removable insulating pad for
the “electronics bay” behind Casey’s dog crate, as well.

Leaks! We’re taking on water! – 04/2022
| Written about a year late, in May of '23 | [index] |
Sometime in the fall of 2021, I found that some of the things we had stored in the lowest cubbies in the walls of the van were wet. I think I’d noticed things being damp previously, but had always put it down to condensation. I think I’d never pulled anything out right after driving in major downpour before. In any case, when I finally discovered the problem, where was at least 1/4” of water in some areas of the bottom of the walls.
I did a lot of investigation, both inspecting all of the seals in the
doors, and walls, and roof, and also sprayed a lot of water at all of
the vulnerable areas.


Using the hose, along with some spray-on talc from the
pharmacy (probably athlete’s foot spray, or something like that), and I
figured out that the water was getting around a bunch of the plastic pins
that attach the lower plastic exterior molding trim to the walls.
Those pins have rubber washers around them, but over time I guess they lose
their waterproofing ability.


I researched various sealers (I didn’t think simple bathtub caulk was necessarily the best thing), and settled on Sikaflex 221. Good reputation, the manufacturer says it’s good for vehicles, and it was carried by Amazon.
 I had to wait until spring for the weather and the van to get reliably
warm enough, but then I did a few things: First, I daubed sealer on
the inside ends of as many of the little pins as I could reach.
I had to wait until spring for the weather and the van to get reliably
warm enough, but then I did a few things: First, I daubed sealer on
the inside ends of as many of the little pins as I could reach.
 Second, since I had enough sealer, I gooped up all of the potential
leak spots on the roof as well, since other owners have reported
problems there.
Second, since I had enough sealer, I gooped up all of the potential
leak spots on the roof as well, since other owners have reported
problems there.
Third, we decided that waterproofing was more important than
aesthetics, and I sealed the top edge of all of the plastic panels,
from the outside. This is to keep water from the walls from going
behind the panels in the first place, thereby keeping it from reaching
the leaky plastic pins.


Since I’m writing this in the spring of 2023, with a year of further use I can say that this was all a success – we’ve had no water in the walls since doing all the sealing.
More action shots, relaxing at “home” – 02/16/2023
It’s been a while since I added more “in use” shots. We’ve just been enjoying the van the last few years, not many “projects”, to speak of.


Battery and fridge – 10/23/2023
This summer we took a trip out west, to the Canadian Rockies in
Alberta. It was an excellent trip, good weather, great scenery, fun
activities, and we weren’t eaten by a bear. What more could
you ask?


Well, you could ask for lots of cold beer, chilled wine, and fresh vegetables in the van – and we had those too! All we’ve ever had before was a cooler, with ice, for keeping things below room (i.e. “van”) temperature, but this year we upped our game, by a lot.
The Fridge
Much of what swayed us to finally get a fridge was when we discovered the IceCo “GO20” fridge/freezer. It’s a slick product, and moreover, it fits in the only space in the van where we could put such a thing.


We got ours from Amazon. We probably didn’t pay what you see on their site now – we waited for a sale, and bought it very early last spring. It’s only about a foot deep, a foot high, and less than two feet long. We had to build a new table for it, an extension of the driver-side countertop, which fits over Casey’s bed. Didn’t take long. We were careful to be sure I could still put the seat in my usual driving position without interference. (Julia’s only 5‘1” – her usual driving position was definitely not an issue!)
The downside to being so diminutive is that the fridge only holds 20 liters of stuff. That’s just a bit bigger than the 19 liter cooler we were using before, but it’s a lot bigger when you factor in the size of a bag of ice, which took about a quarter of the cooler, previously
The fridge also has a nifty partition that you can insert, which turns it into a fridge/freezer. We haven’t used it that much that way, but it’s been nice the few times we have, mainly because we wanted an iced drink later in the day.
Power requirements
But the fridge needs power. Early experiments showed that it consumes (on average) something like 2 amps when just a fridge, and up to 5 amps when doing ice making. So if we ignore the ice for now, it’s about 50 Ah per day. There’s no way we could safely supply that from the van’s starter batteries, which until now were the only electrical source.
I put together a chart of all of our power requirements. As long as we were getting a new “house” battery, we wanted to move as much as possible off of the starter batteries, to reduce the background worry about not being able to start the van at the end of a campground stay.
(The other thing we got this year was a small portable TV, which is a big improvement from watching shows on a poor laptop screen. So that appears in the chart as well.)
| Load | Draw | Hours/day | Amp-hours per day |
|---|---|---|---|
| phones | ~0A | 8 | 1 |
| lights | .5A | 8 | 4 |
| fan | .5A@50% | 2 | 1 |
| TV | 2A | 2 | 4 |
| fridge | 2A | 24 | 50 |
That last column totals 60Ah. Since we drive the van almost every day, that gave me confidence that we could probably get away with 100Ah of battery capacity, as long as we managed our fridge use on days when we weren’t going to be driving much. Or, we could add solar. In practice, having now used the system for a couple of months, our average power consumption is quite a bit lower than that – more like 35Ah/day, more if it’s very hot out.
The Battery
I spent a lot of time shopping for and comparing batteries, and decided early on that we weren’t going to get what we needed from lead acid batteries. Too much space taken up for too little capacity. Plus they need to be vented while charging. So I turned to lithium, in the form of LiFePO4 batteries, which unlike lithium-ion batteries won’t combust or explode. Most such batteries are roughly the size and shape of a regular car battery, which was going to be awkward. We don’t have a lot of space left for new additions. But then I found a new “mini” 100Ah LiFePO4 battery. Don’t know how long these links will be good. We got ours from LI Time, and but an identical battery seems to be available from Redodo.
I even found tear-down reviews of both of the versions of the battery. (I was amazed to find that tear-down reviews are so common on Youtube. But they sure are helpful when shopping!)
The “mini” size was perfect! It fits in an awkward part of the space
our cooler used to live in, where a structural rib of the van’s cage
protrudes in. The battery leaves a nice square space for storage next
to it. If we decide we need more capacity, we can get a second one,
and install it right beside the first.


The Charger
The fastest and most reliable way of charging a van’s battery is from the alternator. And since our van came with an oversized 220A alternator (over twice the size of the “normal” alternator), this was clearly the way to go. I wanted a charger that could charge at up to 50A (in order to replenish our battery very quickly – a 50A charger could refill it in 2 hours), and that had the flexibility to charge from solar, as well, in case we want that. There are only a few models out there that meet those specs, and I went for a DC-to-DC charger from Kisae, their DCT-1250. This thing has the ability to automatically sense when the alternator is capable of charging at the specified rate (selectable between 20A and 50A in 5A increments), and has all of the safety features you’d want.
Shore power – to charge, or not?
You might think that once you’re in a campground, and plug into “shore” power, that you could just use the 120V to keep the battery charged while you continue running appliances from it. And you could, but that requires yet another kind of charger – one that runs from 120V. And none of these things are cheap – you’ve spent another couple of hundreds any time you attach a new electronic box to the wall of your van. But I realized that since we have the DC-to-DC charger, we’ll almost always arrive at a campsite (having driven many hours to get there) with a fully charged battery. And it will stay fully charged if we simply don’t use it. So instead of trying to charge the battery from shore power, we simply stop using it, and run the appliances from a simple shore-powered 12V 20A power supply. I paid just $23 for it.
Here’s a picture of the charger, and the power supply, during initial layout.

The system
It took a bunch of iterations, and probably isn’t optimal, but it does what we need, and in the end, went well. I won’t go into operational detail here. You can read the overview and see the schematic if you want.
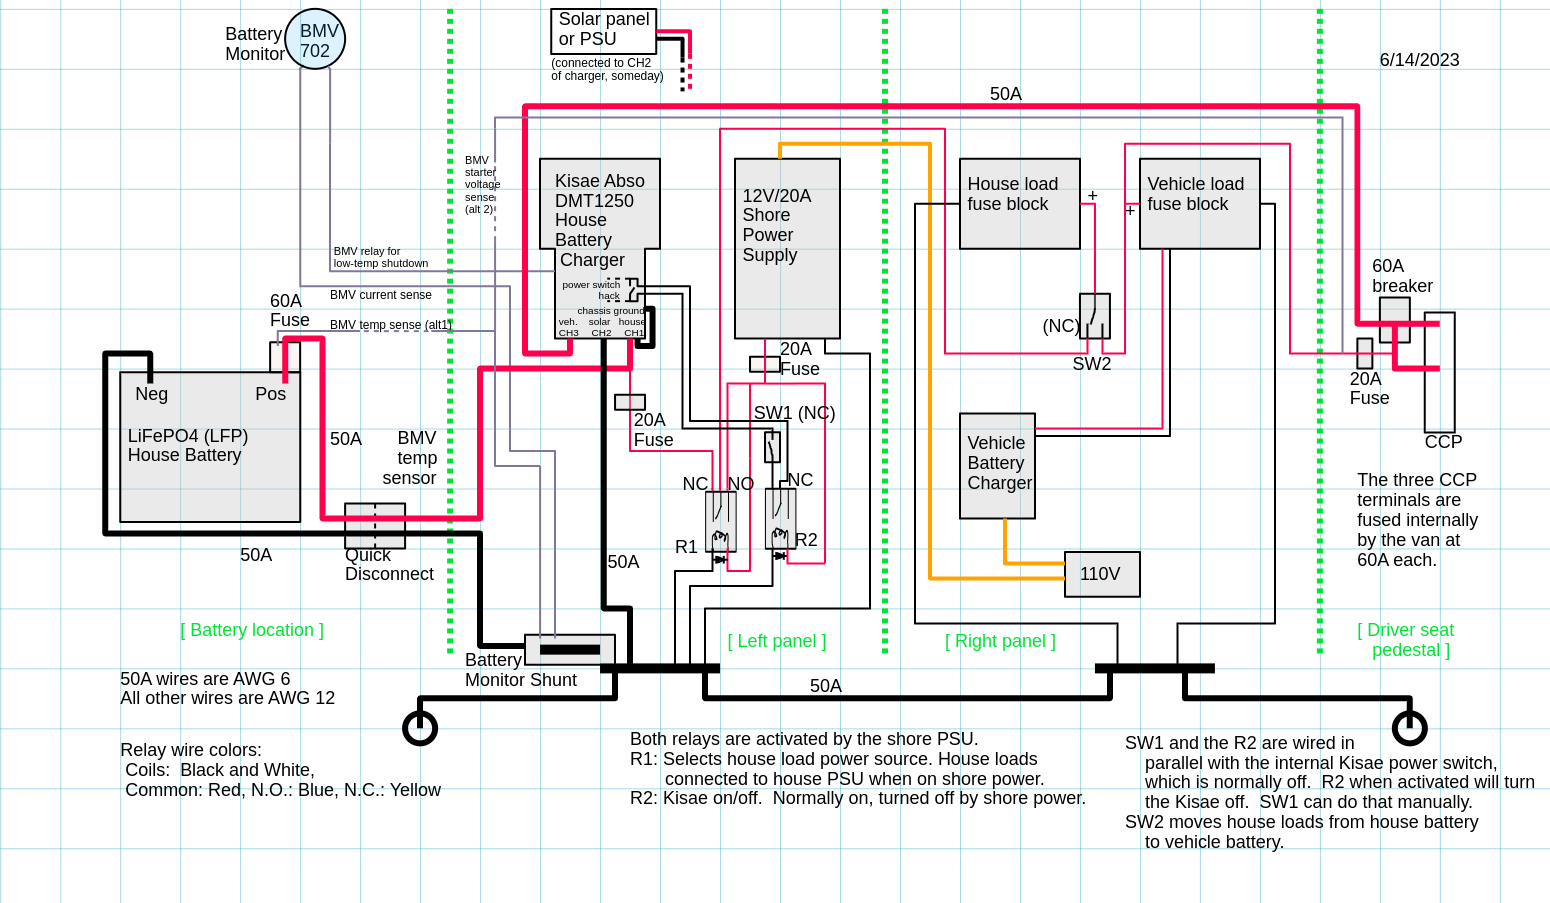
We already had an “electrical panel” in the first cubby behind the driver’s
seat. I added a second panel in the next cubby back, and between that and
the spare space on the first panel, it all fit. Oh – the battery monitor
interface, which used to monitor the starter batteries, now monitors the
house battery, so its big current shunt moved on to the electrical panels as well. It used to
be attached to the back of the driver’s seat pedestal.

Results
The battery, and the charger, have performed flawlessly, just as planned. On a simple overnight stop, where we arrive in the late afternoon and leave sometime the next morning, we typically use about 15% of our battery. Over the course of 24 hours, we use about a third of the battery. I know those numbers don’t really match – it probably has to do with how much we open the fridge across a day, vs. across an evening. Dunno. Usage is also quite temperature dependent – if the temps go down to 40 overnight, we only use 10%.
Having a fridge is fantastic. We can buy cold (or even frozen) things when we stop for provisions, we can keep leftovers if we make too much, we can trivially chill a bottle of wine after we buy it, and vegetables last for most of a week, like they should, instead of just a few days. And when we’re in the mood, we can make ice, and a nice G&T just hits the spot.
Gotchas
There are a few things that aren’t perfect, of course.
-
The big failing of the “mini” battery we got is that unlike many batteries one can buy, it has no internal low temperature cutoff, to keep the battery from charging when we’re below 32F. Happily, the Victron monitor has a mechanism where it can close a small accessible relay on a voltage threshold. And the Kisae has an input, normally used for a temperature sensor (that we don’t have) which, if shorted, will cause the Kisae to go into an error state (“E07” on the display, and stop charging. So by hooking up the Victron’s relay to the Kisaes temperature sensor input, the Kisae will stop charging when the temperature goes too low. Note that the Kisae doesn’t stop draining the battery in this state, far from it. If I recall correctly, it consumes something like 320 mA in that state. So it’s not a perfect solution.
-
An annoying failing of the Kisae DC-to-DC charger is that when it’s not in use (like, parked in the driveway), it uses about .07A (70mA) just for the task of waiting for someone to start the car.
a) The Victron battery monitor has a low-level threshold (“Current threshold”, in their settings) below which it won’t accumulate current usage. The default is 100mA. We had to reduce this (I chose 40mA) in order to get the Kisae idle leakage to show up.
b), that leakage adds up to 1.7Ah / day. Which doesn’t sound like much, but over the course of a month that’s half of our battery!
The answer to both of these problems is to simply shut off the Kisae when it’s going to be cold overnight, or when parking for a long time. Happily, the somewhat hidden and hard to reach switch that they provide is easy to add extra wires to, and those wires can run to a second switch. So we did that, and use it to shut the charger off when appropriate.
Smallest coffee table – 6/12/2025
We’ve long had a (minor) problem with the front seat, when rotated, in that there’s no place for the relaxing occupant to set their drink. Since the rest of the van works so well these days, it’s now the little things that get attention. :-)
I recently got a new CNC mill, so when Julia mentioned we should look into making some sort of table for that seat, for an upcoming trip, I went to work. There’s nothing about this project that requires CNC, but when all you have is a hammer…
So this is what I came up with. The upright is simply bolted to the back surface of the parking brake boot. (The two-part boot, btw, is just held with spring clips. Grab each part under its edges, and pull, hard.) There’s a small shim under the upper bolts that both make it vertical, and give it a small clockwise twist, just to make the table align with the van better.


The hole in the top is made to fit very tightly on the rectangular top of the post, which has shoulders to keep the top at the right height. When we’re not using it, the table will stow on the back of the driver’s seat. (The mickey-mouse ears on the hole are to give clearance for the square corners of the post. The CNC mill can only carve holes with rounded corners.)
Clearly this isn’t for use while driving – your drink would fall right off. It might not even be strong enough for one of those liter-sized coffees that some people like. But it works fine for our cups and wine glasses.
The End (for now)